
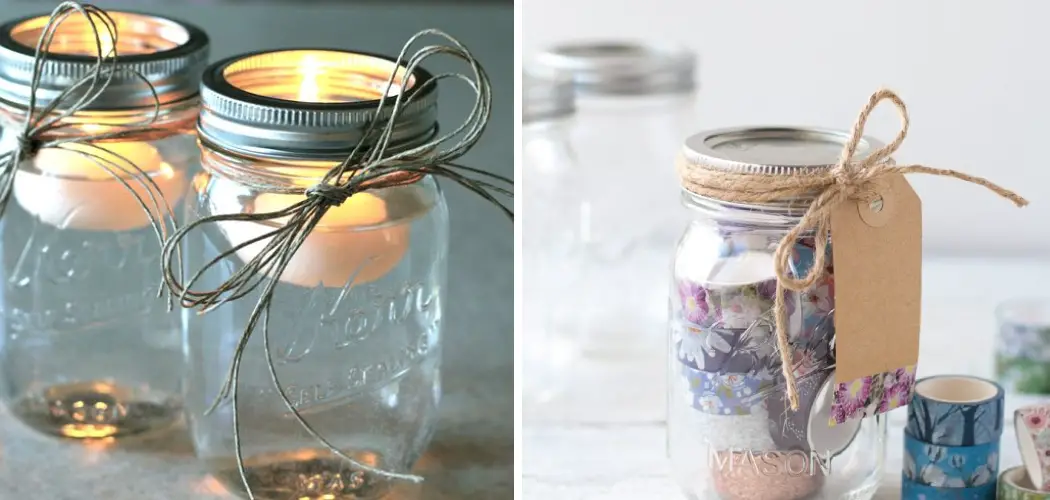
Mason jars are trendy and versatile, and tying a twine bow on one is an easy way to make it look unique. It can be used as attractive decor in your home or as a gift. You can easily create beautiful decorations once you learn to tie a twine bow on a mason jar.

One of the key advantages to learning to tie a twine bow on a Mason jar is that it adds an extra special touch when giving a gift. Twine bows are simple yet elegant, making any homemade crafts or gifts look professional. They also add texture and definition to the jars, which can be used for various décor ideas, such as centerpieces and candle holders. In this blog post, You will learn how to tie a twine bow on a mason jar.
Step-by-Step Processes for How to Tie a Twine Bow on a Mason Jar
Step 1: Inspect the Mason Jar
Ensure the Mason jar is clean and dry with no dirt or debris on the exterior. Use sharp scissors to cut a piece of twine long enough to wrap around the Mason jar and tie it into a bow. The length you’ll need depends on the size of your jar, but generally, you’ll need at least 18-20 inches of twine.
Step 2: Attach Twine to the Mason Jar
Wrap one end of the twine around the neck of your Mason jar, and tie it in a knot at the back. Make sure it is secure so it won’t come undone. Take the other end of the twine and create a loop by wrapping it around your index finger. The loop should be about 1-2 inches long and secured with a knot.
Step 3: Create More Loops
Loop the twine onto your index finger again, and then repeat this step until three or four loops make up the bow. Make sure the loops are even and secure with knots. Remove your finger from the loops, and take one side of the twine to create a tail on the left side of your bow. Secure this with a knot. Repeat this step on the right side, using the remaining length of twine to make another tail.
Step 4: Trim the Tail Tips
Use scissors to trim any excess twine from the tail tips so they are even and match each other. Adjust the bow’s loops to look even and neat, then use your fingers to ensure all knots are secure. Squeeze a tiny drop of glue on the knot at the back of your Mason jar to add extra security.

Step 5: Show Off Your Handiwork
Now that you’ve completed your twine bow, take a step back and admire your handiwork. You can use this decorative touch to dress up any Mason jar and make it look more stylish.
Following these simple steps, you can easily learn to tie a twine bow on a Mason jar. With some practice, soon enough, you’ll be tying perfect bows in no time at all.
Tips for How to Tie a Twine Bow on a Mason Jar
- Wear protective eyewear and gloves when tying the twine around the Mason jar. This will protect your eyes from any pieces of twine that may break off and prevent any potential cuts to your hands or fingers.
- Ensure you use a strong piece of twine so it does not break while wrapping it around the Mason jar.
- Make sure to measure the twine before wrapping it around the Mason jar so that the bow is of equal size on both sides.
- To ensure a more secure hold, use an adhesive (e.g., hot glue) when tying the bow in place after it has been wrapped around the Mason jar multiple times.
- Be sure to tie the twine securely, careful not to create loose ends that may unravel over time.
- When tying the bow, move slowly and delicately to avoid any accidental snags or tears in the twine.
- Use scissors to cut off any excess twine after the bow has been tied.
Following these simple safety tips and precautions, you can successfully tie a twine bow on a Mason jar without hassle.
Is There an Easy Way to Create a Symmetrical Bow?
The key to creating a symmetrical bow on a Mason jar is all in the technique. As long as you know how to tie a basic knot, you should be able to create a perfect bow with twine and your Mason jar. Cut two lengths of equal-length twine – about 12 inches each. Thread one piece through the neck of the jar and tie a simple knot at the top. Now, thread the other piece of twine through the neck of the jar in the opposite direction. When both pieces are in place, start tying knots until you reach your desired bow shape.

Once you’ve achieved your desired shape, secure it by tying an extra knot or two. This will help ensure that your bow won’t come undone when hanging on the side of the jar. Finally, trim any excess twine to create a neat finish. And there you have it – a perfectly symmetrical bow on a Mason jar.
How Often Should You Check the Tightness of the Twine to Make Sure It Stays Secure?
Tying a twine bow on a mason jar is an easy and stylish way to decorate a gift or home decor item. However, it’s important to ensure the twine stays securely tied so your bow remains in place. To keep your twine bows secure, you should check the tightness of the twine once or twice a week. To do this, gently pull on the twine bow to ensure it is still tightly tied around the mason jar. If necessary, you can adjust the tension of the twine as needed.
Additionally, when tying a twine bow onto a mason jar, tie two or three knots at the end so that it remains secure and doesn’t come undone. Doing this will ensure that your twine bow stays in place and looks great for many weeks. By regularly checking the tightness of the twine, you can ensure that it remains secure and your mason jar decorations look beautiful. With a few simple steps, you can easily tie a twine bow on your mason jar and keep it looking great for many weeks.
Are There Any Special Techniques for Tying a Neat and Tidy Bow on a Mason Jar?
Tying a neat twine bow on a Mason jar can be tricky. Getting just the right look takes time, patience, and practice. Here are some tips for achieving the perfect twine bow:

- Start by cutting your twine to an appropriate length – you’ll need enough to create a double loop around the neck of the jar, plus an extra inch for making the bow knots.
- Wrap the twine around the neck of the jar twice. Keep it tight and tidy, as this will help create a professional-looking finished product.
- Once you have your twine loops in place, use one finger to hold them together as you cross the ends over each other and pull the twine tightly.
- Leave one loop slightly longer than the other, as this will be used to form the knot at the center of your bow.
- Take the ends of each loop and tie a tight knot in the middle. This will create two loops that you will use to form your bow’s wings.
- Make sure the knots are tight and secure, and then spread the loops out to form wings.
- Pinch the wings together in the middle to create your bow’s knot. With a little practice, you can tie a neat twine bow on your Mason jar every time.
Following these tips and practicing patience, you can learn how to tie a neat twine bow on your Mason jar.
How Can You Store or Display the Finished Product?
Depending on how and where you use the Mason jar, several options exist for storing or displaying the finished product. If you plan to fill the Mason jar with a gift or food item, use care when handling it to avoid damaging the twine bow. If you’re giving the Mason jar as a gift, wrap it carefully with tissue paper or place it in a gift bag.

If you want to give your Mason jar away empty, consider displaying it on its own. Place a single large twine bow-adorned Mason jar on a shelf or mantelpiece for a rustic, country-style look. Or, you can group several in different sizes and make a decorative display out of them. You can also use multiple Mason jars with twine bows as the centerpiece at your next gathering or event. Place tea lights inside each jar to create an eye-catching display that adds charm and atmosphere to any room. No matter how you use your Mason jar with the twine bow, you will surely bring beauty and warmth to any space.
Conclusion
In conclusion, tying a twine bow on a Mason jar is an easy task, which can add a rustic charm to your gifts, decorations, or everyday items. With just a few simple steps and supplies, anyone can turn a plain Mason jar into something special with the addition of a beautiful twine bow.
So grab some twine and get creative as you add the perfect finishing touches to your Mason jars. You can use all sorts of colors and textures for your twine bows, and you’ll be sure to end up with something that looks great and makes a unique statement. I hope this article has been beneficial for learning how to tie a twine bow on a mason jar. Make Sure the preventive measures are followed chronologically.