
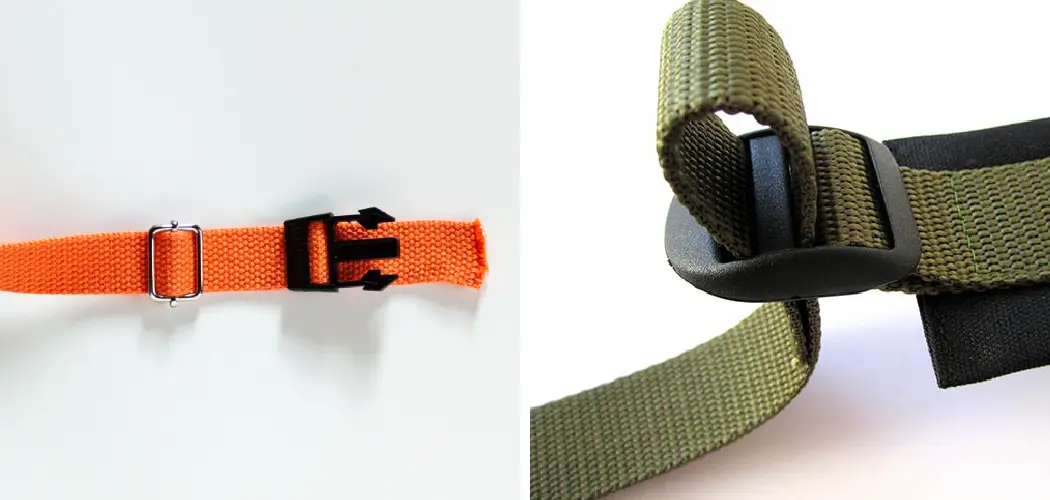
Are you struggling to adjust the length of your straps? With a strap adjuster, there is no need to worry. A strap adjuster is a device that helps you easily adjust the length of straps on items such as shoulder bags, backpacks, and more. Here’s how to thread a strap adjuster.

Whether you want to adjust a backpack, cinch together a belt, or just, need some extra length for your pants or skirt closure, having the ability to thread a strap adjuster is an invaluable skill. By properly learning how to thread and tie straps with an adjustable buckle, you’ll have the necessary tools to manipulate clothing and other items around your needs.
In this blog post, we will explain all of the steps required for successfully creating fashionably secure adjustable straps for any purpose. Read on to find out how!
What Will You Need?
In order to successfully thread a strap adjuster, you’ll need the following tools:
- Strap adjuster
- Scissors
- Thread
- Needle or sewing machine (optional)
Once you’ve gathered these items, complete your project with the following directions.
10 Easy Steps on How to Thread a Strap Adjuster
Step 1: Cut the Strap
Cut the strap to your desired length. You’ll need enough excess material to thread through both sides of the adjuster. If you’re using a sewing machine, make sure to leave enough excess material for the thread to get through.
Step 2: Thread Through the Strap Adjuster
Thread one end of the strap through each side of the adjustable buckle. Make sure that you use enough thread to be able to tie a secure knot at the end. As you thread through the buckle, be sure to keep an even amount of slack on each side.

Step 3: Begin Sewing
If you’re using a sewing machine, begin stitching the two ends of the strap together. If you’re hand-sewing, use a needle and thread to create a secure stitch that will hold up over time. You can use a regular stitch, or if you want to make sure the strap won’t come undone easily, opt for a backstitch.
Step 4: Finished Stitching
Once you have stitched or sewn your straps together, tie off the end with a double knot for added security. This will ensure that no matter what activities you are doing, your straps won’t come undone easily. Additional steps can be taken to reinforce your stitching further if desired.
Step 5: Test Out Your Secure Straps
Test out your newly secured adjustable straps by pulling on each side and ensuring enough resistance against them when pulled apart to be comfortable and secure. You should also check to make sure that nothing is unraveling or coming undone. If everything looks good, you’re all set!
Step 6. Keep Your Supplies Handy
Make sure to store all of your supplies in an easily accessible place so that you can quickly find them if you need to make any adjustments or repairs in the future. Another great idea is to keep some extra thread and needles on hand so you’re always prepared for unexpected repairs. If you’re using a sewing machine, keep it in good working condition.
Step 7. Try Different Types of Straps
There are many different types of adjustable straps to choose from. Experiment with different materials and widths to find the one best suited for your needs. Be careful to choose a strap that is thick enough, as it may not be able to hold up against wear and tear.
Step 8. Use Caution When Working With Straps
Make sure to use caution when working with these straps, as they can cause injury if done incorrectly. Be sure to follow all safety instructions before attempting any adjustments or repairs on the strap adjuster. Otherwise, you could end up with a painful injury.
Step 9. Regularly Check and Maintain Straps
Regularly inspect and maintain your straps, especially if you use them often or in a high-traffic area. Signs of wear and tear should be addressed immediately to ensure long-lasting results. If you find any signs of damage, replace the straps as soon as possible.

Step 10. Enjoy Your Secure Straps
Once you’ve successfully threaded your strap adjuster, enjoy the convenience and comfort of having adjustable straps! Now that you know how to thread a strap adjuster, you can use this skill for countless items in need of adjustment. Happy adjusting!
By following these steps, you can easily and confidently thread a strap adjuster. Have fun, and don’t hesitate to reach out with any further questions or concerns!
5 Additional Tips and Tricks
- If you’re having difficulty threading the strap adjuster, try using a pair of tweezers. This will help you grip the material more easily, so you can guide the adjuster through the strap.
- keep your threading even and consistent throughout the strap. If it’s uneven, it won’t hold securely when worn.
- When using a leather or thick material, use a pre-made hole as a starting point for your threading. This will help ensure that the adjuster fits snugly in place.
- Remember to tie off your knot at the end of each piece of threading for secure fastening!
- Finally, practice makes perfect! Threading straps is a challenging task–you’ll need to practice regularly in order to get comfortable with this skill and achieve a perfect finish.
With these tips and tricks, you’ll be threading strap adjusters like a pro in no time! Have fun!
6 Things You Should Avoid
- Don’t pull the thread too tight, as this may cause it to break.
- Avoid over-threading, which will make the process more difficult and could damage the adjuster.
- Don’t skip steps in the process – making sure each step is performed correctly will ensure a secure finish and prevent your strap from coming undone!
- Avoid rushing through the threading process—take your time to ensure accuracy and precision in each stitch!
- Don’t use a machine to thread straps; hand stitching is always preferable for best results!
- Don’t forget to check the finished product once you’re done threading your strap adjuster—make sure all pieces are secure and the adjuster is correctly positioned.

By following these tips and tricks, you’ll surely have success easily threading your strap adjusters! Have fun!
How Do You Tension a Strap?
When tensioning a strap, the goal is to achieve a secure, comfortable fit. To do this, you must start by threading the adjuster through the strap and then adjusting it accordingly. Start with a small amount of tension and gradually increase as needed depending on how tight or loose you would like the fit to be. Once the desired level of tension has been achieved, tie off any excess thread at each end for secure fastening!
Additionally, you can use the same technique to adjust the length of the strap. By threading more or less material through the adjuster, you can easily create a longer or shorter fit!
These simple steps will ensure your straps fit securely and comfortably every time! Happy stitching!
How Do You Fix a Twisted Adjustable Strap?
Twisted adjustable straps can be a nightmare to fix, but don’t worry! All you need is a bit of patience and some TLC. Start by identifying the twisted section in the strap and working your way back toward the adjuster using tweezers or pliers. Once you have located the twist, slowly untwist it until it is completely straightened out, one loop at a time.
Once that’s done, use the same technique to trace your way back up to the adjuster and rethread it through the strap material. Ensure to keep an even tension throughout so as not to create additional twists! Finally, tie off your thread for secure fastening, and you’re all set!
With these easy steps, your twisted straps will be as good as new in no time! Happy fixing!
How Do You Loosen Adjustable Straps?
If you find yourself with too tight and uncomfortable straps, there is an easy solution! Start by locating the adjuster and gently pulling on it to loosen the strap material. Once you have achieved the desired level of tension, tie off any excess thread for secure fastening.

Alternatively, if your straps contain a buckle or clasp, try loosening and adjusting that as well. To do this, simply press down on either side of the buckle until it’s loose enough to move freely. Then slide it along the strap material until you’ve reached your desired length and secure it with a knot.
By following these simple steps, your adjustable straps will be comfortable and secure in no time! Happy adjusting!
Conclusion
Threading a strap adjuster is a useful skill to know, especially if you’re often in need of quick fixes for your clothing or gear. It can reduce wear and tear of the fabric and allow for a more secure hold than traditional knots. This article provided some helpful information on how to successfully thread your own strap adjuster so that you can reap the benefits this small device has to offer!
As you’ve seen, threading a strap adjuster requires only basic resources and relatively little time, although take care when looping it around, as an incorrectly threaded strap adjuster can create unnecessary pressure and put undue strain on the fabric. However, with the right result of practice and patience, you’ll be able to proudly say, ‘I threaded my own strap adjuster!’
Hopefully, the article on how to thread a strap adjuster has been beneficial to you in some way. Thanks for reading, and happy threading!