
Ready to learn a great new skill? Whether you’ve done some sewing before or are learning the craft for the first time, you’ll be amazed at how easy it is to sew satin blanket binding by hand. From cozy throws and blankets for your home to quilts as unique gifts, there’s nothing like feeling the soft touch of handmade items against your skin.

Not only that but giving something special made with love will have an impact on those who receive them. Once you learn this simple technique, you’ll find yourself making all sorts of pretty creations! So, let’s get started — keep reading to find out more about how to sew satin blanket binding by hand!
What Will You Need?
First things first, what exactly will you need in order to sew a satin blanket binding by hand? Here are some basic materials that you’ll need to gather before getting started:
- Satin binding tape (comes in a variety of widths and colors)
- Blanket or quilt
- Sewing thread (choose a color that matches the binding)
- Hand sewing needle
- Scissors
- Pins (optional)
Now, let’s go through sewing satin blanket binding by hand, step by step. Don’t worry; it’s more manageable than it may seem!
10 Easy Steps on How to Sew Satin Blanket Binding by Hand
Step 1. Prepare the Binding:
Start by measuring the perimeter of your blanket. Then, add an additional 10 inches to this measurement. This will be the length of your satin binding. Cut the satin binding tape according to this measurement. The extra length accounts for corners and a small overlap at the end.

Step 2. Attach the Binding:
Begin at one corner of the blanket. Unfold the satin binding tape and align its raw edge with the raw edge of the blanket. You can use pins to hold the binding in place if you wish. Also, remember to leave a few inches of extra binding hanging off the start of the blanket. This will be useful when you come to finish off the binding.
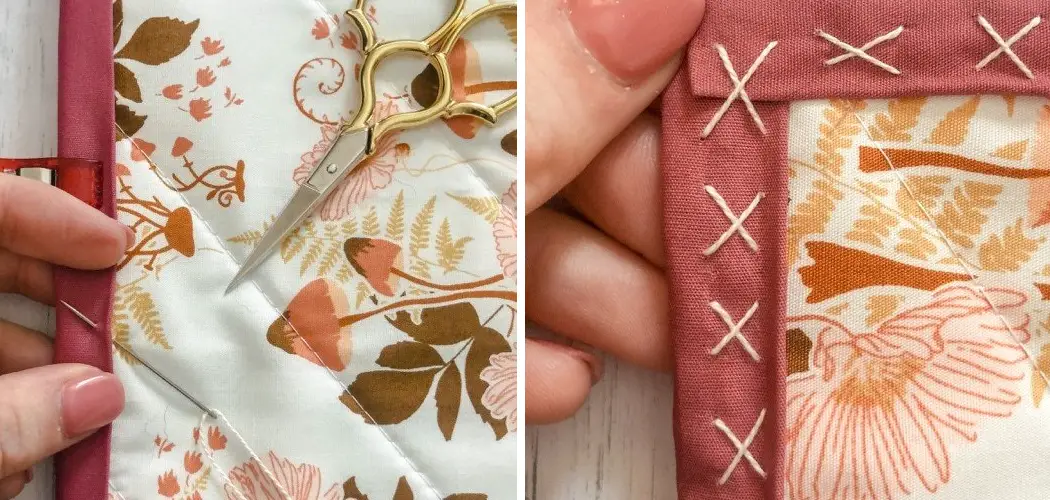
Step 3. Start Sewing:
Thread your needle with the chosen thread and knot the end. Start sewing the binding onto the blanket using a whip stitch or a slip stitch. You should be stitching along the crease closest to the raw edge of the blanket. Try to make your stitches small and even for the best result. Continue sewing along the edge of the blanket until you approach the first corner.
Step 4. Sewing the Corner:
When you reach the first corner of the blanket, fold the binding to form a mitered corner. To do this, stop sewing when you’re about 1/2 inch from the corner of the blanket. Then, fold the binding upward, forming a 45-degree angle.
Fold the acute back down in line with the next side of the blanket, maintaining the 45-degree fold. Pin this fold in place if necessary. Resume sewing from the top edge of the new site, ensuring that the mitered fold stays in place. Repeat this process for all four corners.
Step 5. Finishing the Binding:
As you approach the starting point of the binding, stop sewing a few inches from the end. Overlap the starting end of the binding with the finishing end and cut off any excess binding, leaving about an inch for overlap. Fold the raw edge of the finishing end to the inside and pin it in place.
Resume sewing, ensuring that you sew the overlapped ends securely. Congratulations! You have now completed your satin blanket binding by hand.

Step 6. Finishing Touches:
Finally, review your work and ensure that all stitches are secure and no loose threads are visible. Inspect the corners to ensure the mitered folds are neat and flat. If you wish, press the binding with an iron on a low setting to ensure a crisp, smooth finish.
Test a small patch with the iron first to ensure the heat doesn’t damage the satin. Now, sit back and admire your handiwork. You’ve just learned how to sew satin blanket binding by hand!
Step 7. Care and Maintenance:
Now that you’ve completed your masterpiece, it’s essential to know how to care for your satin-bound blanket properly. Most satin is delicate and requires careful handling. For the best result, it’s advisable to hand-wash your satin-bound blanket in cool or lukewarm water with a mild detergent.
Gently wring out excess water and avoid using a tumble dryer. Simply hang the blanket to dry naturally. This will preserve the vibrance and sheen of your satin binding and ensure your blanket maintains its beauty and softness for a long time!
Step 8. Practice Makes Perfect:
Remember, practice is vital when it comes to sewing. The more you do it, the better you become. Don’t be disheartened if your first few attempts at sewing satin blanket binding by hand aren’t perfect. Even seasoned sewers had to start somewhere. Keep trying, and with each blanket, you’ll see improvement. Soon, you’ll be sewing satin blanket binding with ease and confidence. Happy sewing!
Step 9. Explore and Experiment:
Once you’ve mastered the basics, don’t be afraid to explore and experiment. Try using satin binding in different colors or widths. You can even experiment with different types of stitches or patterns.

Consider adding some decorative elements, such as embroidery or beadwork, along the binding for a more personalized touch. Sewing is a creative craft, and the possibilities are truly endless. Continue to challenge yourself, expand your skills, and enjoy the process!
Step 10. Sharing Your Craft:
Now that you have learned and practiced the art of sewing satin blanket binding by hand consider sharing your newfound talent. You can make blankets as gifts for friends and family, contributing a personal touch to their homes.
Alternatively, you could start a local workshop teaching others your craft or share your work through social media or craft fairs. By sharing your skills, you bring joy to others and contribute to the vibrant and diverse world of handcrafts.Following these steps and using your creativity, you can elevate a simple blanket into a beautiful and luxurious piece.
5 Additional Tips and Tricks
Tip 1. Use Quality Materials:
Select high-quality satin binding and thread that match or complement your blanket. The quality of your materials will affect your final result and the longevity of your blanket.
Tip 2. Keep Your Tools Handy:
Ensure your sewing kit is well-stocked with all the necessary tools. A good sewing kit should include needles of different sizes, thread, scissors, measuring tape, and pins. Having everything within arm’s reach will make the process smoother.
Tip 3. Check for Loose Threads:
After each step, take a moment to check for any loose threads or mistakes. It’s easier to fix errors as you go rather than waiting until the end and having to undo several steps.
Tip 4. Have Fun!
Sewing should be an enjoyable and fulfilling activity. Stay caught up in perfection; allow yourself room for creativity and experimentation. Enjoy the process, and you’ll be amazed at the beautiful results you can create.
Tip 5. Know When to Take a Break:
Sewing for long periods can strain your hands and eyes, so take regular breaks. This gives your body a rest and helps maintain the quality of your work.
With these additional tips and tricks, you’ll be well on your way to mastering sewing satin blanket binding by hand.

5 Things You Should Avoid
1. Avoid Rushing:
The key to a beautiful satin binding is patience. Rushing through the process can lead to mistakes, uneven stitches, and a less-than-perfect finish. Embrace the process and remember that good things take time.
2. Don’t Skimp on Materials:
While saving money by opting for cheaper materials can be tempting, this can negatively affect the final product’s quality. Investing in good quality satin binding and thread can make all the difference in your blanket’s look and durability.
3. Avoid Sewing Through Multiple Layers at Once:
Sewing through multiple layers of fabric can be difficult and result in bunching or puckering. Always ensure your stitches are only going through the necessary layers of material.
4. Don’t Ignore Mistakes:
No one is perfect, and mistakes are part of the learning process. However, ignoring mistakes and continuing to sew can exacerbate the problem. If you notice a mistake, address it immediately to ensure a neat finish.
5. Avoid Neglecting Care Instructions:
Satin is a delicate fabric and needs proper care to maintain its sheen and softness. Pay attention to the care instructions to avoid the fabric becoming dull, damaged, or worn out prematurely.
By avoiding these common mistakes, you can ensure your satin-bound blanket is of the highest quality and will last for years to come.
Conclusion
To conclude, how to sew satin blanket binding by hand is a daunting task. However, with the right materials and these steps as guidance, achieving professional-looking results is easy. Learning how to make this exceptional edge is not only a beautiful touch to your projects but also gives you an incredible sense of satisfaction.
The first time you sew a satin blanket binding will be thrilling – especially when you show off your finished creation. As you become more experienced, satin binding will become second nature. You’ll be able to use it on all types of blankets, clothes, and crafts.
So go ahead and get stitching; you’ll be proud of what you’ve made! And don’t forget to share your work with friends and family – they’ll appreciate the effort that went into the project!