
Do you have a creative streak but are not sure how to put it into action? Sewing is one of the most versatile and rewarding forms of craft, allowing you to make practical (and sometimes even fun) objects with your own two hands. If you’ve ever wondered how to sew a ball, we’ve got just the guide for you!
In this article, we’ll go through all the steps from selecting fabric and threading your needle, to power-stitching and adding extra flair — so by the end, not only will you be able to wow your friends with an amazing handcrafted project, but also bring out that inner seamstress who’s waiting in all of us. Ready set go!

Tools and Materials You Will Need to Sew a Ball
Before you get started, it’s important to make sure that you have the right materials for the job. Here’s a list of everything that should be on your crafting table:
- Fabric (it can be whatever type and color you like)
- Thread
- Needle
- Measuring tape
- Scissors
- Pins
- Sewing machine (optional)
Step-by-Step Guidelines on How to Sew a Ball
Step 1: Select Your Fabric and Cut Out the Pieces
First, choose a fabric that you like for your ball. You can either use one solid color or get creative and mix different textures and colors to make it more dynamic. When deciding on the size of the pieces, keep in mind that you’ll need two identical circles with diameters of your desired ball size.
Once you’ve selected your fabric, measure and cut out two circles using the scissors. Make sure that they are as even as possible.
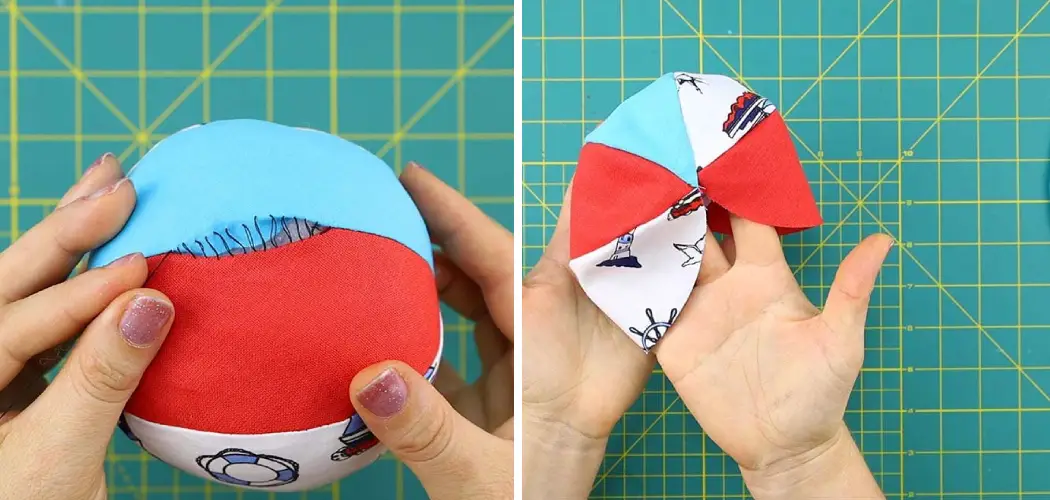
Step 2: Sew Together the Two Pieces of Fabric to Create One Ball-Shaped Piece
Now it’s time to get stitching! Place the two pieces of fabric right sides together and pin them in place.
Next, choose the type of stitch that you want to use for your project. For a sturdy ball, try using a zig-zag stitch on the sewing machine or if you’re working manually with a needle and thread, a simple running stitch should do the trick. Make sure that you leave enough space between stitches so that there is room for stuffing later on.

Once you’re done stitching, carefully cut off any excess thread or fabric and turn the ball-shaped piece right side out.
Step 3: Stuff Your Ball with Filling of Your Choice
Now it’s time to fill your ball with whatever type of filling you choose. You can go for something traditional such as polyester stuffing, or you can get creative and use some other type of material like fabric scraps or old t-shirts to give it a more unique look.
Once you’ve finished filling your ball, carefully sew up the opening with small stitches and tie off any loose ends.
Step 4: Final Touches
Your hand-sewn ball is now ready for its final touches! You can either leave it as is or add some decorative elements such as buttons, ribbons, or anything else you think could make your project look even more amazing.
Following these easy steps, you’ll be able to create a beautiful hand-crafted ball in no time! Whether it’s for yourself or as a present for someone else, there’s nothing quite like the feeling of pride that comes from creating something with your own two hands. So get crafting and have fun!
Additional Tips and Tricks to Sew a Ball

- Make sure to use sharp scissors or fabric shears so that you get nice clean edges on your pieces of fabric.
- If you are using a sewing machine, remember to set the tension correctly before starting to stitch. This will ensure that the stitches look even and neat.
- Use a thimble to make it easier and more comfortable when hand-sewing with needles.
- If you’re planning on making multiple balls, try using different colors and patterns so that each one looks unique.
- To give the balls an extra special touch, add some sparkle or glitter by sprinkling it on top of the filling before closing up the ball.
- If you’re making a toy ball, make sure to use stuffing that is safe for kids and doesn’t have any small parts that could be a choking hazard.
- Don’t forget to have fun! Sewing can sometimes be intimidating at first, but with enough practice, you’ll soon be able to create amazing projects with ease.
Following these tips and tricks, you’ll be well on your way to becoming a master seamstress! So go ahead and enjoy the creative process of hand-sewing — it’s sure to be rewarding in more ways than one.
Things You Should Consider to Sew a Ball
1. First, you need to choose a fabric that is suitable for the ball shape and size that you want to sew. Take into account the kind of fabric and its thickness so that your final product looks professional and well-crafted.
2. Then, cut out two pieces of the same pattern in the fabric with enough material for a good seam allowance. You can use a template to help you get an accurate shape, or you may draw the pattern freehand directly on the fabric.
3. Next, pin the two pieces of fabric together and sew around the edge using a straight stitch. Make sure that both sides are securely pinned in place before starting to sew.
4. Once you have gone all the way around your fabric, you can turn the ball right side out. Fill the inside of the ball with stuffing or beans to give it some weight and shape.
5. Finally, sew up the opening that you left when turning your fabric right-side-out using a ladder stitch so that your finished product is secure and won’t come apart.

Sewing a ball is a great way to get creative and make something fun for yourself or as a gift for someone else. With the help of this step-by-step guide, you will be able to sew a personalized ball that looks just like you want it to!
Precautions Need to Follow for Sewing a Ball
- Make sure you have all the necessary supplies. You’ll need fabric, thread, stuffing material (such as cotton balls, polyester batting, or foam), a needle, scissors, and pins.
- Test the fabric before you start to sew. This will ensure that there won’t be any surprises after you’ve finished stitching.
- Use sharp needles for sewing; dull needles can cause skipped stitches and other problems. Also, use the right size needle for the fabric type.
- If you’re using an intricate pattern on your ball, use a tracing wheel and carbon paper so that you can replicate it exactly.
- Make sure to cut your pieces accurately. It’s important to measure and mark out all pieces before cutting.
- When sewing, keep the sides of the fabric even, otherwise your stitching won’t look neat.
- Double-check to make sure that all of your pieces are sewn together correctly. You don’t want to have to rip out and replace any stitches!
- When stuffing the ball, use small amounts of stuffing at a time, so that it is even and full. Don’t overstuff or understuff; this will affect how your finished product looks and feels.
Following these precautions will help you create a perfect ball that looks great and stands the test of time. Now, let’s get started!
Frequently Asked Questions
What Kind of Needle Do I Need for Sewing a Ball?
A suitable needle for sewing a ball is one with a rounded tip. This will help reduce the chances of damaging the fabric while you’re stitching. However, if you are using thicker or heavier materials, it’s best to use an extra-large needle. Also, make sure to use high-quality thread since it will provide better stitch quality and help keep the stitching from unraveling.

How Many Stitches Should I Make?
The number of stitches you need to sew your ball depends on the size and type of fabric you’re using. Generally speaking, a small ball requires about 20-25 even stitches, while a larger ball may require up to 50-60 even stitches. Adjust the number of stitches to suit your specific needs.
What’s the Best Way to Sew My Ball?
The best way to sew a ball is by following a few key steps: first, cut two pieces of fabric to the desired size; second, place the pieces of fabric together, wrong-side facing out; third, use pins to hold seams together; fourth, thread the needle and begin stitching.
Make sure that you make even stitches all around. Finally, when your stitches are complete, fill the ball with stuffing and tie off the end of your thread. And you’re done!
How Can I Add Embellishments to My Ball?
Adding embellishments is a great way to make your finished ball look even more unique and fun. You can do this by using appliqué, ribbons, sequins, or any other decorative materials. Simply stitch the ornamentations into the fabric before stuffing the ball for an extra special touch.
Conclusion
All in all, knowing how to sew a ball can be a great way to get creative and make something unique. With the help of this guide, you should now have all the information and tools you need to start sewing your own ball! So go ahead, grab some fabric, thread, and stuffing – and let the fun begin! Happy crafting!