
Have you ever wanted to make something from clay, but don’t have the time or patience for a full pottery class? Air-dry clay is an easy and accessible way to get creative with your hands. It is important to know how to seal air dry clay. It doesn’t require any kilning, ovens, or special tools – only scissors, water, and your own hands.

With its ease of use comes some knowledge about what it can do; in this blog post, we’ll discuss how to seal air-dry clay so that it will last longer! We’ll cover the importance of sealing, choosing the right sealant, and how best to apply it. So read on if you’re interested in exploring air clay as a creative outlet!
Tools You Will Need:
Air Dry Clay
The main ingredient for this project is, of course, air-dry clay. You can purchase it in most craft stores or online. It comes in different colors and types – some are self-hardening, while others need to be exposed to the air to dry.
Permanent Sealant
Choosing the right sealant is crucial for the longevity of your air dry clay creation. A permanent sealant, such as polyurethane or clear acrylic spray, will protect your piece from water damage and help prevent it from cracking or breaking.
Paintbrush
A small paintbrush is useful for applying the sealant onto your clay. Make sure to clean and dry the brush before using it so that there are no unwanted substances on the surface of your clay.
Why is Sealing Clay Important?
Sealing clay is an essential part of the clay and glazing process. Sealing clay helps to prevent it from becoming too brittle, which can cause your creation to break when fired in the kiln. It also helps draw in the colorants and other added materials into the surface layers of the clay. It prevents them from running together or evaporating away during firing, thus helping to lock in brighter, more vibrant colors and textures.

Sealing is an essential step if you’re looking to get beautiful batik effects; not sealing your piece before adding dye will result in colors that appear dull and muddled. Lastly, sealing provides you with a better substrate for the application of various glazings; using unsealed clay could lead to uneven surfaces.
9 Steps Guide on How to Seal Air Dry Clay:
1. Prepare Your Workspace
This will protect the surface from any spills or splatters and make for easier cleanup.
To prepare your workspace, covering it with plastic wrap or a vinyl tablecloth is the best way to go. Not only will this help to protect your surface from any unexpected spills or splatters during crafting or other activities, but cleanup afterward is also an effortless task.
The plastic wrap serves as a barrier between the clay and the surface, which means you won’t have to worry about unsealed air clay taking residence on your desk or countertop. It’s a simple step that will make all your crafting projects much less stressful and time-consuming!
2. Make Sure Your Clay is Completely Dry
This could take anywhere from several days to a few weeks depending on the thickness of your work. If you’re feeling impatient, you can bake the clay in a low oven for 15 minutes or so to speed things up.
Clay projects can be incredibly enjoyable, but it’s important to pay attention to the drying process before you begin. If the clay is not completely dry when you start crafting, it could ruin your work. The time it takes varies – thick pieces generally need more time than thin pieces.
But if you’re in a hurry and don’t have several days or weeks to wait, you can use your oven to speed things up! Bake any type of clay project on low heat for 15 minutes or so – keep in mind that different clays have different heat recommendations on their packaging. A little extra patience or heating will ensure your project is finished just how you want it!
3. Choose Your Sealant
Some popular options include Mod Podge, acrylic spray sealer, or varnish. You’ll need to make sure the sealant is safe for use on air-dry clay.
When it comes to sealants, choosing the right one is essential when working with air-dry clay. Popular options available are Mod Podge, acrylic spray sealer, and varnish. All of these choices protect the clay from wear and tear but also carry different types of finishes.

Mod Podge has a matte finish and is water-resistant while acrylic spray sealer provides a glossy finish. Varnish is known for having a glossy shine that resembles oil paint. Make sure to read the labels carefully before selecting to make sure the product you choose is safe for use on air-dry clay.
4. Apply the Sealant
Applying the sealant to your clay project can be an integral step in protecting it and giving it a beautiful finish. It’s best to do this using either a paintbrush or sponge, taking care to cover all parts of the surface evenly.
This includes underneath and any hard-to-reach crevices, which should not be neglected as they could cause weakening or cracking of your piece over time. If necessary, you can also use a toothpick or similar tool to apply a sealant to these areas with accuracy and efficiency. Don’t forget – seal it up for a safe, long-lasting masterpiece!
5. Allow the Sealant to Dry
After carefully shaping your clay into the desired item, the next step is to seal it. To do this with Air Dry Clay, use a sealant like Mod Podge. The process may seem daunting, but it is quite simple. First, brush the sealant on one side evenly using long strokes.
Give it ample time to dry after you have covered the entire surface area before flipping it over and repeating for thorough protection from wear and tear; about half an hour should be more than sufficient for complete dryness! Following these steps every time you use air-dry clay will ensure that your projects stand the test of time!
6. Cover Any Exposed Areas
How many coats you need will depend on how thick your piece is and what look you’re going for.
Applying sealer to your project is a great way to ensure that it will last for years. After the initial sealant has dried, you may need to add additional coats depending on the thickness of your piece and the look you are aiming for.
The more coats you apply, the even finish and sheen your final project will have. To get that perfect, professional finish, make sure each coat dries completely before applying a new layer. Applying enough coats of sealer will give your handmade piece longevity and protection from everyday wear and tear.
7. Let Each Coat Dry
Applying multiple coats of sealant to Seal Air Dry Clay and waiting for them to dry can be a long process. After each coat is applied, it must completely dry before another one can be added. The drying time required depends on how much sealant you applied – it could take anywhere from several hours to a few days.
A hairdryer can be used on the low setting to speed up the drying process if needed. That being said, make sure not to overheat the clay and keep an eye on it as you progress. Allowing all coats of sealant to properly and thoroughly dry will ensure you have a nice, even polish on your project in the end.
8. Add Glazes or Colorants
Once the sealant has dried, your artwork is truly complete and ready to go! To finish off your design with some extra flair, you can also add glazes or colorants. Seal Air Dry Clay is ideal for this step as its non-cracking formula makes it easy to apply different mediums of paint or clay finishes to the surface. Be creative and express yourself – the possibilities are endless with Seal Air Dry Clay.
You can use various glazes or colorants on your clay project to give it a unique and personalized touch. This is the perfect opportunity to add some additional details, patterns, or colors to make your work stand out. Choose from acrylic paint, enamel paint, or even nail polish for a fun and vibrant look. Just make sure to let each layer dry before adding another one to avoid smudging or blending the colors.
9. Store Your Finished Piece
After all the hard work and effort put into your project, it’s important to store it properly to ensure its longevity. Keep it in a cool, dry place away from direct sunlight or extreme temperatures.
If you’re not planning on displaying your piece right away, wrap it in acid-free tissue paper or bubble wrap to protect it from dust and damage. For extra protection, consider storing it in a box or container with a lid to keep out any potential air contaminants. This will also prevent any accidental bumps or nicks that could ruin your masterpiece.
Sealing air-dry clay may seem like a daunting task, but with the help of this guide on how to seal air and some patience, you’ll be able to create beautiful pieces that will last for years to come. Now, get out there and show off your creations! Happy crafting!
Tips for Sealing Air Dry Clay
1. Start with a clean surface. Make sure your work area is clean and free of any debris. This will help to ensure that your clay is smooth and free of any imperfections.
2. Knead the clay until it is soft. This will make it easier to work with and prevent any cracks from forming.
3. Roll the clay out into a thin sheet. The thinner the sheet, the less likely it is to crack when drying.
4. Use a rolling pin to smooth out any bumps or imperfections.
5. Cut the clay into the desired shape or use a mold.
6. Place the clay piece on a non-stick surface such as wax paper or a silicone mat.
7. Allow the piece to air dry for 24-48 hours, depending on the thickness of the piece. Thicker pieces may take longer to dry completely.
8. Once dry, sand any rough edges or imperfections with fine-grit sandpaper.
9. Paint or decorate the piece as desired.
- Seal the piece with a clear sealant to protect it from damage and preserve its finish.
How Many Coats of Sealer Do You Need for Air Dry Clay?
Working with air-dry clay can be quite rewarding and fun once you master the basics. One important detail to keep in mind is how many coats of sealer to apply when working with air-dried clay. Depending on the type of clay and the desired effect, one or two coats should be sufficient. If you want a glossy finish, adding an extra coat can help with that.
Be aware that some sealers are only suitable for interior use, while others may be able to withstand some outdoor conditions. It is also important to let each layer of sealer dry completely before adding another coat. Otherwise, it will not adhere properly, so take your time if you’re looking for professional results.
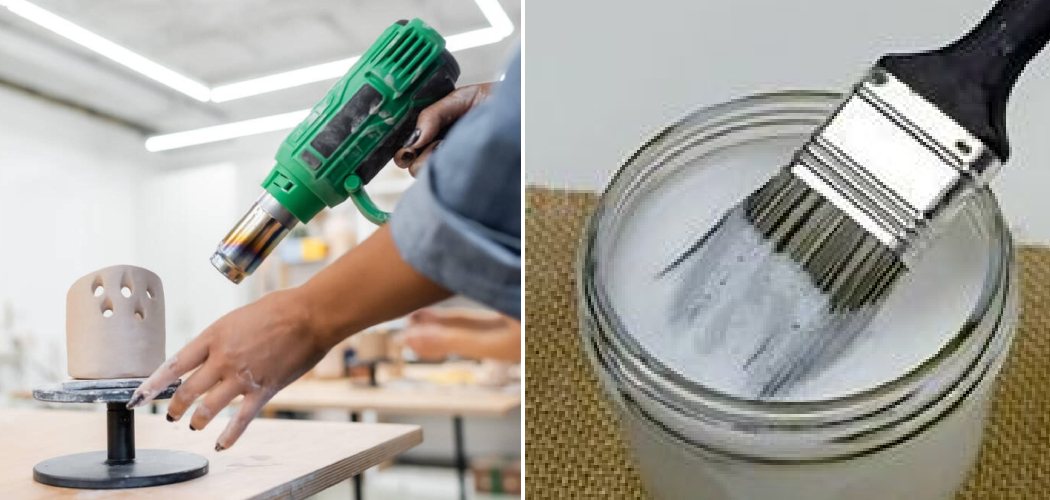
Speed Up the Drying Process – Learn How to Properly Use a Hairdryer When Sealing Air Dry Clay
When using a hairdryer to speed up the drying process of air dry clay, controlling the temperature is key. Set the hairdryer on a low heat setting and keep it at least six inches away from the clay. A higher heat setting will cause the clay to crack or warp; the cooler air helps to slowly dry the project evenly and prevents it from shrinking too much. Hot air can also add unwanted texture details or causes sections to stick together.
So be sure not to spend too long with just one area of your project. Use a gentle back-and-forth motion and move away as soon as you see steam coming off of your project. With quick but controlled movements, you’ll have a successful sealing project in no time!
You Can Check It Out To Crochet Cat Toys
Frequently Asked Questions:
Q: Can I Use Water-based Sealers on Air Dry Clay?
A: Yes, water-based sealers are generally safe to use on air dry clay. However, it is important to test the sealer on a small area first to ensure compatibility and avoid any unwanted reactions with the clay.
Q: How Do I Know When My Air Dry Clay is Completely Dry?
A: The time it takes for air dry clay to completely dry can vary based on the thickness and humidity level in your workspace. A general rule of thumb is to wait 24-48 hours before handling or adding another layer of sealant, but always check the package instructions for specific drying times. You can also touch or lightly tap the clay to feel for any soft spots – if it feels firm and solid, it is likely dry.
Q: Can I Paint on Air Dry Clay Before Sealing?
A: Yes, you can paint on air dry clay before sealing. In fact, painting before sealing can help to prevent any potential cracking or warping of the clay. Just make sure your paint is completely dry before adding a layer of sealant on top.
Q: Can I Use Other Types of Sealants on Air Dry Clay?
A: Yes, there are various types of sealants that can be used on air clay, such as varnish, polyurethane, and epoxy resin. However, it is important to always test a small area first to ensure compatibility and avoid any unwanted reactions. Follow the manufacturer’s instructions for the best results. It is also important to consider the purpose and location of your project when choosing a sealant – some may be more suitable for indoor use while others are more durable for outdoor conditions.
Q: How Do I Remove Sealant from My Hands or Tools?
A: If you accidentally get sealant on your hands or tools, it can be difficult to remove. However, rubbing alcohol or nail polish remover can help to dissolve the sealant. Be sure to wash your hands and tools thoroughly afterwards.
Conclusion
Applying a sealer to air-dry clay is an optional step that can give your clay project a finished look, make it more durable, and protect it from the elements. You should carefully determine how to seal air dry clay.
Depending on the type of finish you want for your project, there are several different types of sealers you can use on air-dry clay. You can also tint some sealers to add color to your projects. Experiment with different techniques and materials to find the perfect combination for your next craft project!
You Can Check It Out to Make Doorstop