
Are you an avid crafter or DIY enthusiast looking for tips on how to safely and securely remove safety eyes from your projects? Then look no further! Today, we’ll be talking about the best methods for removing safety eyes in a timely and safe manner so that you can quickly move on to the next part of your crafting journey. From the kind of tools you’ll need to understand what makes a good quality safety eye, this guide will help save time and make sure your pieces stay intact throughout the removal process.

Navigating safety eyes on stuffed animals and other crafts can be a tricky task. Knowing when, where, and how to remove them properly is essential to ensure safe construction and prevent damage to your project. In this blog post, we’ll cover everything you need to know about how to remove safety eyes! So let’s get started taking those safety eyes off in no time flat!
Why May You Want to Remove Safety Eyes?
1 . To Replace Damaged Eyes
One of the most common reasons for wanting to remove safety eyes is when they have become damaged. This can happen after a toy has been played with frequently, or if the toy has been in storage and suffered damage over time. Safety eyes are a great feature on toys as they cannot be pulled out by young children, but this also means that when they do become damaged, they can be quite difficult to remove.
2 . To Clean the Toy
Another reason for wanting to remove safety eyes is to give the toy a good clean. Whether it’s been sitting on a shelf for months or has been dragged around by your child everywhere, toys can collect dirt and grime over time. In order to properly clean a stuffed animal or toy, it’s important to remove any small parts such as safety eyes.

3 . To Repurpose the Toy
Sometimes you may want to repurpose a stuffed animal or toy by giving it a new look. This could be for a DIY project or simply to update the toy’s appearance. In order to do this, you will need to remove the existing safety eyes and replace them with new ones to match your desired look.
4 . To Make Repairs
If a toy has been well-loved, it’s likely that some of its parts may become damaged over time. This includes the safety eyes, which can become loose or fall out completely. Removing the old safety eyes and replacing them with new ones can help restore the toy to its original condition and ensure it continues to be safe for playtime.
5. To Swap Out Eye Colors
For crafters and DIY enthusiasts, removing safety eyes can also be a way to change up the eye color of a toy. This can help add a unique touch or match the toy’s appearance with your personal style. Whether you’re changing from black to blue or brown to green, swapping out safety eyes can give your toy a whole new look. Just make sure to use the appropriate-sized safety eyes for the toy you’re working on.

How to Remove Safety Eyes in 5 Easy Steps
Step 1: Gather Your Tools
Before you begin, make sure you have all the necessary tools on hand. This includes a pair of pliers, tweezers, and possibly a flathead screwdriver if the safety eyes are particularly difficult to remove.
Step 2: Secure The Toy
If possible, secure the toy or stuffed animal in place using clamps or by having someone hold it steady. This will prevent the toy from moving around while you are trying to remove the safety eyes.
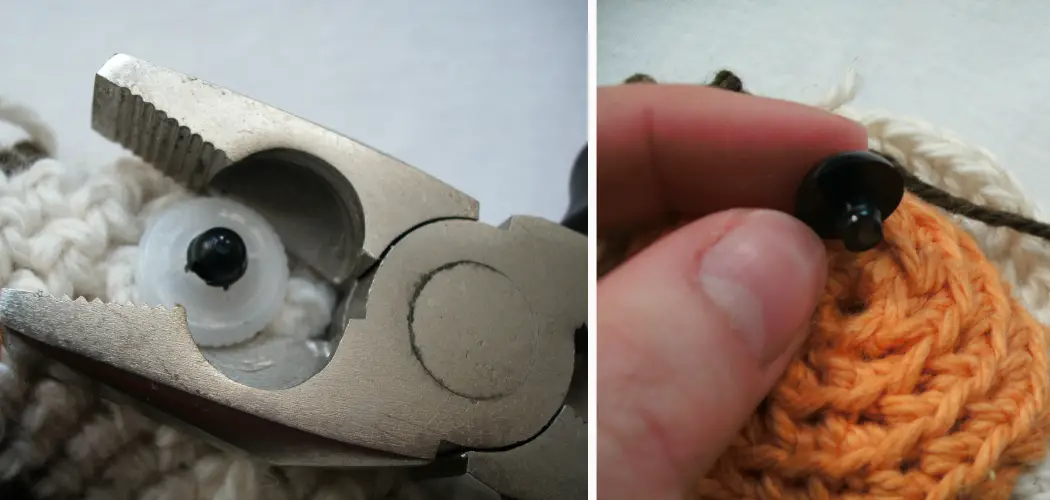
Step 3: Use Pliers to Grip the Back of the Eye
With one hand, use a pair of pliers to grip the back of the safety eye. Make sure to only grab onto the base of the eye and not any surrounding fabric or stuffing.

Step 4: Use Tweezers to Pull the Front of the Eye
With your other hand, use a pair of tweezers to grip the front of the safety eye. Pull gently but firmly in an outward motion until the eye pops out of its socket. This will require some strength, so don’t be afraid to use a little force.
Step 5: Repeat for the Other Eye and Replace as Needed
Once one eye has been removed, repeat the process for the other eye. If you plan on replacing the safety eyes with new ones, simply follow the same steps in reverse to insert them into place. Also, make sure to properly dispose of the old safety eyes as they can be a choking hazard for young children.
Some Extra Tips to Remove Safety Eyes
1 . Wear Protective Gear
It is important to wear protective gear while removing safety eyes. These gears provide protection from any flying debris or dust that may come out during the process.
2 . Use Pliers
Pliers are a useful tool in safely removing safety eyes without causing any damage to the fabric. They provide a good grip and make it easier to pull the eyes out.
3 . Be Gentle
While using pliers, it is important to be gentle and not exert too much pressure. This can cause the safety eyes to break or damage the fabric. Also, be careful not to pull too hard as this can cause the eyes to fly out and potentially injure someone.
4 . Start with One Eye
It is best to start removing one eye at a time. This will help in maintaining balance and stability while working on the other eye.
5 . Gently Wiggle the Eye
Before using pliers, gently wiggle the eye back and forth to loosen it. This will make it easier to remove without much force.
6 . Use a Screwdriver
For safety eyes that are tightly secured, using a small screwdriver can be helpful in loosening them. Simply insert the tip of the screwdriver between the eye and fabric and gently twist until the eye comes off.

Frequently Asked Questions
What Precautions Should I Take Before Removing Safety Eyes?
Before removing safety eyes, make sure you have all the required tools at hand. These include a pair of scissors, pliers and tweezers. You will also need a soft cloth or tissue to clean the area around the safety eye. Additionally, it is important to ensure that your work area is well-lit and clean to avoid losing any small parts that may come off during the removal process.
Can I Reuse Safety Eyes After Removal?
Yes, safety eyes can be reused as long as they are in good condition. Before reusing them, make sure to inspect the safety eyes for any damage or wear and tear. If there are no signs of damage, you can safely reuse them.
How Do I Remove Safety Eyes From a Stuffed Animal?
Removing safety eyes from a stuffed animal requires careful handling to avoid damaging the fabric or stuffing. Start by gently pulling on the plastic washer at the back of the safety eye with your fingers. If it doesn’t come off easily, use a pair of pliers to grip and turn the washer until it loosens. Once the washer is loose, you can remove it and pull out the safety eye from the front of the fabric. Use tweezers to remove any remaining pieces if needed.
Can I Use the Same Method to Remove Safety Eyes From Different Materials?
The method for removing safety eyes may vary slightly depending on the material they are attached to. For example, if you need to remove safety eyes from a hard plastic surface, you can use a sharp tool like an X-ACTO knife to carefully cut around the safety eye and remove it. For materials like fabric or paper, you can follow the same method as mentioned above.
How Do I Clean the Area After Removing Safety Eyes?
After removing safety eyes, use a soft cloth or tissue to clean any residue or dirt that may be left behind. This will ensure that the area is clean and ready for reattaching safety eyes or any other embellishments. If there are any stubborn marks, you can use a gentle cleaner suitable for the material to remove them.
What Should I Do With Unused Safety Eyes?
If you have unused safety eyes after your project, it is best to store them in a safe place for future use. Make sure to keep them away from direct sunlight or extreme temperatures to avoid any damage. You can also organize them by size and color in a small container for easy access when needed. Overall, taking proper precautions while removing safety eyes and storing them correctly will ensure their longevity and usability for future projects.
Conclusion
Removing safety eyes may seem like a daunting task at first, but with the right tools and technique, it can be done easily. Whether you need to replace damaged eyes or want to give your toy a new look, following these simple steps will ensure that the process is safe and effective.
Now you know how to remove safety eyes ! Just remember to always use caution when working with small parts, and enjoy your newly revamped toy! So go ahead, get creative and have fun with removing safety eyes!Happy crafting!