
Transforming wood slices into personalized pieces of art by putting pictures on them is a creative and heartwarming endeavor that allows you to capture cherished memories or create unique home decor.
Whether you want to showcase family photographs, commemorate special occasions, or add a rustic touch to your living space, learning how to put pictures on wood slices is a satisfying and imaginative process.

In this article, we will guide you through the step-by-step methods and techniques to transfer your favorite images onto wood slices. From selecting the right wood slices and preparing your photos to applying the transfer and adding finishing touches, you’ll discover the secrets to creating stunning, custom wood slice art that preserves your moments in a beautifully natural way.
So, let’s embark on this artistic journey and uncover the art of transferring images onto wood slices to adorn your space with sentimental and visually appealing creations.
The Appeal of This Craft for Personal or Gift Purposes
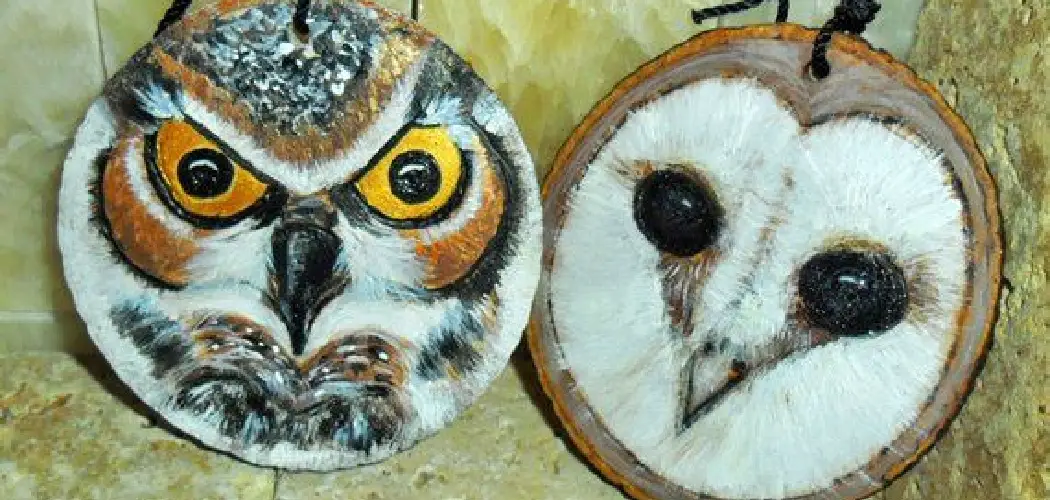
Wood burning, also known as pyrography, is an art form that involves burning designs onto wood surfaces using a heated tool. This technique has been around for centuries and has evolved over time to incorporate various tools and techniques. One modern variation of this craft is putting pictures on wood slices.
The appeal of putting pictures on wood slices lies in its versatility and uniqueness. Each wood slice is unique in its own way, with varying grain patterns and imperfections. This adds character and charm to the final product, making it a one-of-a-kind piece of art.
Furthermore, this craft allows for creativity and personalization. From selecting the perfect wood slice to choosing the design and placement of the picture, each step can be tailored to individual preferences. This makes it a great option for personal projects, such as home decor or personalized gifts.

Aside from its personal appeal, putting pictures on wood slices also has a special sentimental value. It can serve as a tangible memory of a special event or moment captured in the picture. The natural warmth and texture of wood adds an element of nostalgia to the picture, making it even more meaningful.
10 Methods How to Put Pictures on Wood Slices
1. Transferring a Printed Image
One of the most popular methods for putting pictures on wood slices is to transfer a printed image onto the wood. This can be done by using a laser printer and special transfer paper that is designed specifically for this purpose.
First, print the desired image onto the transfer paper and then use an iron or heat press to apply it to the wood slice. Once cooled, peel off the transfer paper, and voila! You have a beautiful picture on your wood slice!
2. Using Mod Podge
Another great way to put pictures on wood slices is by using Mod Podge. This is a type of glue that can be used to adhere photos and other images to surfaces such as wood, canvas, and more.
To use Mod Podge, first, apply a thin layer of glue onto the surface of your wood slice and then place your image over the top. Apply another thin layer of glue over the top of the image and allow it to dry completely before displaying your work.

3. Decoupage
Decoupage is another great way to put pictures on wood slices. This method involves cutting out small pieces of paper or fabric and gluing them onto your wood slice in order to create an interesting design or pattern.
To get started with decoupage, you’ll need some scissors, glue, and any type of paper or fabric that you would like to use for your project. Cut out small shapes from your chosen material and then glue them onto your wood slice in whatever pattern you desire!
4. Wood Burning
Wood burning is another popular method for putting pictures on wood slices. With this technique, you can create intricate designs by using heated tools such as pyrography pens or soldering irons to burn away layers of the surface material in order to reveal different colors underneath. This method takes some practice but can be used to create stunning works of art!
5. Acrylic Paint
For those who are looking for something simpler than pyrography or decoupage, acrylic paint may be just what you need! Acrylic paint can be used to easily add color and texture to any wooden surface without having any prior experience with painting techniques. All you need are some basic supplies such as paintbrushes, paints, sealants, etc., along with some creativity!
6. Stencils
Stenciling is one of the easiest ways to put pictures on wood slices without having any prior artistic experience or knowledge about painting techniques. Simply choose a stencil design that you like (there are plenty available online) and trace it onto your wooden surface using either pencils or markers – whichever works best for you! After tracing out your design, fill in any areas with acrylic paint until it looks just how you want it to!

7. Sharpies
Sharpies are one of those items that everyone has lying around their house – so why not put them to good use? You can draw directly onto your wooden surface with Sharpies in order to create beautiful designs that will last forever! Choose from either fine point or ultra-fine point tip sizes depending on how detailed you want your picture to look – either way will turn out great!
8. Watercolor Pencils
Watercolor pencils are perfect if you want something between drawing with Sharpies and painting with acrylics – they provide a softer effect than regular colored pencils but still give off vibrant colors when blended together properly!
Start by lightly sketching out what kind of picture you want on your wooden surface before coloring it in with watercolor pencils; once finished blend everything together using water until desired results have been achieved!
9. Alcohol Ink Markers
Alcohol ink markers are perfect if you’re looking for bold colors that won’t fade over time – they come in various shades, so there’s sure to be something that fits whatever style picture you’re trying to achieve! Simply draw directly onto your wooden surface using these markers before sealing everything up with varnish so that nothing smudges; once dried, everything should stay intact forever!
10. Dried Flowers & Leaves
Last but not least – dried flowers & leaves make great additions too any picture placed upon a wooden surface; simply arrange them however desired before securing them down with hot glue (or other adhesive) – this creates an interesting 3D effect which makes for an eye-catching piece when hung up upon walls inside homes/offices/etc.
Things to Consider When Putting Pictures on Wood Slices
When it comes to adding pictures onto wood slices, there are a few things you should consider before getting started. This will help ensure that your project turns out the way you envision and lasts for years to come.
Type of Picture
The first thing to think about is what type of picture you want to put on your wood slice. Do you want a printed photo, a hand-drawn design, or something else? The type of picture will determine the materials and techniques you will need to use. For example, if you want to transfer a printed photo onto the wood slice, you will need special transfer paper.
Wood Slice Size
The size of your wood slice is also an important factor to consider. The size will determine how big or small your picture can be, as well as what techniques you can use. A larger wood slice will give you more room to work with and allow for more intricate designs, while a smaller wood slice may limit your options. Keep in mind that the bigger the wood slice, the more expensive it will be.
Type of Wood
Another consideration is the type of wood you use for your project. Different types of wood have different textures and colors, which can affect how your picture turns out.

For example, using a lighter-colored wood like birch will give you a brighter and clearer image, while using a darker wood like cherry may result in a more muted or vintage look. It’s best to experiment with different types of wood to see which one works best for the picture you want to put on it.
Conclusion
It’s time for you to get creative with your wood slices! By following the steps outlined in this blog post, you will be able to add unique images and visuals to your wood slices. Work at your own pace and try different techniques until you get the result you want.
Writing a blog post such as this one isn’t easy but our aim was that by the end of it, you would have a clear understanding of how to put pictures on wood slices.
With some patience and experimentation, we hope that this blog serves as a useful inspiration for your project. Remember to share your work on social media – we can’t wait to see what beautiful versions you create! So go out there and start showing off – happy crafting!