
Painting your doormat is a great way to spruce up your front entryway and add unique personal flair to your home. Whether you want an attention-grabbing design or something subtle that expresses a bit of yourself, there are plenty of creative options! Turn an ordinary doormat into a work of art with just a few simple steps – perfect for d-i-y followers and experienced painters alike.

With just some regular craft supplies and paint, you can create something truly special that visitors will be sure to take note of every time they come by. Read on for all the tips on how to paint a door mat you need to know when it comes to painting door mats—you’ll be surprised at how easy it is!
Why Do You Need to Paint a Door Mat?
First of all, let’s discuss why painting your doormat is such an appealing idea. Apart from being an attractive addition to your doorstep, it also gives you a unique creative outlet. Painting your own doormat allows you to personalize your entryway and showcase a bit of creativity while also adding some color and charm to your home’s exterior.
You can choose a design that reflects your personality, hobbies, favorite colors or seasonal themes – all of which you don’t get with store-bought doormats. Plus, painting a doormat is also a fun and budget-friendly craft project.
Materials Needed
To paint your door mat you will need:
- A Plain Coir Doormat
- Acrylic Paint in Various Colors
- Painter’s Tape
- Stencils (Optional)
- Paintbrushes
- Pencil or Chalk (for Sketching Out Designs)
- Newspaper or Drop Cloth for Protection
11 Step-by-step Instructions on How to Paint a Door Mat
Step 1: Prepare Your Doormat
The first thing you need to do is prepare your doormat. Place it on a flat surface, preferably outside or in a well-ventilated area. If the mat has any debris or dirt, clean it off with a broom or vacuum.
This will ensure that the paint adheres properly and smoothly. It is also helpful to lay down some newspaper or a drop cloth to protect the surrounding area from paint splatters. You can also use painter’s tape to mark off any areas you don’t want to be painted, such as the edges or border of your doormat.

Step 2: Choose Your Design
Decide on what design you want for your doormat. You can either go with a simple color block pattern or get more creative with stencils, patterns, or freehand painting. Consider your home’s exterior and personal style when deciding on a design. You can also use this opportunity to incorporate seasonal themes or fun quotes. It’s completely up to you! You can also sketch out your design on paper beforehand to get a better idea of how it will look.
Step 3: Sketch Out Your Design
Using a pencil or chalk, lightly sketch out your desired design on the doormat. This will serve as a guide for when you start painting. But don’t worry about getting every detail perfect, as you can always make adjustments while painting. It’s all about having fun and letting your creativity flow! It’s also a good idea to use painter’s tape to mark off any straight lines or edges for a clean and precise look.
Step 4: Prep Your Paint
If using stencils or patterns, make sure they are clean and free of any dried paint. Squeeze out some acrylic paint onto a palette or paper plate and have your paintbrushes ready. You can use as many or as few colors as you want, depending on your design. It’s best to start with a few colors and add more as you go. This way, you won’t waste paint or end up with too many colors that don’t work well together.
Step 5: Use Painter’s Tape for Clean Edges
If you want clean, crisp edges on your design, use painter’s tape to outline the areas you want to paint. This will prevent any bleeding or smudging of paint. You can also use the tape to create patterns or geometric designs on your doormat. It’s a simple and effective way to achieve a professional-looking finish. It’s important to make sure the tape is firmly pressed down to avoid any paint seeping underneath.
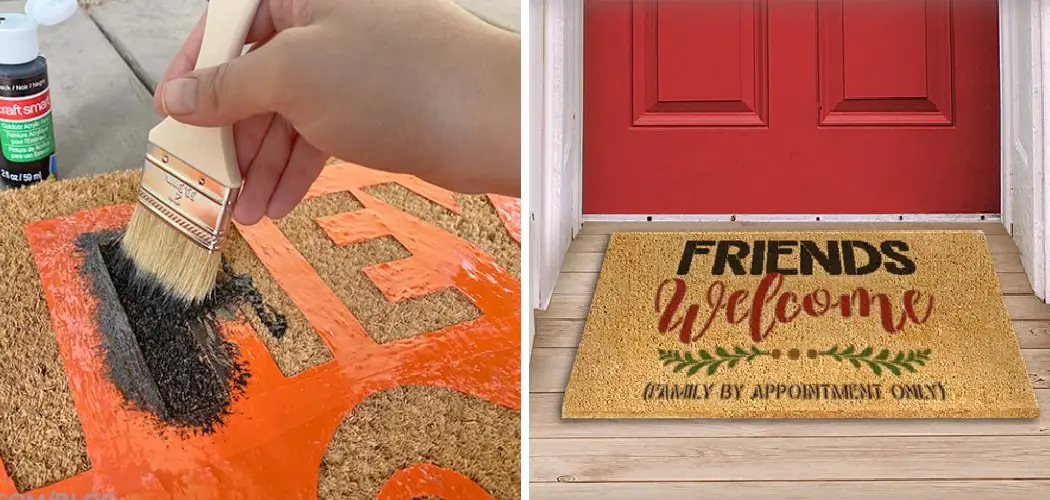
Step 6: Start Painting!
Now comes the fun part – painting! Dip your brush into the paint and start filling in your design. Be patient and careful, taking your time to fill in all the areas neatly. This is especially important if you are using multiple colors or intricate designs. You can also use a stencil brush for stencils to achieve a clean and even finish. For larger areas, you may want to use a roller for quicker application. It’s also recommended to start with lighter colors and add darker shades on top if needed.

Step 7: Utilize Different Brushes for Textures
Depending on your design, you can use different brushes to create various textures and effects. For example, a sponge brush can give a speckled or mottled look while a fine-tipped brush is great for detailing. You can also use a toothbrush or comb to create unique patterns and textures. Have fun experimenting with different techniques!
Step 8: Let It Dry
Once you have finished painting, allow the doormat to dry completely. This should take about an hour or so, depending on how thick your paint layers are. You can also use a hairdryer on low heat to speed up the process. It’s essential to make sure the paint is completely dry before moving on to the next step. This will prevent any smudging or smearing of your design. You can also add additional layers of paint if needed.
Step 9: Add Accents (Optional)
If you want to add any extra details or accents to your design, now is the time to do it. Consider using metallic paint or adding a monogram for a personalized touch. It’s also a good idea to add a layer of clear acrylic sealant over your design to protect it from wear and tear.
You can also use a fabric sealant if your doormat is made of a different material other than coir. But be sure to follow the instructions on the sealant for best results.
Step 10: Seal the Paint (Optional)
To protect your design and make it last longer, you can choose to seal the doormat with a clear acrylic spray. This will also make it easier to clean in the future. It’s best to do this step outside or in a well-ventilated area and follow the instructions on the spray for the best results. Once dried, you can add a nonslip backing to your doormat if desired.
Step 11: Display Your Masterpiece!
After your doormat is completely dry and sealed (if you choose to), it’s time to display your newly painted masterpiece! Simply place it back on your front doorstep and enjoy the compliments from visitors. You can also switch up the design whenever you want by using different colors or patterns.
Have fun with it and don’t be afraid to get creative! Painting a doormat is an easy and affordable way to add a personal touch to your home’s entrance. So grab your materials, let your imagination run wild, and have fun painting your very own doormat!

Following these simple steps, you can easily learn how to paint a door mat and create a unique and welcoming entrance to your home. Get creative and have fun with it – the possibilities are endless! So go ahead, grab your doormat and get ready to unleash your inner artist. Happy painting!
Tips
- Be Patient While Painting and Let Each Layer of Paint Dry Completely Before Adding Another. This Will Prevent Any Smudging or Smearing.
- Use Painter’s Tape or Stencils for Clean and Precise Edges.
- Experiment With Different Brushes and Techniques to Create Various Textures and Effects.
- Protect Your Design by Sealing It With a Clear Acrylic Spray to Make It Last Longer. It Will Also Make It Easier to Clean in the Future.
- Have Fun and Let Your Creativity Flow! Your Doormat is a Reflection of Your Personal Style, So Make It Unique and Have Fun With It. Happy Painting! Now You Know How to Paint a Door Mat. Enjoy Your Personalized Doormat Every Time You Enter Your Home.

Frequently Asked Questions
Q1: Can I Use Any Type of Paint for My Doormat?
A: Acrylic paint is the best type of paint to use for doormats as it is durable, water-resistant, and easy to work with. You can also use fabric paint if your doormat is made of a different material. But avoid using oil-based paint as it can crack and chip over time.
Q2: Can I Use a Stencil Brush for Regular Painting?
A: Yes, you can use a stencil brush for regular painting. It is especially useful for achieving clean and crisp edges when using stencils or patterns on your doormat. It can also be used for smaller designs and details.
Q3: How Long Does It Take for the Paint to Dry?
A: This depends on how thick your paint layers are, but it usually takes about an hour or so for the paint to dry completely. You can also use a hairdryer on low heat to speed up the process. It’s essential to make sure the paint is completely dry before moving on to the next step.
Q4: Can I Use Multiple Colors in My Design?
A: Yes, you can use as many colors as you like in your design. Just make sure to plan out your design beforehand and let each layer of paint dry before adding another color on top. It’s time to unleash your creativity and make a one-of-a-kind doormat.

Conclusion
As you can see, creating a charming and creative painted doormat is easier than it looks. After all of the preparation and waiting, it’s time to get to work. Put on your painting outfit, grab the necessary supplies, and get crafty! Your finished doormat will add a touch of character to your home and be sure to impress any visitors. All that’s left now is to enjoy planning the figures and colors that you’d like to feature on your doormat.
Good luck and have fun! Why not even take it a step further by getting creative with other surfaces, such as wood boards or fabric flags? The possibilities are endless – so let your adventure start here. Now get out there and have some fun making your own beautiful door mat masterpiece! Thanks for reading this article on how to paint a door mat.