
Are you looking for a fun and creative way to decorate your home with art that YOU created? Block printing on fabric is the perfect way to express yourself, as it’s easy to learn and can produce beautiful works of handmade art. With just a few items from the local craft store, some food coloring or ink, your favorite piece of fabric, and your imagination – you will be creating unique masterpieces in no time!

Block printing on fabric has been around for centuries, and it’s a technique used by many cultures throughout history. It involves carving a design onto a block of wood or linoleum, inking it, and stamping it onto fabric to create a repeated pattern.
In this blog post, we’ll explore all the details necessary for how to block print on fabric.
What Will You Need?
Before diving into the steps for block printing on fabric, let’s gather all the necessary supplies. These are items that you can quickly get from your local craft store or online:
- Fabric: Choose a natural fiber fabric like cotton or linen, as they absorb ink better than synthetic fabrics. Ensure to wash and dry your textile before removing any sizing or chemicals that may interfere with the ink’s absorption.
- Block Printing Ink or Food Coloring: You can choose from various block printing inks available in different colors at your craft store. Alternatively, you can also use food coloring mixed with a small amount of alcohol to create your custom colors!
- Blocks: You can find pre-carved blocks with designs at your craft store or carve your own using linoleum or woodblocks.
- Carving Tools: If you choose to carve your blocks, have a set of carving tools handy.
- Inking Tray and Brayer: You will need these tools to spread the ink evenly on the block before stamping it onto the fabric.
- Paper Towels or Rags: These will come in handy for cleaning up any excess ink.
- Cardboard or Foam Sheets: Place these under your fabric to prevent ink from bleeding through to your work surface.
Now that we have all of our supplies, it’s time to get started on creating our block printed masterpiece!
9 Easy Steps on How to Block Print on Fabric
Step 1. Preparation of the Fabric:
Start by spreading out your fabric on a flat surface. Ensure to place cardboard or foam sheets beneath it to avoid ink leakage onto your work surface. Iron the fabric if necessary to remove any creases or wrinkles – a smooth surface will yield better printing results.

Step 2. Choosing and Preparing the Block:
Select the block you want to use for your design. If you are using a pre-carved block, simply test it on scrap fabric to ensure the design transfers well. If you’re carving your block, use your carving tools to etch your design into the block carefully.
Remember that the design will be stamped onto the fabric as a mirror image, so plan your design accordingly. Once your block is ready, wipe it clean to ensure no debris left that might interfere with the ink application.
Step 3. Applying the Ink:
In this stage of the block printing process, you will need your inking tray and brayer. Pour a small amount of ink onto the inking tray. Then, using the brayer, spread the ink evenly across the tray.
Once the ink is distributed evenly, roll the brayer over your prepared block, ensuring that the design’s surface is sufficiently covered. Try to apply a uniform layer of ink to avoid blotchy prints. Remember, in block printing, less is often more when using ink.
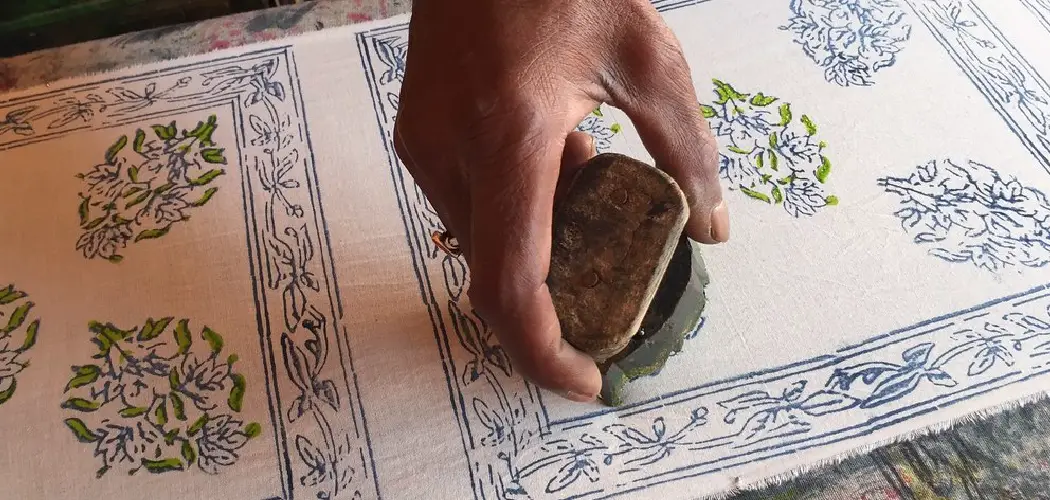
Step 4. Stamping the Design:
Now comes the fun part – stamping the design onto your fabric! Ensure your fabric is flat and smooth before you begin. Position your inked block on the fabric where you want your design to be. Apply even pressure to the back of the block, then carefully lift it straight up to prevent smudging. Wait a few moments to allow the ink to transfer onto the fabric.
If the design is not as straightforward or as dark as you’d like, you can re-ink the block and stamp it again. Remember, block printing is an art, not an exact science – slight variations in the print add to its charm!
Step 5. Repeating the Pattern:
Once you’ve successfully stamped the first design, it’s time to repeat the pattern. Re-ink your block and stamp the next part of your fabric, aligning the block carefully to keep the pattern consistent. You can create any pattern you like, whether a straight line, a staggered arrangement, or a free-form design.
Continue this process until you have filled your fabric with your beautiful block print design. Let each print dry before moving on to the next to avoid smudging the design. Remember to clean your block intermittently to prevent ink buildup.

Step 6. Let it Dry:
After you have finished applying your block print design to the fabric, it is essential to let it dry completely. The drying time can vary based on the type of ink used and the thickness of the application. Typically, it can take anywhere from a couple of hours up to a full day.
To speed up the drying process, you can use a hairdryer on a low setting, but be careful not to blow the ink around or touch the fabric while it’s still wet. Patience is key in this step, as touching the design prematurely can cause smudging or color transfer.
Step 7. Heat Set the Design:
Once your fabric has dried entirely, it’s time to heat set the design. This step helps to ensure the longevity of your design by making it resistant to washing and fading. Place a piece of white paper or a scrap piece of fabric over the printed design to protect it, then firmly press a hot iron (set to the fabric-appropriate setting) over the paper or scrap fabric.
Move the iron in a circular motion, taking care not to stay in one place for too long as this might scorch the fabric. Continue this process until you have heat-set the entire printed area.
Step 8. Washing and Drying:
After the design has been heat set, it’s time to wash your fabric. This step is crucial to remove any excess ink and to ensure the design is colorfast. Hand wash the fabric gently in cold water with a mild detergent.
Avoid using bleach, as it can fade the design. Rinse thoroughly until the water runs clear. Afterward, allow the fabric to air dry naturally. Avoid wringing or twisting the fabric, as this could distort the printed design. Once dry, you can iron the material again for a crisp finish.
Step 9. Final Inspection:
After your fabric has dried, it’s time for the final inspection. Carefully examine the block printed design for any inconsistencies or areas where the ink may not have transferred correctly. If you notice any light spots and want a more vibrant look, you can re-stamp those areas. However, remember that the beauty of block printing lies in its imperfect perfection.

The unique imperfections give a handmade touch to your fabric. After your final inspection, your block-printed fabric is ready for any project you have in mind!
By following these nine easy steps, you can master the art of block printing on fabric and create unique, handcrafted pieces that reflect your creativity and style.
5 Additional Tips and Tricks
- Practice on Paper First: Before printing on your final fabric, practice your design and technique on scrap paper. This helps you understand the pressure and ink needed for the perfect print.
- Wash Fabric Beforehand: Pre-wash your fabric to remove any sizing or starch, which can interfere with the ink’s adhesion. After washing, iron the fabric smooth for a clean printing surface.
- Use a Clear Acrylic Block: Consider using a clear acrylic block if you’re carving your design. It lets you see where you’re placing the design and helps with accurate alignment.
- Store Leftover Ink: If you have leftover ink, store it in an airtight container to use for future projects.
- Test Wash a Sample: After heat setting your design, test wash a small printed sample. This will help you ensure the design withstands washing without fading or bleeding. If the print fades significantly or the colors bleed, you may need to modify your heat-setting process or try a different kind of ink.
Remember, block printing on fabric is an art form. Keep going even if your first few attempts come out perfectly.
5 Things You Should Avoid
- Avoid Rushing the Process: Block printing on fabric requires patience and precision. Take time with each step, from carving your design to applying the ink, to ensure the best results.
- Avoid Using Too Much Ink: While it might be tempting to load up your block with a lot of ink, it can actually result in streaks and a less crisp print. Use a moderate amount of ink, and remember to re-ink the block as needed.
- Avoid Touching the Fabric While Wet: As mentioned earlier, touching the fabric while it’s still wet can cause smudging or color transfer. Be patient and allow the design to dry completely before handling it.
- Avoid Using Intense Heat to Dry Fabric: Instead of using a blow dryer or placing the fabric in direct sunlight, allow it to air dry naturally. Excessive heat can cause the ink to set incorrectly and damage the design.
- Avoid Washing with Harsh Detergents: Stick to mild detergents when washing your block printed fabric. Harsh chemicals can damage the ink and cause it to fade or bleed.

By avoiding these common mistakes, you can ensure that your block printed fabric turns out beautifully every time.
Conclusion
To conclude, creating stunning block prints on fabric is not as daunting a task as one might think. Taking the time to set up the material correctly, carefully carving the design into your printing blocks, and adequately applying the ink will all contribute to creating beautiful works of art. As with any type of crafting, practice makes perfect! Be patient and have fun experimenting with different techniques and color combinations until it results in something you are really proud of.

Take this new knowledge and use it as inspiration for creating unique pieces for yourself or possibly pursuing something more professional. Go forth, artisans, and get imagining, designing, carving, printing, and sharing – don’t forget to keep a portfolio! With these creative skills that you now possess, there is no telling what kind of unique projects you will come up with.
Hopefully, the article on how to block print on fabric has inspired you to try this traditional technique and add your own personal touch to your fabric projects. So gather your materials, get creative, and start block printing on fabric!