
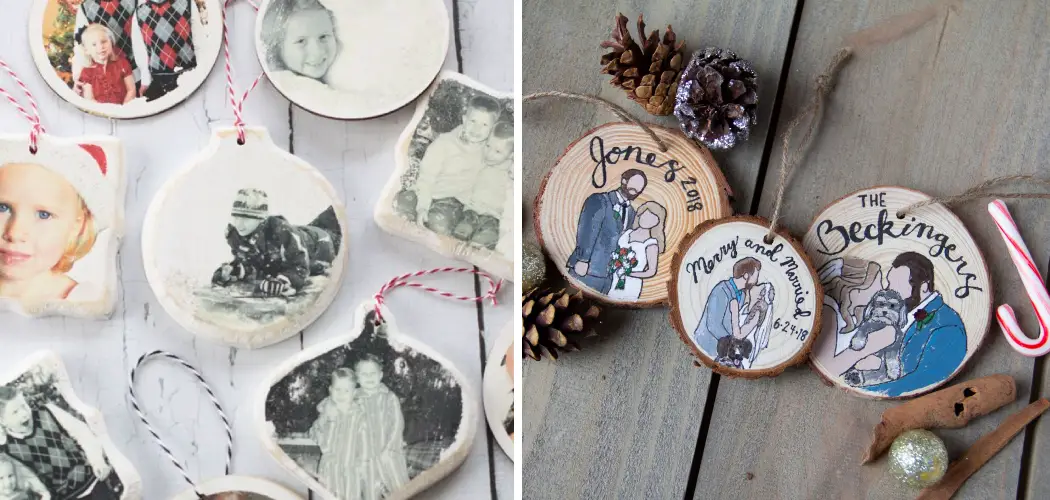
With the holiday season rapidly approaching, many of us are beginning to search for fun activities to do with our family. Not only will you be able to create a meaningful experience and lasting memories this year by making festive wooden ornaments together, but you can customize them even further by adding an image or special memory that evokes emotion when you hang it up on your tree!

Learn how to make wooden ornaments with pictures using simple tools and materials that won’t cost too much – perfect for anyone looking for creative ideas this season.
Tools and Materials You Will Need to Make Wooden Ornaments With Pictures
- Wood scraps
- Saw
- Pencil
- Ruler
- Sandpaper
- Varnish or wood glue
- Paint
- Printout of image
- Scissors
- Drill and small drill bit (optional)
- String
Step-by-Step Guidelines on How to Make Wooden Ornaments With Pictures
Step 1: Cut the Wood to Create the Ornament Shape
Using the saw, cut out a shape for your ornament from a piece of scrap wood. You can use any shape you want – stars, circles, hearts – just be sure to draw it on the wood first using a pencil and ruler. While cutting out the shape, be mindful of any sharp edges and round them off with sandpaper as necessary.
Step 2: Prepare and Prime the Wood
Once you have your shape cut out, sand down any rough spots. Apply a varnish or wood glue to give it a nice finish and let it dry completely. Once dry, paint the ornament in whatever color suits your fancy – white, black, red, etc.
Let the paint dry completely before moving on to the next step. You can also add glitter or other embellishments now if you’d like. You can use the drill to make a hole in the top of your ornament for stringing if desired.

Step 3: Add the Picture to the Ornament
Print out an image and cut it down to the size that will fit onto your ornament (don’t forget to include a bit of extra space for glue). Attach the image with wood glue and press firmly. Let it dry for a few hours. Adding extra embellishments such as glitter or beads is a great way to customize your ornament even further.
Step 4: Drill Holes For String
If you want to hang up your ornament, use the drill and small drill bit to create two holes – one at the top of the ornament and one at the bottom. Ensure that they are both symmetrical and of equal size. Make sure to sand the wood around the holes to get rid of any splinters.
Step 5: Add String
Once all of the components are dry and ready, thread a piece of string through both holes and tie it in a knot at the top. You can also use ribbon or other decorative materials instead if you’d like. And that’s it! You now have a customized wooden ornament with an image of your choice.
These homemade wooden ornaments make great gifts to give away this holiday season. With just a few simple tools and materials, you can create personalized decorations that will be cherished for years to come. Have fun making them with your loved ones and hang them on the tree with pride!

Additional Tips and Tricks to Make Wooden Ornaments With Pictures
- Use high-quality wood glue and sealer to hold the picture in place and keep it from peeling off.
- When cutting out the shape of your ornament, use a fine-toothed saw blade for a smooth finish.
- To add an extra layer of protection to your ornament, apply polyurethane paint or varnish after gluing the picture in place.
- If you want to add a unique touch to your ornament, consider applying gold or silver leafing along the edges of your design.
- Always use a soft cloth when cleaning and polishing your wooden ornaments with pictures, as harsh abrasives can damage them over time.
- When hanging your finished ornament, use a lightweight string or ribbon and avoid using nails to prevent splitting the wood.
- If you plan on making several wooden ornaments with pictures, it may be worthwhile investing in an electric jigsaw for faster, more accurate cuts.
- Make sure to use safety glasses when working with wood to protect your eyes from sawdust and stray pieces of wood.
- Have fun with your design and don’t be afraid to experiment with different shapes, sizes, and colors! Wooden ornaments with pictures are a great way to express yourself and add a personal touch to your holiday decor.
Following these tips and tricks will help you to create a beautiful wooden ornament with pictures that you can proudly display year after year. Have fun and happy crafting!
Things You Should Consider to Make Wooden Ornaments With Pictures
1. Choose the Right Wood:
Using quality materials is paramount when creating a wooden ornament with a picture on it. Hardwoods such as maple, walnut, cherry, and oak are ideal for this type of project due to their durability and strength. You will also need to consider how the grain pattern of the wood affects your design. Choose pieces that have interesting patterns or colors to add some visual interest.
2. Pre-treat the Wood:
Before you begin working with your wood, it’s important that you pre-treat it in order to prevent warping. You can do this by applying a sealer or a finish such as polyurethane or lacquer. This will also help to protect the surface of the wood from scratches and other damage and will make it easier to apply your picture.

3. Cut the Ornament Pieces:
Once you have chosen and pre-treated your wood, it’s time to cut out the pieces for your ornament. You can use a jigsaw or other hand saw to cut each piece to size. Make sure that all of the pieces fit together snugly so that your ornament will be structurally sound. This is an important step in order to create a successful wooden ornament with pictures.
4. Drill Holes:
In order to make a wooden ornament with pictures, you will need to drill holes for the picture frames or any other decorations that you plan to attach. Use a drill press or hand-held drill to create small, precise holes in the pieces of wood. Make sure that all of the holes are the same size and depth.
5. Glue Pieces Together:
Next, use reliable wood glue to attach all of your pieces together. You may also need to use clamps or rubber bands to keep everything tight while the glue dries. Once it’s dry, you can sand down any rough edges or surfaces with some fine-grit sandpaper.
6. Attach Pictures or Decor:
Finally, you can attach any pictures or decorations that you want to your wooden ornament with glue or other adhesives. Make sure to press firmly and evenly on all of the pieces so that they will stay secure for many years to come. Enjoy displaying your beautiful handmade ornament!
By following these steps, you can create a beautiful wooden ornament with pictures that will be cherished for years to come. With the right materials and tools, this project is relatively straightforward and doesn’t require much skill or experience. Have fun creating your own unique design!
Frequently Asked Questions
What Type of Wood is Best to Use for Making Wooden Ornaments?
The type of wood you choose will depend on the look and feel that you want for your decoration. Softwoods such as pine, cedar, basswood, and spruce are great choices for a lightweight ornament with natural tones. Hardwoods like oak, walnut, and cherry are good for a heavier ornament, and can also be stained to give the wood an attractive color.

What is the Best Glue to Use for Wooden Ornaments?
Cyanoacrylate glue (or “super glue”) is a great choice for gluing wood ornaments because it bonds quickly and easily. It is important to note, however, that cyanoacrylate glue should never be used directly on pictures or photographs as it can damage them. For this reason, you should use double-sided tape or foam adhesive to secure the photos onto the wood before applying the glue.
How Do I Attach Pictures to Wooden Ornaments?
The best way to attach pictures to wooden ornaments is to use double-sided tape or foam adhesive. Make sure that the photos are trimmed down to size before adhering them, and ensure that the wood surface is smooth and free of any debris. After applying the adhesive, press firmly onto the wood for a few seconds until it is secure.
Conclusion
Knowing how to make wooden ornaments with pictures is a great way to create unique decorations with personal meaning. By selecting the right type of wood, using the correct glue, and attaching photos correctly, you can create beautiful wooden ornaments that will be enjoyed for years to come.
With a little bit of preparation and patience, anyone can make stunning wooden ornaments with pictures!