
Do you want to learn how to make adorable and stylish tulle hair bows? If so, then you’ve come to the right place! In this blog post, we will walk through the process of making DIY tulle hair bows that are perfect for any occasion.

From picking out materials and prepping the tulle fabric to beautifully accenting your bow with a centerpiece like a button or flower — this blog post has everything about how to make tulle hair bows!
Creating stylish hair accessories has never been easier! Today, we will show you how to make your tulle hair bows. With just a few basic craft supplies and some time, you can design beautiful bows in no time.
So grab some supplies and create beautiful floral accessories that can add a stunning touch to nearly any outfit.
What Are the Uses of Tulle Hair Bows?
Tulle hair bows can be used for a variety of occasions. Whether you’re looking to dress up for a special event or just want something cute and unique, these fun accessories can provide the perfect touch.
The soft fabric gives a delicate and whimsical feel that can be used to top off an outfit for any occasion. From a night out on the town to a wedding or special event, these bows can add a beautiful and unique touch to your look.
What Materials Do You Need for Tulle Hair Bows?
To make tulle hair bows, you’ll need some basic craft supplies. Here is what you’ll need:
- 5-7 yards of tulle fabric (in any color)
- Scissors
- Glue gun & glue sticks
- Ribbon of your choice
- Optional embellishments (flowers, buttons, etc.)
Once you have gathered all the materials needed, let’s move on to the next step!
10 Easy Steps on How to Make Tulle Hair Bows

Step 1: Cut the Tulle Fabric:
Begin by cutting the tulle fabric into long strips. You’ll want to cut the fabric into 4-6 inch wide strips for this step. Once the fabric is cut, gather each strip together and fold them in half.
Step 2: Create a Bow Base:
Using the gathered tulle strips, fold them in towards the center to create a ‘bow base.’ You can use a hair tie or thread to hold everything together at the center. As you do this, make sure to keep the strips in order of color or length so your bow looks nice and neat.
Step 3: Secure with Glue Gun:
Once you have created your bow base, secure it with a glue gun. Ensure that all the folds are secured tightly so that none of them come undone while wearing. Remember to let the glue set before moving on to the next step.
Step 4: Wrap the Ribbon Around the Center of the Bow:
Cut off a ribbon and wrap it around the center of your bow base. This will help keep everything in place and add a nice decorative touch. Try to use a ribbon with colors that complement your tulle fabric.

Step 5: Fluff Out the Tulle Strips:
Now, fluff out each of the tulle strips by gently tugging at them on both sides. This will create an even more full look for your bow. Another way to do this is to tie a knot in the center of each strip before unfolding them.
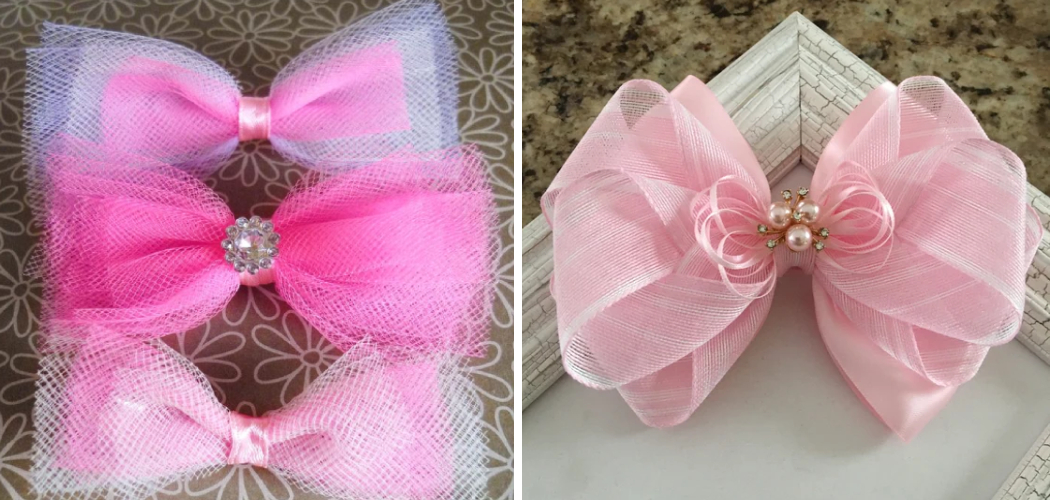
Step 6: Place Embellishments on Bow:
If desired, you can place embellishments like buttons or flowers in the center of your bow to give it an extra special touch. Play around with different colors and shapes until you find something that fits your style! Be careful to use only a few embellishments, as this can make the bow look cluttered.
Step 7: Glue Down Embellishment:
Once you have placed an optional embellishment onto your bow, use a glue gun to secure it. Make sure that everything is firmly adhered to before continuing on to the next step. Press it down firmly to ensure that the glue sets properly if using a button.
Step 8: Wrap Ribbon Around Embellishment:
If you choose to use an embellishment for your bow, wrap a ribbon around it. This will help keep the centerpiece in place and give your hair bow an extra charm. You can also wrap the ribbon around the center of your bow to give it a finished look.
Step 9: Attach Hair Clip or Headband Base:
Attach a hair clip or headband base to the back of your bow. Make sure that everything is securely attached so that there are no gaps or loose pieces. Remember that the clip or headband placement will depend on how you plan to use it.

Step 10: Enjoy Your Creative Masterpiece!
You’re now finished with your tulle hair bow! Show off your creative masterpiece in style and enjoy the compliments that come with it. Remember that you can always experiment with different colors and shapes to create unique looks for any occasion.
By following these easy steps, you can now make your tulle hair bows! We hope this tutorial was useful and you have fun creating beautiful accessories. Have fun!
5 Additional Tips and Ticks
1. Measure the length of tulle needed to make your hair bow. It’s best to measure twice and cut once so you don’t have to start over if you cut too much.
2. Use a hot glue gun for a strong and durable hold to ensure the tulle won’t easily come undone.
3. Use multiple tulle colors to create an eye-catching hair bow that looks unique and stands out from the crowd.
4. Add embellishments such as rhinestones or glitter for extra sparkle and shine!
5. finish off your tulle hair bow with a ribbon at the base for an even more beautiful look. This is also a great way to ensure all ends are secured so your creation stays together no matter what activity you do throughout the day!
With just a few simple steps, you’ll be able to make your very own unique and beautiful tulle hair bow. Have fun with it, and show off your creativity!
5 Things You Should Avoid
1. Don’t use superglue, as this can be difficult to remove and may damage your hair.
2. Avoid using too much glue, as this will make the bow too stiff and hard to tie.
3. Avoid using bright colors or patterns that don’t match or complement the other items in your wardrobe.
4. Don’t cut the tulle too short when measuring the length you need for your bow; you want it to be long enough so it looks nice without being overly bulky.
5. Finally, don’t skimp on quality materials; cheaper materials tend to look less polished and may not last very long, either! Investing in good quality supplies can go a long way.
By avoiding these common pitfalls, you can be sure to create the perfect tulle hair bow for any occasion. With just a bit of practice and patience, you can create stunning designs that are sure to turn heads!

5 Different Kinds of Tulle Hair Bows:
1. Curly Bow: This type of bow is created by gathering the tulle strips in a more circular shape. You can use more fabric for a fuller look or keep it simple with just a few strips.
2. Ribbon Bow: For this bow style, you’ll need an extra wide ribbon to wrap around the center of your bow and secure it in place. You can also use multiple ribbons for a unique look.
3. Braided Bow: This is a fun way to show off your creative side by braiding the tulle strips together before tying them at the base. You’ll need three separate colors of tulle for this design.
4. Frayed Bow: To get this look, cut different lengths of tulle fabric, then fray out the ends for an added texture and dimension. Add some sparkly embellishments for an ultra glamorous look.
5. Twisted Bow: This bow style is created by twisting two tulle strips together in the center and then tying them at the base. Try using different shades of the same color for an extra special touch!
With so many different styles, you will surely find a unique way to express your personality with a tulle hair bow. Whether you go for something simple or more intricate, have fun experimenting and creating beautiful designs that are all your own!
Conclusion
How to make tulle hair bows is a great way to express your creativity and style. With just a few supplies, creative imagination, and patience, you can easily make simple and elegant hair accessories that look great on any hairstyle. These statement pieces are sure to receive compliments!
The fashion possibilities are endless; have fun creating unique looks for each occasion. From layered bows with contrasting fabrics to mini clips with cute characters, you’ll quickly be able to tailor your DIY style to dreams of success!
Remember, playing around to get the right look is important – practice makes perfect! Most of all, have fun making these gorgeous accessories, and enjoy wearing your wonderful creations!