
Are you preparing for the holidays and looking for a fun way to decorate your home? If so, making straw ornaments is an affordable and accessible craft project anyone can do! You can create beautiful decorations that will fill your home with festive cheer with just some straws, scissors, string, and beads. Not only are they cute homemade decorations, but these ornaments are also durable; they’ll last through many holiday seasons!

Straw ornaments have been a popular decoration in many cultures for centuries. They come in various shapes and sizes and can be used to embellish Christmas trees, wreaths, garlands, or hung from windows or doorways. As a bonus, they’re also biodegradable and environmentally friendly.
To get started on this crafty venture, keep reading to find out how to make straw ornaments.
What Will You Need?
To make straw ornaments, you’ll need a few supplies you may already have at home.
- Straws: While any type of straw can work, the best ones are those made from wheat stems, as they are sturdy and come in natural shades of tan and brown.
- Scissors: Sharp scissors will do just fine for this project. These will be used to cut and shape the straws.
- String: Any thin string or twine type will work for this project. You can also use embroidery floss, thin ribbon, or fishing line if you prefer.
- Beads: This is an optional supply, but adding beads to your straw ornaments can give them a more festive look. You can use any type of beads, but small wooden or plastic ones work best.
Once you have these supplies, you can start making straw ornaments!
8 Easy Steps on How to Make Straw Ornaments
Step 1: Gather Your Straws
The first step in making straw ornaments is to gather all your straws. Depending on the size and number of ornaments you want to make, you may need a lot or a little. If you’re using wheat straws, ensure they are clean and dry. If you’re using plastic or paper straws, choose colors that fit your desired aesthetic. Once you have all your straws, you can move on to the next step.
Step 2: Cut Your Straws
Next, it’s time to cut your straws. For this, you’ll need your sharp pair of scissors. If you want to create different sized ornaments, cut your straws into varying lengths. A good size is about 2 to 3 inches, but feel free to experiment with different sizes to suit your preference. When cutting, ensure that the ends are as straight as possible for a neat finish. Now, with your cut straws, you’re ready for step three.

Step 3: Thread Your Straws
Now, thread your string or twine through the straw pieces. You can incorporate one piece at a time or gather several straws on your string simultaneously. If you’re using beads, now is the time to add them to your design. Alternate between straw pieces and beads to create a pattern. Be sure to leave some extra string at both ends for tying. Once all your straws (and beads if you’re using them) are threaded, you’re ready for the next step.
Step 4: Tie Your Ornaments
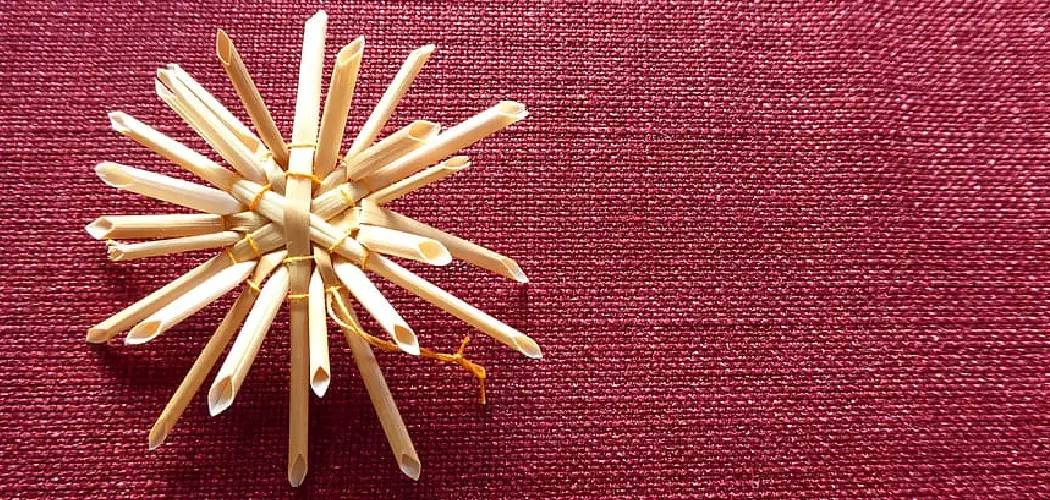
Once your straws and beads (if you used them) are all threaded onto the string, it’s time to tie your ornaments together. First, decide what shape you want your ornament to be. You can make a simple circle or get creative with shapes like stars, hearts, or squares.
To make a circle, tie a secure knot to bring the ends of your string together. If you want to make a more complex shape, you may need to tie knots at various points along the string to secure the straws in place. After tying your ornament, cut off any excess string, leaving a small loop if you want to hang it. Congratulations, you have just completed your straw ornament!
Step 5: Final Touches
Now that you have your essential straw ornament, this is the time to add any final touches to make it your own. You may paint the straws, add glitter, or wrap them in a ribbon — it’s up to your personal preference and creativity.
If you decide to paint your ornaments, acrylic paint works best. Remember to allow paint or glue to dry thoroughly before hanging your ornament. Your straw ornament will be displayed once you are happy with your final product. Congratulations on creating a unique holiday decoration from scratch!
Step 6: Display Your Ornaments
Now that your straw ornaments are ready, it’s time to show them off! You can hang them on your Christmas tree, wreaths, garlands, windows or doorways. Make sure to choose a spot where they can be seen and appreciated. You can use additional string, ribbon, or hooks to secure them.

Remember, placing and displaying these ornaments is also a part of the creative process, so feel free to experiment with different locations and arrangements until you find what works best for your space. Enjoy the festive atmosphere your homemade straw ornaments bring to your home!
Step 7: Add Extras
If you want to make your straw ornaments memorable, consider adding extras to your design. This could be additional beads in various colors and sizes or even small charms or bells that jingle when moved. Consider adding a touch of nature by incorporating dried flowers or small pine cones. Remember, these additions should be lightweight to keep your ornaments from becoming too heavy. Let your creativity guide you as you embellish your straw ornaments, making each one a unique piece of art. Just remember to attach any extras securely to ensure they stay in place.
Step 8: Preserve Your Ornaments
Preserving your straw ornaments is a crucial step to ensure they last for many holiday seasons to come. While durable, straw can become brittle over time, especially if exposed to varying temperatures and humidity levels. One way to preserve your ornaments is to apply a light coat of clear acrylic spray.
This offers protection and adds a subtle sheen to your ornaments, enhancing their natural beauty. Another option is to store them properly after the holiday season. Wrap each ornament in tissue paper and keep them in a cool, dry place until the next time you’re ready to use them. Remember, proper care and storage can significantly extend the life of your handmade straw ornaments, allowing you to enjoy their charm for years.

By following these simple steps, you can create beautiful and unique straw ornaments that will add a special touch to your holiday decor.
5 Additional Tips and Tricks
- Select high-quality straws: Opt for sturdy, high-quality straws for the best results. These hold their shape better, can withstand the crafting process, and last longer as ornaments.
- Experiment with colors and textures: Don’t limit yourself to natural straw colors. Feel free to paint your straws or buy colored ones to add a visual pop to your ornaments.
- Use a sharp crafting knife: When cutting your straws, use a sharp crafting knife to get clean, precise cuts. This will make assembling your ornaments easier and creating a polished end product.
- Practice the art of patience: Making straw ornaments can be a delicate and time-consuming process. Take your time, and don’t rush. Remember, the beauty is in the detail.
- Protect your work: Once your straw ornaments are finished, consider using a clear protective spray to help them withstand the test of time. This is especially useful if you plan to use them as outdoor decor.
With these additional tips and tricks, you are now equipped with all the knowledge to create beautiful straw ornaments.
5 Things You Should Avoid
- Avoid using low-quality straws: Low-quality straws can easily bend or break during crafting, leading to subpar ornaments. Always opt for high-quality, sturdy straws.
- Don’t use blunt cutting tools: A blunt cutting tool can cause the straws to fray or split, affecting the final appearance of your ornaments. Always use a sharp crafting knife for clean, precise cuts.
- Avoid rushing the process: Crafting requires patience and attention to detail. Running through the process can lead to mistakes and a less-than-ideal end product.
- Don’t ignore safety measures: Always be cautious when using sharp crafting tools. Ensure your work area is well lit and free from distractions to prevent any accidents.
- Avoid exposing ornaments to harsh weather conditions: Although straw ornaments are durable, they are not designed to withstand extreme weather conditions. If you use your ornaments outdoors, ensure they are protected from heavy rain or intense sunlight.
By avoiding these common mistakes, you can ensure that your straw ornaments turn out beautifully and last for years.

Conclusion
With the arrival of the holiday season, how to make straw ornaments is a great way to enjoy time with family and friends while getting into the festive spirit. These easy-to-make decorations can be personalized by creating unique shapes and hanging them in windows or on favorite trees at home.
Not only do these ornaments look beautiful, but they also make great gifts for loved ones—delightful additions to any decorative display! So why not grab some straws and let your creativity run wild?
Have fun crafting your one-of-a-kind decorations, and enjoy all that this wonderful season has to offer! Hopefully, these tips have provided valuable insights and inspiration to make your straw ornaments successful. Happy crafting!