
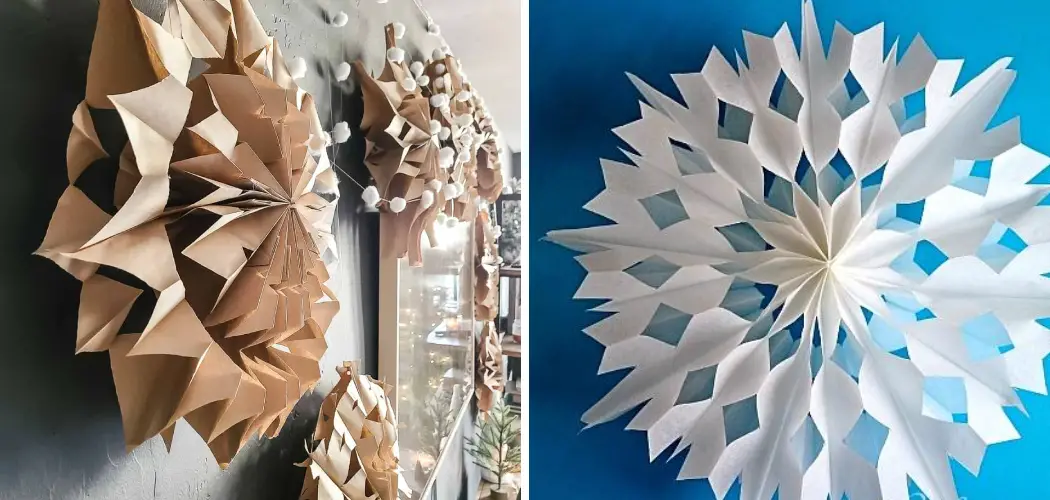
Are you bored of making snowflakes out of construction paper? Why not spice things up this winter with a DIY project that is not only creative but also frugal and eco-friendly – creating beautiful snowflakes out of old paper bags! Today, we’ll be giving you step-by-step instructions on how to make snowflakes out of paper bags.

Not only will these projects help get rid of the clutter in your home, but they’re also great for teaching kids about sustainability and the importance of recycling. So let’s dive in and start crafting some gorgeous and unique snowflakes that’ll bring a splash of color to any cold winter season!
What Is the Best Paper for Making Snowflakes?
The best paper for making snowflakes is a white paper. Hydrogen-bleached copy paper works well, as does craft or drawing paper. If you want to add some color, regular printer paper in various colors can be used.
Cardstock makes excellent snowflakes that are more durable but may be too thick for intricate designs. Paper bags also work well, though they may need to be cut down in size so the individual pieces are not too large and unwieldy. For a more rustic look, use brown kraft paper or waxed butcher paper.
Whichever type of paper you choose, make sure it isn’t too thin because it will tear easily when folded and cut. Whatever the material, keep it flat and smooth for the best results. Additionally, if you are using paper bags, make sure to flatten them out as much as possible.
Finally, it is helpful to use a sharp pair of scissors when cutting the snowflakes so that the edges remain crisp and clean. Once your materials have been gathered, you’re ready to start making some beautiful paper bag snowflakes!
10 Methods How to Make Snowflakes Out of Paper Bags
1. Gather Your Materials:
For this project, you will need four paper lunch bags, scissors, a hole punch, and optional craft supplies like markers, glitter glue, and googly eyes. If you are using markers or other craft supplies, make sure to put down a sheet of newspaper or a drop cloth to protect your work surface. However, if you want to keep supplies minimal, all you need is the four paper bags.

2. Cut Out the Snowflake Shape:
Start by cutting out your snowflake shape from the paper bag. Leave some pieces of paper uncut to form the stem of the snowflake. For a simple snowflake, cut along the edges of the paper to create an even shape. When done correctly, you should be able to hold up the paper and see a snowflake shape.
Next, if you would like to add more intricate details to your snowflake, use scissors to cut along the edges of the paper and make more cuts to create different angles. You can also use a hole puncher to add small circles to your snowflake.
3. Fold Your Snowflake:
Fold up your paper bag like an accordion. Make sure to press down firmly and evenly on the paper bag so that your snowflake will turn out even. When you are done, your bag should be flattened and have at least eight folds.
If you want your snowflake to have an intricate design, make sure to fold it up very small. However, if you want a bigger snowflake, fold it up larger. To make sure that your snowflake is symmetrical, you can use a ruler to measure the size of each fold. When you are done, unfold your snowflake and admire it.
4. Cut Your Snowflake:
When you are done folding, use scissors to cut along the edges of the paper bag. This will give your snowflake its distinctive look. Be sure to be careful when cutting the bag, as you don’t want to cut too close and tear it. You can cut out different shapes, such as stars, circles, or snowflakes.
If you are feeling artistic, you can even make your own designs! When finished with the cutting, look closely at your snowflake. Does it need more definition? If so, use a pencil to draw lines in the paper bag and then cut out those lines. When you are finished, unfold your snowflake to see the beautiful design.
5. Punch Holes in Your Snowflake:
Using a hole punch, start punching holes along the sides of your folded paper bag at regular intervals. This will allow for more intricate designs when you unfold them later on. You can also create unique shapes by cutting with scissors.
Be careful not to cut too deeply, as you don’t want your snowflake to tear apart. However, the more daring can create bold creases and slits for a more dramatic effect. Though, if you prefer a more traditional look, it’s best to keep things simple with just a few holes.
6. Unfold Your Snowflake:
Carefully unfold your paper bag and take note of all of the unique shapes that have been created by cutting and punching. Once your paper bag snowflake is unfolded, you can hang it up or add more decorations, such as glitter and colored markers. You can also use a glue stick to attach more paper or other decorations.

If you want to make your snowflake look more realistic, use a white paint pen or glitter glue to add sparkles. Be creative and have fun! However, if you choose to decorate your paper bag snowflake, be sure to take a picture and share it with friends and family. Your unique snowflake will be a conversation starter for sure!
7. Make Final Adjustments:
At this point, you can make any final adjustments to your snowflake by folding or cutting sections of it as needed. You can also add some glitter for a festive look! When you’re finished, your paper bag snowflake should look like a beautiful winter wonderland!
Enjoy the holiday season with your own handmade snowflakes! If you want to make more, just start the process over and create a whole flurry of snowflakes! However you choose to use them, these snowflakes are sure to bring some festive cheer into your home. Try to involve the whole family to make it a fun holiday activity. Have fun and happy crafting!
8. Attach the Stem:
Using a piece of string or ribbon, attach the stem section of your paper bag snowflake to the main body of the snowflake. This will give it more stability when hung up on a tree or window display. Secure the stem to the main body of the snowflake with a piece of tape if needed. Hang your paper bag snowflakes with their ribbon or string and admire your beautiful handiwork!

Creating paper bag snowflakes is an easy, fun craft that can help you bring a touch of winter wonderland to your home during the holiday season. With just a few simple materials and steps, you can create beautiful snowflakes that will last through the entire season. So grab some paper bags and get started on your own winter masterpiece!
9. Hang Up Your Snowflake:
Now that your paper bag snowflake is finished hang it up and admire your work! It’s sure to be a great addition to any holiday decorating display. If you’re feeling extra creative, you can also try making a few snowflakes out of paper bags in different sizes and colors. The possibilities are endless! Additionally, you can even glue several snowflakes together to create a holiday-themed mobile. Just be sure that you hang it up securely, so it doesn’t fall and break.
10. Enjoy:
Don’t forget to take a few moments to appreciate your newly crafted paper bag snowflake! Congratulations, you did it! Enjoy the festive atmosphere, and don’t forget to share your snowflake creation with family and friends. However you choose to display your paper bag snowflake, it will be sure to bring festive cheer. Now you know to make snowflakes out of paper bags – so what are you waiting for
How Many Paper Bags Make a Snowflake?
The answer to this question depends entirely on the size of the paper bag you would like to use and the complexity of your snowflake design. For instance, if you are using smaller paper bags (think lunch-size), then one or two bags might be sufficient for a basic snowflake shape.
However, if you are looking for a more intricate snowflake design, then you will likely need at least four or five paper bags. You can even combine multiple sizes of paper bags to create a more elaborate snowflake. The possibilities are nearly endless!

Conclusion
Take some downtime this winter season and make it special by making some delightful paper bag snowflakes with family or friends! Who knows, you may even end up inspiring others with your beautiful creations! So let go of those boring holiday traditions and express your creativity this season by learning how to make snowflakes out of paper bags!