
Crafting whimsical and vibrant pom poms adds a touch of playfulness to a wide array of DIY projects, from home decor to accessories. One of the most efficient and user-friendly tools for creating these delightful yarn embellishments is the pom pom maker. Whether you’re a seasoned crafter or a novice looking to infuse some creativity into your projects, learning how to make pom poms with pom pom maker.

In this article, we’ll guide you through the simple yet rewarding process of using a pom pom maker, providing step-by-step instructions and tips to ensure your pom poms turn out fluffy and uniform. From choosing the right yarn to mastering the winding technique, this comprehensive guide will empower you to effortlessly incorporate these charming accents into your crafting repertoire.
Introduction to Pom Pom Makers as a Convenient Tool
A pom pom maker is a handy tool when it comes to making fluffy and colorful pom poms. It eliminates the need for cardboard or other improvised methods, making the process of creating pom poms quicker and more efficient. With this simple yet effective tool, you can easily make perfect pom poms of various sizes in no time.
Pom pom makers come in different shapes and sizes, but they all serve the same purpose – to help you create beautiful and uniform pom poms effortlessly. They are widely available in craft stores or can be purchased online at an affordable price. Whether you’re a beginner or experienced crafter, a pom pom maker is definitely a must-have tool in your crafting arsenal.
Different Types and Sizes of Pom Pom Makers
If you are looking to make pom poms, using a pom pom maker can make the process much quicker and easier. Pom pom makers come in various types and sizes, so it’s important to understand your options before making a purchase.
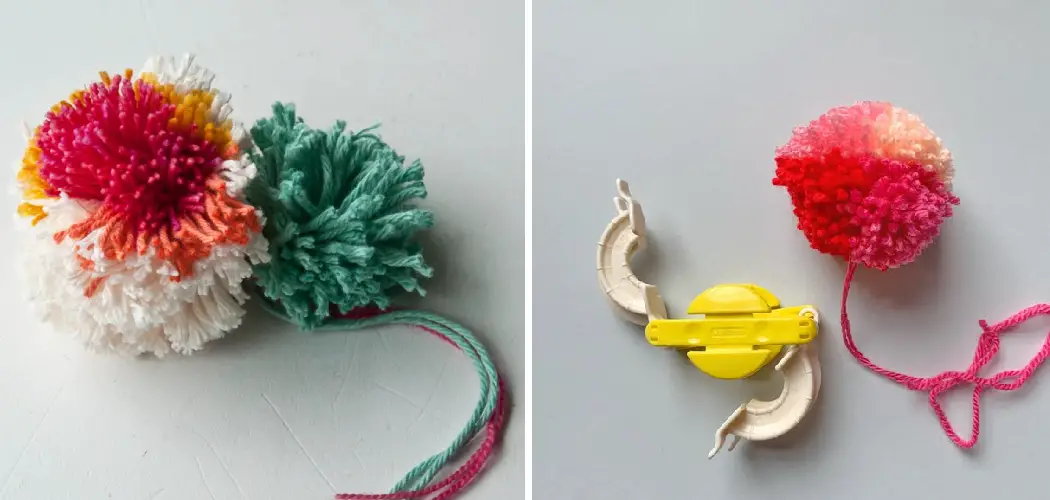
One of the most common types of pom pom makers is the plastic donut style maker. These are usually sold in sets with different sizes, allowing you to make pom poms of different sizes. They are easy to use and can create fluffy and full pom poms.

Another popular type is the Clover pompom maker which has a unique shape that resembles a bow tie. This type of maker allows you to easily trim your pom pom into the desired shape, making it perfect for more intricate designs.
There are also pom pom makers made from wood and metal, which are often used for larger projects or making multiple pom poms at once. These tend to be sturdier and more durable than plastic makers, but they can also be more expensive.
When it comes to sizes, most pom pom makers range from small (around 1 inch) to large (over 4 inches). Some makers may even have extra-large sizes for giant pom poms. It’s important to consider what size pom poms you want to make before choosing a pom pom maker.
Aside from the different types and sizes, there are also electric pom pom makers available that can quickly create multiple pom poms with the push of a button. These are great for those who want to save time and effort, but they can be quite expensive.

10 Methods How to Make Pom Poms with Pom Pom Maker
1. Gather Materials
Before you begin making pom poms with a pom pom maker, you will need to gather all the necessary materials. You will need a pair of scissors, yarn in the color of your choice, and a pom pom maker. If you don’t have a pom pom maker, you can make one using cardboard or plastic.
2. Choose Your Yarn
Once you have gathered all the materials, it is time to choose your yarn. You can use any type of yarn for your project but be sure to select one that is not too thin or thick as this may affect the outcome of your project.

3. Cut Your Yarn
Once you have chosen your yarn, it is time to cut it into pieces that are approximately 8 inches long. You will need two pieces for each pom-pom, so if you are making several then cut enough pieces accordingly.
4. Start Wrapping Your Pom Pom Maker
Now that you have all the materials ready, it is time to start wrapping your pom-pom maker with yarn! To do this, take one piece of yarn and loop it around one side of the maker until it is completely covered in yarn. Then repeat on the other side with another piece of yarn until both sides are covered in an even layer of yarn.
5. Tie Off The Yarn
Once both sides are completely wrapped in yarn, tie off each end securely using a double knot and cut off any excess yarn at the ends. This will ensure that your pom-poms stay together when finished!
6. Trim The Loose Ends
Now it’s time to trim any loose ends that may be sticking out from your pom-poms so they look neat and tidy when finished! Use sharp scissors to carefully trim away any excess pieces of yarn so they are even with the rest of the wrap on each side of the maker.

7. Remove The Pom Pom Maker
Once your loose ends have been trimmed away, carefully remove your pom-poms from their makers by gently pulling them apart at each end until they come free from their molds! Be careful not to pull too hard as this could cause them to unravel or break apart!
8. Fluff Up Your Pom Poms
Now that your pom-poms have been removed from their makers, give them a good fluffing up by gently shaking them out and separating any strands that may be stuck together! This will help give them a nice round shape when finished!
9. Tie A Knot At The Center Of Each Pom Pom
Take one strand from each side of each individual pompon and tie them together in a tight knot at the center point where all strands meet up! This will help keep everything secure while also giving each individual pompon its own unique shape and texture when finished!

10. Trim Away Any Excess Strands And Enjoy Your Finished Product!
The last step is to trim away any excess strands that may still be sticking out after tying off the center knot on each individual pompon! Once this has been done simply enjoy your beautiful handmade creations – perfect for crafting projects or simply adding some extra flair to any outfit!
Things to Consider When Making Pom Poms
When it comes to crafting, making pom poms is a fun and versatile activity that can add a touch of color and texture to your projects. Whether you’re making them for home decor, clothing embellishments or just for fun, having the right tools and techniques can make all the difference in creating beautiful and fluffy pom poms.
Choose the Right Size Pom Pom Maker
Pom pom makers typically come in sizes ranging from small to extra large, with the larger ones creating bigger and fluffier pom poms. When deciding on the size of your pom poms, consider what you will be using them for and how prominent you want them to be in your project.
Smaller pom poms may work well for delicate projects such as jewelry or smaller home decor pieces, while larger pom poms may be better suited for accent pieces on clothing or bigger home decor items.
Use the Right Yarn
The type of yarn you use can greatly affect the final look and feel of your pom poms. For a fluffier and fuller pom pom, opt for thicker yarns such as wool or acrylic. Thinner yarns can also be used, but may result in a less dense and more stringy pom pom.
Don’t Overstuff the Maker
When using a pom pom maker, it’s important not to cram too much yarn into each section as this can make it difficult to properly close the maker, resulting in uneven or lopsided pom poms. Instead, it’s best to fill each section about three-quarters full, leaving enough room for the yarn to move and fluff up when trimmed.
Trim Carefully
Once you have closed and secured your pom pom maker, it’s time to trim your pom pom into shape. Using sharp scissors, carefully cut through all the loops in the sections of the maker, being sure not to cut the tie strings holding the pom pom together. After trimming, give your pom pom a gentle shake and fluff up any areas that may need it.

Conclusion
In summary, using a pom pom maker to create your own pom pom projects is an easy-to-do activity for kids at home or in the classroom. It can be enjoyed by people of all ages, regardless of their crafting skills and abilities. Plus, you’ll have an endless supply of fun things to do with your pom poms: from creating decorations for rooms or parties to making handmade gifts or accessories.
No matter the project you choose, we guarantee it will be colorful and unique! So what are you waiting for? Grab some yarn today and start trying out different techniques on how to make pom poms with pom pom maker, explore various color combinations, and add a little bit of handmade charm to your life.