
Making your own poinsettias is a delightful and festive way to add a touch of holiday cheer to your home decor. Whether you want to create a centerpiece for your holiday table or adorn your mantel with vibrant floral accents, crafting poinsettias allows you to personalize your decorations. In this article, we will guide you through the process of how to make poinsettia step by step.

From selecting the right materials and colors to shaping the petals and assembling the flowers, we’ll provide you with the knowledge and inspiration how to make poinsettia. Get ready to unleash your creativity and infuse your holiday season with the elegance and charm of these iconic holiday blooms.
The Beauty and Symbolism of the Poinsettia Flower
The poinsettia is a traditionally festive flower with red, white, pink or even yellow blooms. It is the perfect choice for holiday decorations and gifts, but it holds much more than just a decorative value. Dating back to the Aztecs of Mexico, the poinsettia is rich in symbolism.
According to Mexican legend, an impoverished girl on her way to church was inspired by an angel to gather some weeds from the roadside and offer them to Jesus as a gift. When she arrived at church, the weeds had transformed into beautiful red poinsettias. Since then, these flowers have symbolized faithfulness and hope through difficult times.
Today, poinsettias are often associated with Christmas celebrations and the holiday season. They also have special meaning for those who practice Christianity, since the splendor of the red blooms represents the Star of Bethlehem.
This star was said to have guided the Three Wise Men in their travels to find Jesus Christ in Bethlehem. The poinsettia is therefore a reminder of how God’s love and grace can be found even in unlikely places.
In addition to religious significance, poinsettias are also associated with good fortune, wealth, and success. Ancient Aztec warriors believed that the blood-red color of these flowers symbolized courage and bravery on the battlefield. Even today, people often give poinsettias as gifts during celebrations or special occasions to wish someone luck and prosperity in life.

The Versatility and Joy of Making Paper Poinsettias as Decorations
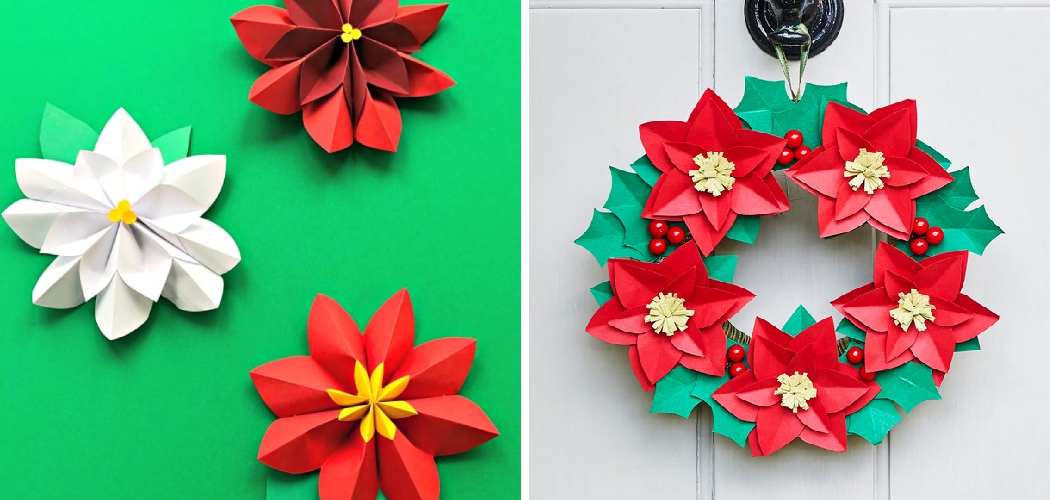
Making paper poinsettias is a great way to decorate for the holidays. Poinsettias are seen in many places during this festive season, from homes and businesses to churches and public spaces. With some basic craft materials and a few simple instructions, you can make your own unique paper poinsettia decorations.
Paper poinsettias are incredibly versatile. You can use them as wall hangings, ornaments, or even stylish centerpieces for holiday tables. To get started, you’ll need construction paper in assorted colors (red, green, yellow, pink and white), scissors or a craft knife, glue stick and adhesive foam dots or squares.
Although making paper poinsettias is easy enough for kids, it’s also a fun and creative project for adults.
To start, cut your construction paper into small, even-sized squares. Then fold each square in half twice to create four petal-shaped sections. Once the petals are formed, roll each one slightly from the center outward to give them a more realistic shape and texture. Secure the rolls with glue or adhesive dots/squares in order to hold their form.
Next you’ll need to assemble your poinsettia layers. Begin by gluing eight of the petal sections together around a central point; this will become your first layer of leaves. To add subsequent layers, glue four petal sections around the center of your first layer, and then repeat the process until you have a full poinsettia.
Discuss Different Material Options for Making Paper Poinsettias
When making paper poinsettias, you have a variety of material options that can be used to create your flowers. Traditional craft paper is a popular choice for creating these festive decorations, but there are other materials that can be used as well.

A few examples include cardstock, foam sheets, tissue paper, and fabric scraps. Each material will provide a slightly different look to the finished product; so it’s important to consider which material best fits the desired style you’re going for before starting your project.
10 Methods How to Make Poinsettia
Method 1: Gather Materials
Begin by gathering the necessary materials to create your poinsettias. Besides the red and green construction paper, scissors, pencil, hot glue gun, floral wire, green floral tape, and yellow or gold pom-pom, you may also want to gather additional embellishments like ribbons, glitter, or artificial snow to further enhance the beauty of your poinsettias.
Method 2: Create Petal Templates
Using your pencil, draw various petal shapes on the red construction paper. Poinsettia petals are typically large and pointed at the ends, resembling the shape of an elongated leaf. Cut out the petal shapes, ensuring smooth edges, and set them aside. You can create different sizes and shapes of petals for added dimension and variety in your poinsettias.
Method 3: Shape the Petals
To give your poinsettia petals a more realistic and natural look, gently curl the edges of each petal. You can achieve this by using the blade of the scissors and running it along the edges of the petals.
Apply slight pressure as you move the blade from the base to the tip of each petal. This process will add depth and dimension to the petals, mimicking the characteristic curl of real poinsettia flowers.
Method 4: Form the Flower Base
Cut a small circle from the green construction paper to serve as the flower base. This base will provide a stable foundation for attaching the petals. Apply a small amount of hot glue to the center of the base and carefully position the larger petals around it.
Start with the outer layer, slightly overlapping the petals to create a pleasing arrangement. Continue layering the smaller petals toward the center, ensuring each petal is securely glued in place.

Method 5: Add the Center
To mimic the appearance of the yellow flower clusters found in poinsettias, glue a yellow or gold pom-pom to the center of the flower base. Apply a dab of hot glue to the center and press the pom-pom firmly onto the glue, securing it in place. Adjust the size of the pom-pom to match the proportion of your poinsettia and ensure it stands out as the vibrant center of the flower.
Method 6: Create Leaf Templates
Using the green construction paper, draw leaf shapes in various sizes. Poinsettia leaves are typically long and narrow with pointed tips. Add curves along the edges of the leaves to resemble their natural contours. Cut out the leaf shapes, ensuring clean lines and smooth edges. You can create different sizes and shapes of leaves to add visual interest and create a fuller and more realistic appearance.
Method 7: Attach Leaves
Apply a small amount of hot glue to the bottom of each leaf and carefully position them around the base of the flower, alternating their sizes and angles. This will create a lush and leafy appearance, replicating the foliage found on poinsettia plants. Vary the placement of the leaves to achieve a balanced and natural look, ensuring they are securely glued in place.
Method 8: Wire Stem
Cut a piece of floral wire to your desired stem length, considering the intended use and display of your poinsettias. Attach one end of the wire to the back of the flower base using hot glue, ensuring it is securely fastened.
Wrapping the wire with green floral tape will not only provide stability but also create a finished and seamless stem. Begin wrapping the tape at the base of the flower and continue down to the end of the wire, securely anchoring the tape as you progress.
Method 9: Make Multiple Poinsettias
To create a captivating display, make multiple poinsettias in various sizes. Experiment with different petal shapes, colors, and leaf arrangements to add variety and visual interest. You can make smaller poinsettias to use as accents or larger ones to serve as focal points. Combine different sizes and colors to create a stunning arrangement that captures the essence of these iconic holiday flowers.
Method 10: Display and Decorate
Once you have completed your poinsettias, consider different ways to display and decorate them. Arrange them in a vase as a standalone centerpiece or use them to adorn wreaths, garlands, or gift wrap.

To further enhance their festive appeal, incorporate additional elements like ribbons, glitter, or artificial snow. Let your creativity guide you as you create a captivating and personalized display that brings the beauty and warmth of poinsettias to your holiday decorations.
Conclusion
With this guide handy, you can make your own poinsettia and let it bloom in all its festive glory. To keep the beautiful blooms alive, take care to water the plant once every week or two and when leaves begin to fall, reduce watering. Be sure to also give your poinsettia a warm spot with lots of sunlight—and don’t forget to pinch the blooms at the end of winter!
Make sure you don’t overdo it with fertilizing as too much can cause damage so stick to low-nitrogen formulas during summertime. Follow these simple instructions outlined in this blog post about how to make poinsettia, and you’ll be able to get the job done with ease.