
Fall is in the air, and everyone loves a good craft project to get into the spirit of the season. This year, why not try your hand at making some beautiful felted pumpkins? The changing of the seasons means embracing all the wonderful things that come with it, and this autumn, there is no better way to celebrate its arrival than to learn how to make your very own felted pumpkins!
This craft not only looks stylish as an interior decoration or centerpiece but can also be used in a variety of ways, from creating garlands and wreaths to gifting friends or family.
Felting is an easy way to create striking three-dimensional shapes out of wool with just a few simple steps of how to make felted pumpkins. No matter what your level of crafting experience may be, felted pumpkins are easy enough for even beginners to attempt.
Not only are felted pumpkins perfect for decorating around your home during autumn months, but you can also incorporate them into other crafts like wreaths or garlands. In this blog post, I’ll walk you through detailed instructions on how to make your own felted pumpkins that will delight all who see them!
What is Felted Pumpkin?
Felting is a craft where wool fibers are manipulated and compressed into different shapes, creating a dense fabric that can be used for various projects. Felted pumpkins look like real pumpkins but are made with wool instead of real gourds.
You can use any type of wool roving you prefer to make the pumpkin, from merino or alpaca wool to mohair or even recycled sweaters. The end result is beautiful decorations that can be used around your home during autumn months, as well as incorporated into other crafts like wreaths and garlands.
Materials Needed
- Wool Roving (any type of your choice)
- Felting Needle
- Foam Mat
- Scissors
- Yarn (optional)
- Thread (optional)
10 Ways on How to Make Felted Pumpkins
1. Gather Supplies
Gather the materials for your project. You’ll need wool roving, a felting needle, a foam mat, scissors (optional), yarn (optional), and thread (optional). Also, have a bowl of water handy. If you have all of these supplies, you’re ready to start making your felted pumpkin!
2. Create the Core
Take some wool roving and roll it into a ball in the palm of your hand. The size will depend on how big or small you want your pumpkin to be. Insert the felting needle through the center of this wool ball several times to ensure the fibers are compacted. This will be the core of your pumpkin, so make sure it is as firm as possible.
3. Add Shapes
Take some more wool roving and roll it into an oval shape, then attach it to the core that you made in step 2 with your felting needle. This will be the elongated body of your pumpkin. Add more wool roving around this body, shaping it into a pumpkin-like shape and adding bumps or indentations to give it texture.
4. Felt the Pumpkin
Once you have added all the shapes to your pumpkin, use your felting needle to feel it firmly together. Work from the center out and pay attention to make sure all seams are firmly felted together.
5. Trim the Wool
Once your pumpkin is completely felted, use your scissors to trim away any excess wool that may be sticking out of it. Do this carefully, as you don’t want to damage or destroy your hard work!
6. Add Features
At this point, you can add any features or decorations to your pumpkin if you wish. For example, if you want to make a jack-o-lantern, use your felting needle and wool roving to create two eyes, a nose, and a mouth on the front of your pumpkin. You can also add a stem or leaves to the top of your pumpkin.
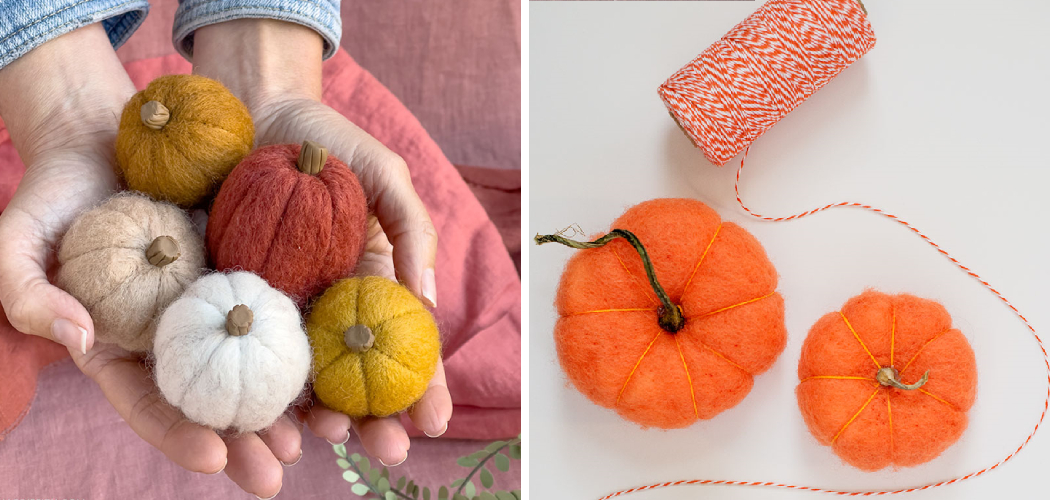
7. Add Yarn (Optional)
If you want to give your pumpkin a unique look, add some yarn around its body. Take some yarn and wrap it around the circumference of your pumpkin, felting it in place with your needle as you go. Make sure to secure the yarn at the beginning and end for a clean look.
8. Add Thread (Optional)
You can also use thread to add details or decorations to your pumpkin. Use embroidery floss or any other type of sturdy thread you have, and stitch it into your felted pumpkin using a thin needle. You can use this technique to create stripes, circles, or any other pattern you like.
9. Add the Stem
At this point, you have finished making your pumpkin, and it is ready for its stem! Take a piece of wool roving and shape it into an elongated cone shape (or any other shape that looks like a pumpkin stem). Attach it to the top of your pumpkin with your felting needle.
10. Final Touches
Your felted pumpkin is now complete! Give your pumpkin a final trim and shape, if necessary, then set it aside to admire your work. You can use it as decor in your home or give it away as a gift to a friend or family member. Congratulations on making your very own felted pumpkin!
Now that you know how to make felted pumpkins, let your imagination run wild and create one of the most unique decorations this autumn season! Experiment with different shapes, sizes, and colors of wool roving and see what you can come up with.
7 Tips to Make the Felted Pumpkins Last Longer
1. Choose felting wool with a high content of animal fibers such as merino, alpaca, or angora. The more natural the fiber is, the better it will last over time. It will also give your felted pumpkins a more realistic look and feel.
2. Keep the wool clean when you’re fetling it. Dirt and oils from your hands can cause the fibers to degrade over time, leading to an overall decrease in the quality and shape of your pumpkins. Use gloves if necessary to avoid transferring any dirt or oils to the wool.
3. Use a strong needle that can easily penetrate through the layers of felt. If you are using an embroidery or tapestry needle, switch to a felting needle instead, as it is designed specifically for this purpose. A strong needle will make sure your pumpkins last longer and won’t fall apart prematurely.
4. Make sure to felt each layer together as you build your pumpkin by using a back-and-forth motion with the needle. This will help ensure that everything is connected firmly and won’t come apart easily over time.
5. Use additional details such as embroidery floss or ribbons to give your pumpkin a more finished, professional look. This will also help keep the pieces in place as you continue to work on your pumpkin.
6. Store your felted pumpkins in a cool, dry place away from direct sunlight. Sunlight can cause the colors of the wool to fade over time and make it prone to damage or wear. Keep them inside a box or container for safekeeping.
7. If possible, get an acrylic sealant spray and lightly mist it over the surface of your pumpkin to provide extra protection against dirt and wear. This will also help keep the colors vibrant for longer periods of time. While this step is not required, it is recommended if you want your felted pumpkins to stand the test of time.
With these tips, you can rest assured that your felted pumpkins will last for many seasons to come! Have fun crafting your own unique felted pumpkins, and enjoy the festive season!
Frequently Asked Questions
How Long Will It Take to Finish the Project?
Making felted pumpkins typically takes about two to four hours. The exact time depends on the size of the pumpkin and your skill level. If you are a beginner, it may take you longer. While working, make sure to take regular breaks, so you don’t get too tired.
How Much Will It Cost?
Making felted pumpkins is fairly inexpensive. You will need a few supplies, such as wool roving, foam pumpkins, fabric stiffener, and other materials. The cost of these items can vary depending on where you buy them from. Generally, the total cost should be around $20 to $30. Also, keep in mind that you can reuse materials for multiple projects.
Conclusion
Crafting a felted pumpkin from wool roving is a great way to create a unique, beautiful item for autumn. The process is relatively simple and the result is a stunning piece that looks like it came from an artisan shop. Not to mention, it’s an eco-friendly project since you can use materials found in your home or reuse wool scraps. Have your friends over this fall and make felted pumpkins together!
This is a craft activity everyone will enjoy, and they’ll be proud of their creations when they take them home. For an even more festive feeling, try matching the color of your handmade pumpkin with your favorite wardrobe piece for added style.
Get creative and create the perfect felted pumpkin for any autumn décor scene! Why not start now? Take out those supplies and get ready to craft yourself with this guide on how to make felted pumpkins to have something fun!