
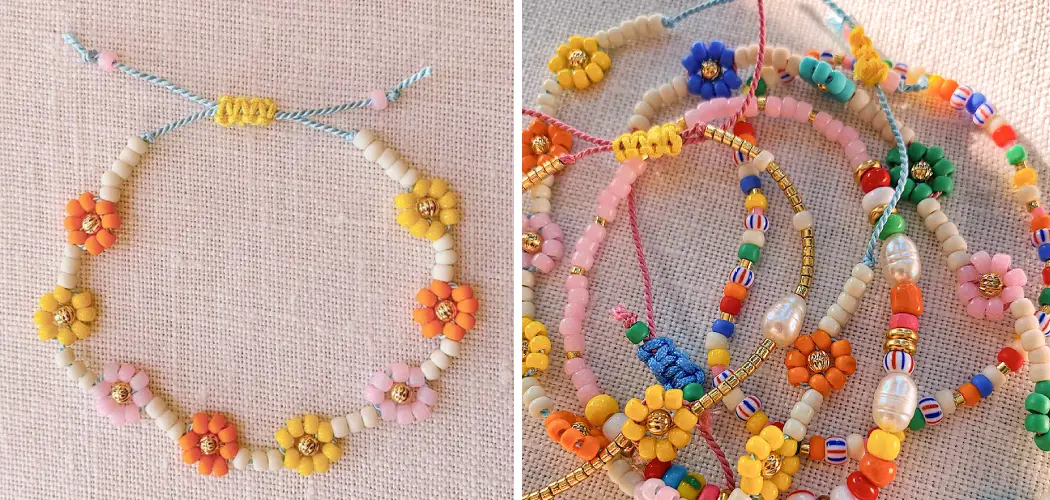
Beaded daisy bracelets are a delightful and charming accessory that adds a touch of elegance to any outfit. The beauty of these bracelets lies in their simplicity and versatility, making them a perfect choice for both casual and formal occasions.
Creating your own beaded daisy bracelets is not only a creative and enjoyable experience but also allows you to customize the design to suit your personal style. In this article, we will guide you through the step-by-step process of how to make beaded daisy bracelets, from selecting the beads to assembling the daisy pattern.

With a few basic materials and a dash of creativity, you can craft stunning beaded daisy bracelets that showcase your craftsmanship and add a unique touch to your jewelry collection. Let’s embark on this beading adventure and create beautiful daisy bracelets that will brighten your wrist and evoke admiration from those around you.
Beaded Daisy Bracelets and Their Appeal
Beaded daisy bracelets are a timeless fashion statement. They bring a little bit of simplicity and whimsy to any ensemble. Not only that, but they can also be made quickly and affordably by anyone with basic crafting skills. Whether you’re looking for an easy gift or something special to make yourself, creating a beaded daisy bracelet is the perfect way to get that unique piece with a vintage flair.
To make a beaded daisy bracelet, you’ll need the following materials:
- A range of different beads – Round and flat-backed glass are popular choices
- Stretch or wire cord
- Needle nose pliers
- Scissors (optional)
- Jewelry clasps
Once you have all your supplies ready, you can begin creating your bracelet. Begin by cutting two lengths of cord, each at least 8 inches long. Now take one of the cords and thread your beads onto it in a circular pattern to form the daisy shape.
Try using contrasting colors to make the daisy design even more eye-catching. When the daisy is complete, tie a knot at each end of the cord and use your pliers to secure them.

Now you can add the desired length to your bracelet by attaching the second piece of cord. Start with one end and thread it through both knots on the daisy. Then alternate between looping the cord around daisy beads and adding new beads until you reach the desired length for your bracelet.
Once you’ve reached the right size, make a knot at each end of the cord and secure it with pliers to finish off your beaded daisy bracelet.
The Materials and Tools Needed for Bracelet Making
Making a beaded daisy bracelet is easier than you think! All it takes are some basic materials and tools to get started. Here’s what you’ll need:
- Seed beads of various sizes, colors and shapes
- A beading needle
- Beading thread
- Scissors
- Clear tape or glue for securing the ends
- Beading mat (this will help you keep your beads organized while you work)
Once you have all of these supplies gathered, you’re ready to start making the bracelet! Begin by threading the needle with a length of beading thread that is about two feet long. Since this project will use small seed beads of varying sizes and shapes, it’s important to make sure that the thread is securely tied off at both ends to prevent any beads from coming undone.
Next, arrange your seed beads on the beading mat according to the pattern you want for your bracelet. You can use different colors and shapes of beads to create a unique look for your finished product.
11 Methods How to Make Beaded Daisy Bracelets
Method 1: Gather Materials
Before you begin making beaded daisy bracelets, take the time to gather all the necessary materials. The key components you will need include:
Beads: Select an assortment of small round beads to represent the daisy petals. You can opt for seed beads, glass beads, or any other type that complements your design and color scheme.

Center Bead: Choose a slightly larger or differently shaped bead to act as the center of the daisy. This bead will be the focal point of your bracelet.
Beading Thread: Use strong and durable beading thread that suits the size of your chosen beads. Nylon thread or beading wire are excellent options that offer flexibility and strength.
Beading Needle: A thin beading needle with a small eye will facilitate the threading of beads and allow you to create intricate patterns with ease.
Scissors: Keep a pair of sharp scissors handy to cut the beading thread cleanly and neatly when needed.
Clasp or Closure: Consider the type of clasp or closure that best suits your bracelet design and personal preference. Lobster clasps, toggle clasps, magnetic clasps, or even sliding knots are popular choices.
Jump Rings: If your chosen clasp does not come with jump rings, have some available to attach the clasp securely to the bracelet ends.
Jewelry Pliers: Keep a set of jewelry pliers on hand to open and close jump rings, and to attach the clasp smoothly and securely.
Method 2: Measure and Cut Beading Thread
Before you start beading, measure and cut a length of beading thread that is slightly longer than your desired bracelet length. It’s always better to have extra thread than to fall short during the creative process. You can trim any excess thread later when finishing the bracelet.
Method 3: Thread the Needle
Thread one end of the beading thread through the eye of the beading needle. Ensure that the thread is secured, and there are no knots or tangles, as this will make the beading process smoother and prevent frustrating snags.
Method 4: Start Stringing Beads
Begin the bracelet by stringing the center bead onto the beading thread. This bead will be the focal point of your daisy design and will determine the overall appearance of the bracelet. Position the center bead in the middle of the thread, leaving enough space on either side to create the daisy petals.

Method 5: Create the Daisy Petals
To create the daisy petals, begin by stringing a specific number of beads onto the thread and then push them close to the center bead. The number of beads for each petal will depend on the size of your chosen beads and the desired fullness of the daisy. For a delicate and intricate look, you can use a higher number of beads, or for a simpler design, use fewer beads for each petal.
Method 6: Bring the Thread Back
After completing one petal, bring the beading thread back through the center bead and the first bead of the petal you just created. This step will secure the petal in place and create a connection between the petals and the center bead, forming the first petal of the daisy.
Method 7: Repeat the Process
Continue creating daisy petals by stringing beads, bringing the thread back through the center bead, and securing each petal in place. To maintain the daisy’s symmetrical appearance, space the petals evenly around the center bead. As you add more petals, gently push them closer to the center to create a snug and cohesive daisy shape.
Method 8: Experiment with Petal Variations
While creating the daisy pattern, you can experiment with different petal variations to add depth and uniqueness to your bracelet design. Try alternating bead colors or sizes for each petal, or incorporate metallic or translucent beads to create a captivating interplay of light and color. The beauty of beading lies in the opportunity to let your creativity flourish.
Method 9: Finish the Daisy
Continue adding petals until you are satisfied with the size and fullness of your daisy. Typically, daisies have five or six petals, but feel free to adapt the number to suit your vision. The final daisy will serve as the centerpiece of your beaded bracelet.

Method 10: Add a Beaded Band
To complete the bracelet, string additional beads onto the beading thread after finishing the daisy. These beads will form the band of the bracelet and provide a comfortable fit around your wrist. You can use a single color for a cohesive look or create a pattern with different colored beads to complement the daisy design.
Method 11: Attach the Clasp
Once you have reached your desired bracelet length, it’s time to attach the clasp. Depending on the type of clasp you’re using, employ jump rings and jewelry pliers to secure the clasp to the bracelet ends. Be sure to fasten the clasp firmly to ensure the bracelet stays securely on your wrist.
Conclusion
In conclusion, making beaded daisy bracelets is a fun and creative activity that helps you get into the summer feeling. The possibilities are truly endless when it comes to color combinations and different techniques for creating beautiful motifs with beads.
It’s a great project to do with friends and family, or even as a solo venture! Now that you know the basics of how to make beaded daisy bracelets, why not give it a try yourself?
Whether you’re just starting out in jewelry-making or already an experienced designer, there are endless creative ways to make beaded daisy bracelets. We invite you to explore and find new ways to create beaded daisies that speak to your own unique style. Remember: anything goes!