
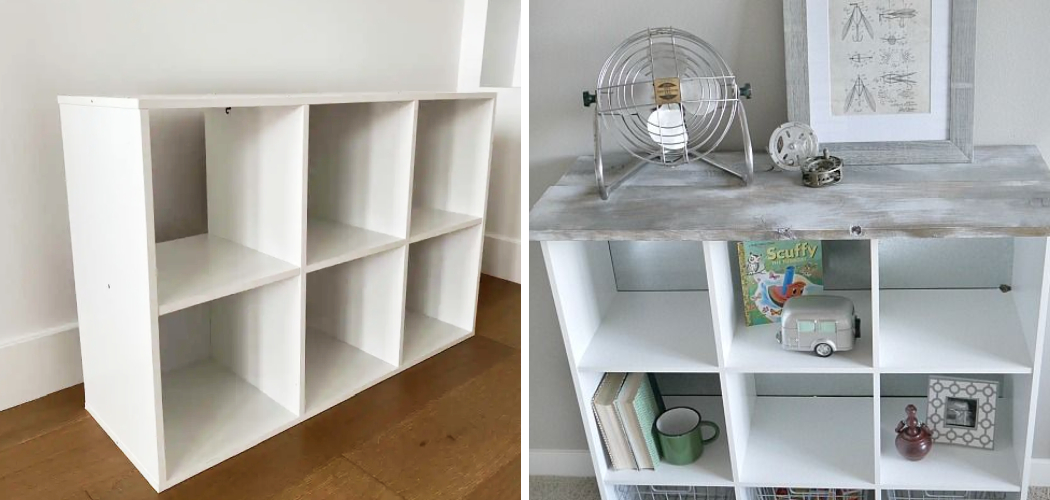
Storage cubes are versatile and practical solutions for organizing and decluttering any space. Whether you need storage for your home, office, or classroom, making your own storage cubes allows you to customize the design, size, and functionality to suit your specific needs. In this article, we will guide you through the process of how to make a storage cube from scratch.

From selecting the right materials and measurements to cutting, assembling, and finishing the cube, we will cover all the essential steps. Whether you’re a DIY enthusiast or a beginner, making a storage cube is a satisfying and rewarding project that will help you create a more organized and tidy environment.
Get ready to unleash your creativity and enhance your storage capabilities with a homemade storage cube that perfectly fits your space and style.
Benefits of Homemade Storage Cubes
Homemade storage cubes offer many benefits over store-bought versions. For starters, they are affordable and can be customized to fit any home’s specific needs.
They can also be built using different materials, such as wood, plastic, or fabric, depending on the desired look and function of the cube. Furthermore, DIY storage cubes allow for a much more personal touch and can be decorated to fit any interior design.
Additionally, they are much more durable than store-bought options, as they are constructed with quality materials and can last for many years without any problems. Finally, making storage cubes at home provides an enjoyable hobby that will bring a sense of creative fulfillment when the project is finished.
With all these advantages, homemade storage cubes are a great way to stay organized while also adding a unique element to your space. Additionally, you can rest assured knowing that you are helping to reduce the amount of plastic and other materials used by purchasing store-bought versions. The possibilities with DIY storage cubes are simply endless!

Factors to Consider Before Making a Storage Cube
Before making a storage cube, there are a few factors to consider that will determine the overall size, shape and purpose of your cube. The first factor is the purpose of the cube. Are you looking for a decorative piece or do you need extra storage? Knowing what function the cube will serve can help narrow down your options.
For example, if you’re using it as a decorative piece, you may opt for a smaller cube with an interesting design. If you need extra storage, then a larger one might be more suitable. The second factor is how much space you have available in the area where the storage cube will go.
The last thing you want is to make something too big that won’t fit in the area. Measure out the area to ensure that your storage cube will be able to fit comfortably in its designated spot.
The third factor is the materials you’re going to use for your cube. Different materials have different advantages and disadvantages – wood may look more aesthetically pleasing, but plastic might be cheaper and easier to clean. Consider how long-lasting and resilient each material is, as well as whether or not it will suit the room’s style.
Identifying the Purpose and Use of the Storage Cube
Before you begin to make a storage cube, it’s important to think about the purpose and use of the cube. Consider what items you’ll be storing in the cube, such as clothing, books, toys, etc. This will help determine the size and type of materials needed to construct your storage cube.

If you plan on using multiple cubes together for larger items like blankets or pillows, make sure that all of the cubes are an equal size so they fit together well.
Additionally, consider how much weight your storage cubes need to support. Depending on what you’re storing, lightweight materials may not be suitable for heavier objects. It’s also important to decide where you want your storage cubes placed – this will help you decide which type of material you should use.
If your storage cubes will be in a room without much ventilation, avoid materials like wood that can warp or swell in high humidity environments.
Once you identify the purpose and use of your storage cube, it’s time to start building! You’ll need to gather all of the necessary materials and tools before beginning the project. It’s important to have everything on-hand so that you don’t have to make unnecessary trips during the construction process. Make sure to double check that you have everything you need before getting started.
10 Methods How to Make a Storage Cube
1. Gather Materials:
Start by gathering the necessary materials for making a storage cube. This typically includes plywood or MDF boards, screws or nails, wood glue, a circular saw, a drill, a tape measure, and sandpaper for smoothing the surfaces.
To make the storage cube more attractive, you may also want to buy wood stain, paint, or wallpaper. Although it is possible to make a storage cube with just wood and screws, these additional materials can help create a more attractive look.
2. Measure and Cut the Panels:
Measure and mark the dimensions for the sides, top, bottom, and back panels of the storage cube on the plywood or MDF boards. Use a circular saw to carefully cut along the marked lines. Ensure precise and straight cuts for accurate assembly.

Smooth the edges with a sandpaper to prevent splinters. Use an adhesive spray or wood glue to attach two panels together at 90-degree angles, and clamp them together until the adhesive dries. Repeat this step for all sides, top, bottom, and back panels of the storage cube.
3. Sand the Panels:
Use sandpaper to smooth the edges and surfaces of the cut panels. This step helps remove any roughness or splinters, creating a polished finish. Next, you need to join the panels together.
To do this, you can use a variety of methods depending on the look and feel you want to create. Glue and nails are popular choices, but you can also use screws, dowels or even duct tape! Whatever method you choose, make sure it is strong and secure enough to hold the cube together.
4. Assemble the Panels:
Begin assembling the storage cube by attaching the sides to the top and bottom panels. Apply wood glue along the edges and use screws or nails to secure them together. Ensure the panels are aligned and square, using a square tool or measuring diagonally.
To strengthen the cube, use corner braces inside each corner. Make sure all screws and nails are securely fastened. If the cube needs to be portable, consider using wheels or handles. However, fasten these securely as well.
5. Reinforce the Joints:
To reinforce the joints and ensure stability, add additional screws or nails along the edges where the panels meet. This step provides extra strength and prevents the cube from wobbling or coming apart. Alternately, you can use glue or adhesive to hold the panels together.
Make sure that the glue dries completely before moving on to the next step. Finally, you can use corner brackets to reinforce the joints and add extra stability. Attach each bracket to two adjoining panels using screws or nails, and secure the brackets into place.
6. Add the Back Panel:
Attach the back panel to the assembled cube. Apply wood glue along the edges of the back panel and use screws or nails to secure it to the sides, top, and bottom panels. This step completes the basic structure of the storage cube. If desired, you can add additional supports along the edges of the back panel to reinforce it.

7. Sand and Finish the Cube:
Use sandpaper to smooth any rough surfaces or edges of the assembled cube. Pay attention to corners and edges to create a seamless and polished finish. Consider applying paint, stain, or varnish to protect and enhance the appearance of the cube.
At this point, you have a fully functional storage cube that can be used for nearly any purpose. You can customize the look of your cube further by painting it, adding decorative trims, or even adding fabric for a unique look.
8. Install Shelves or Dividers:
If desired, add shelves or dividers to customize the storage cube’s interior. Measure and cut additional panels to fit inside the cube, and attach them securely using screws, nails, or shelf brackets.
The shelves and dividers can be used to organize items by size, shape, or purpose. For instance, use a shelf to separate out heavier items like books, and use dividers to organize small items like tools.
9. Add Handles or Knobs:
Enhance the functionality and aesthetics of the storage cube by attaching handles or knobs to the front panels. Choose hardware that complements the style of your cube and provides easy access to the contents. Use a drill to make holes in the front panels, then attach the handles or knobs using screws.
10. Personalize and Decorate:
To add a personal touch, consider decorating the storage cube with paint, stencils, decals, or adhesive wallpaper. You can also apply fabric or contact paper to the interior surfaces for a pop of color or pattern.
Conclusion
Making a storage cube is not as difficult as it may seem. Taking a few weekends and organizing your supplies, you can have the perfect space to organize and store items that often find themselves scattered all over the house.
By following these easy steps on how to make a storage cube, you can stay organized and clutter-free in no time. And when you’re done, why not take it one step further and add custom labels or trinkets to make your storage cubes truly unique? Share your creations with friends and family—they may be inspiring someone else to do the same!
You Can Also Check This Out to Pack Hats in a Suitcase