
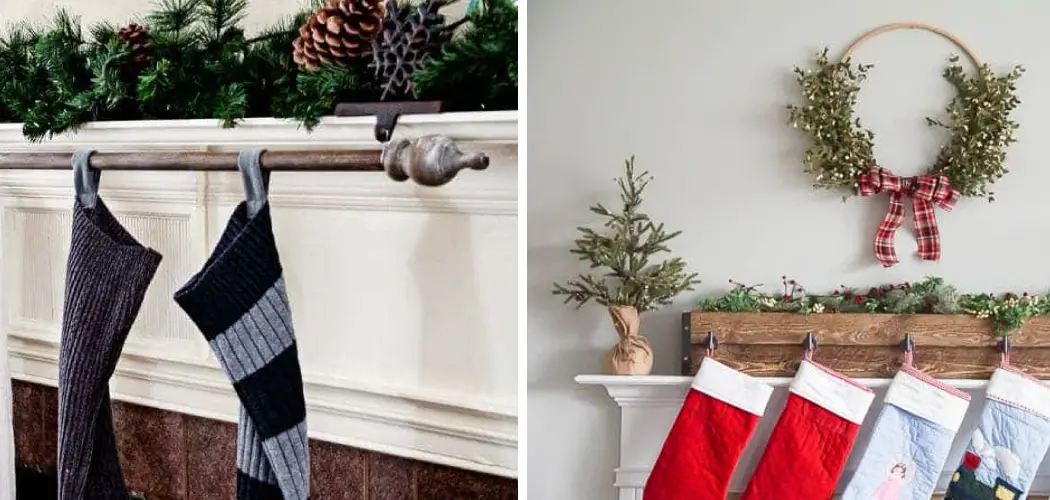
Stocking holders are an essential part of Christmas decorations. They serve as a perfect way to hang stockings in front of the fireplace or on a wall without damaging them.

While you can easily buy stocking holders from any store, making your own adds a personal touch and makes it unique. Stockings are an essential part of the holiday season, and what better way to display them than with a beautiful stocking holder.
Not only do they add charm and character to your fireplace mantel or shelves, but they also serve as a practical solution for hanging stockings without damaging your walls. In this blog post, You will learn in detail how to make a stocking holder.
Materials You Will Need
- 2×4 wood board
- Saw
- Sandpaper
- Paint or Wood Stain
- Paintbrush or Rag for Staining
- Measuring Tape
- Pencil
- Drill
- Screws
- Hooks
Step by Step Processes for How to Make a Stocking Holder
Step 1: Inspect Your Materials
Before you begin the process of making a stocking holder, make sure you have all the necessary materials. Take stock of what you have and what you still need to acquire.
Step 2: Choose Your Design
Stocking holders can be made in various designs, from simple to elaborate. Consider your personal style and choose a design that appeals to you. Using a measuring tape, mark and cut the wood pieces according to your desired design. Remember to wear protective gear such as gloves and goggles while handling tools.
Step 3: Sand the Edges
Smooth out any rough edges on the wood with sandpaper. This will ensure that your stocking holder is safe to handle and prevents splinters. Using wood glue and clamps, assemble the cut pieces of wood according to your chosen design. Allow time for the glue to dry completely.
Step 4: Add Decorative Elements (Optional)
If you want to add a personal touch, you can paint or decorate your stocking holder using various materials such as paint, glitter, or stickers. On the top of your stocking holder, drill evenly spaced holes using a power drill. These will be used to hang the stockings.
Step 5: Attach Hooks
Insert hooks into the drilled holes and secure them in place with screws or bolts. Make sure they are tightly secured to avoid any accidents. To add stability to your stocking holder, you can attach a base using wood glue or screws. This is especially helpful if you have heavier stockings.
Once everything is assembled and secure, it’s time to display your homemade stocking holder. Hang up your stockings and enjoy the festive addition to your holiday decor.
Safety Tips for How to Make a Stocking Holder
- When working with tools and materials, it is always important to wear protective gear such as gloves, safety goggles, and a dust mask. This will help prevent any potential injuries or accidents.
- Make sure to use the appropriate tools for each step of making your stocking holder. Improper tools can cause damage to the materials and also increase the risk of accidents.
- If you are using hot glue or a hot glue gun, be sure to handle them with caution as they can cause burns. Keep them away from children and pets.
- When using power tools such as a drill or saw, make sure to follow all safety guidelines and keep your hands away from moving parts.
- When working with wood, always make sure to cut away from your body and keep your fingers clear of the blade.
- Be careful when handling small or sharp objects such as nails or screws. They can easily cause injuries if not handled properly.
- Lastly, be aware of the potential fire hazards when making a stocking holder with candles or other flammable materials. Always have a fire extinguisher nearby and never leave a lit candle unattended.

These safety tips are important to keep in mind when making your own stocking holder. By following these precautions, you can ensure a safe and successful project. Remember to always prioritize safety while working with tools and materials.
How Long Does It Take to Make a Stocking Holder?
The time it takes to make a stocking holder can vary depending on the materials and techniques used. However, on average, making a basic stocking holder can take about 1-3 hours. Materials such as wood, metal, or clay may require additional time for cutting, shaping, and drying.
Embellishments and decorations like paint, glitter, or fabric can also add to the overall time spent on the project. For a more complex and detailed stocking holder, it can take anywhere from 4-8 hours or even longer. This includes creating intricate designs and incorporating multiple materials for a unique finish.
Keep in mind that crafting is meant to be an enjoyable and relaxing activity, so don’t worry too much about the time it takes. Take your time and have fun creating your very own personalized stocking holder. Remember, the end result will be a beautiful addition to your holiday decor for years to come.
Cost of Materials and Supplies
The overall cost of your DIY stocking holder will ultimately depend on the materials and supplies you choose. If you’re looking to add a personal touch to your holiday decor, making your own stocking holder is a great option. Not only can it be customized to fit your style and needs, but it can also be more cost-effective than purchasing one from a store.
However, the cost of materials and supplies can vary depending on the type of stocking holder you want to make. In this guide, we will break down the general costs for making a stocking holder so you can plan accordingly. Here is a breakdown of potential costs for different types of stocking holders:
1. Wooden Stocking Holder

If you have basic carpentry skills and access to tools, you can easily make a wooden stocking holder. The cost of wood will vary depending on the type and quality you choose, but it typically ranges from $10-$30.
2. Metal Stocking Holder
Similar to wooden stocking holders, metal holders require some DIY skills and tools. The cost of materials will depend on the type of metal (e.g. iron, steel) and can range from $20-$50.
3. Mason Jar Stocking Holder
This is a popular choice for rustic or farmhouse-style decor. The cost of materials will include mason jars (typically $10 for a set of 4), hooks ($5-$10), and any additional decorative elements you want to add.
4. Personalized Stocking Holder
If you want to add a personal touch, you can opt for a customized stocking holder. This will include the cost of materials mentioned above, as well as any additional costs for personalization (e.g. stencils, paint).
Cost-saving Tips
1. Use Reclaimed or Repurposed Materials
Instead of buying new wood or metal, consider using materials you already have or can find at a thrift store.
2. Shop Sales and Use Coupons
If you’re purchasing materials from a craft or home improvement store, keep an eye out for sales and use coupons to save some money.
3. Borrow Tools
If you don’t have the necessary tools for your DIY project, consider borrowing them from a friend or family member instead of buying them.
Common Mistakes to Avoid
Making your own stocking holder can be a fun and creative project, but it’s important to keep in mind some common mistakes that could lead to unsatisfactory results. Here are a few things to avoid:
1. Not Measuring Properly

Whether you’re using wood or metal, accurate measurements are crucial for a sturdy and balanced stocking holder. Make sure to measure twice before making any cuts.
2. Using the Wrong Tools
Different materials require different tools, so be sure to use the correct ones for your project. This will not only ensure better results but also prevent any accidents.
3. Not Letting Paint or Stain Dry Completely
If you’re adding a decorative touch to your stocking holder with paint or stain, make sure to let it dry completely before handling. Otherwise, you risk smudging or ruining your design.
4. Not Considering Weight Limit
Stockings can get quite heavy when filled with gifts, so it’s important to consider the weight limit of your stocking holder while designing and constructing it. This will prevent any accidents or damage to your holder.
With these tips in mind, you can confidently make a stocking holder that fits your style and budget.
How Do You Troubleshoot Any Issues With Your Homemade Stocking Holder?
Once you have completed making your own DIY stocking holder, it is important to troubleshoot any potential issues that may arise. This will ensure that your stocking holder is safe and secure for hanging stockings during the holiday season. Here are some common troubleshooting tips for homemade stocking holders:
1. Check the Weight Capacity
One of the first things you should do is check the weight capacity of your stocking holder. This will determine how many stockings you can hang and the type of items that can be placed inside them. Make sure to evenly distribute the weight by hanging an equal number of stockings on each side.
2. Test Stability
It is important to test the stability of your homemade stocking holder before hanging any stockings. Gently pull on each stocking to make sure the holder can withstand the weight without tipping over. If you notice any instability, consider adding more support or adjusting the design.

3. Reinforce Weak Points
As with any DIY project, there may be weak points in your stocking holder design. It is important to reinforce these areas to prevent any accidents from occurring. This could include using extra screws or adding additional support beams.
4. Consider the Material
The type of material used for your stocking holder can also affect its stability and weight capacity. If you notice any issues, consider using a stronger or thicker material for added support.
5. Use Appropriate Hanging Materials
When hanging your stockings, make sure to use appropriate materials such as strong hooks or sturdy nails. This will ensure that your homemade stocking holder stays in place and can support the weight of the stockings.
6. Check for Loose Parts
Over time, your homemade stocking holder may become loose due to wear and tear or frequent use. It is important to regularly check for any loose parts and tighten them as needed to maintain stability.
By following these troubleshooting tips, you can ensure that your homemade stocking holder is safe and secure for hanging stockings during the holiday season. Remember to always be cautious when placing heavy items in your stockings and never overload your stocking holder beyond its weight capacity.
Conclusion
In conclusion, stocking holders are a fun and easy way to decorate your home during the holiday season. Not only are they practical, but you can also customize them to match your personal style and decor.
By following these simple steps, you can create a beautiful stocking holder that will be the envy of all your guests. First, gather all necessary materials such as wood boards, paint or stain, screws, and hooks. Then, measure and cut the boards to your desired size. Next, assemble the boards using screws and attach the hooks securely.
Finally, you can add any personal touches such as painting or stenciling designs onto the holder. I hope reading this post has helped you learn how to make a stocking holder. Make sure the safety precautions are carried out in the order listed.