
Adding twine to a wood sign is a beautiful way to give it a unique and rustic look. Twine is a versatile material that can be used to create different designs and patterns, making it a popular choice for DIY enthusiasts.
However, many people struggle with attaching twine to a wood sign, and that’s what we’ll be discussing in this blog post. We’ll be sharing some tried and tested methods on how to attach twine to wood sign like a pro.

Can You Attach Twine to The Wood Sign?
Adding twine to a wooden sign is a fun and stylish way to give it a rustic and handmade feel. The good news is that attaching twine to a wood sign is easy and can be done in a matter of minutes, no matter what your experience level with DIY projects may be.
There are several ways to do this, but one popular method is to drill small holes into the top of the sign and thread the twine through them, tying a knot at each end to secure it in place. Alternatively, you can also use a powerful adhesive to stick the twine directly onto the surface of the sign, creating a clean and polished look.
No matter which method you choose, adding twine to your wooden sign is a great way to make it stand out in any room and add a touch of personality to your home decor.
Why Should You Attach Twine to The Wood Sign?
Wood signs are a popular way to add personality to your home decor. If you’re looking for a way to take your wood sign to the next level and really make it stand out, consider attaching twine to it. Twine is a versatile and rustic material that can add a touch of charm and character to any sign.

Not only does it look great, but it also adds practicality. By attaching twine to your wood sign, you can easily hang it up on a wall or door without having to worry about nails or other hardware. So why settle for a plain old wood sign when you can elevate it with the simple addition of twine?
The Ultimate Guide on How to Attach Twine to Wood Sign
1. Choose the Right Twine
The first step to attaching twine to a wood sign is to choose the right twine. There are different types of twine available in the market, such as hemp twine, jute twine, and cotton twine. Choose a twine that suits your project’s theme, and make sure it’s thick enough to hold its shape and not too thin that it looks flimsy.
2. Prepare the Wood Sign
Once you have your twine, the next step is to prepare the wood sign. Make sure it’s sanded and smooth to prevent splinters. Also, ensure that the surface is clean and free of dust and debris. You can use a damp cloth to wipe the surface and let it dry before attaching the twine.
3. Use Glue to Secure the Twine
One of the best ways to attach twine to a wood sign is to use glue. Apply a thin layer of glue to the back of the twine and place it on the wood sign. Press the twine firmly so that it sticks to the wood. You can use a clothespin to hold it in place while the glue dries.
4. Staple the Twine
Another method to attach twine to a wood sign is by stapling it. Mark where you want to attach the twine on the wood sign using a pencil. Then, use a staple gun to attach the twine to the wood. Make sure you staple it firmly, so the twine doesn’t come off.

5. Wrap the Twine Around the Wood Sign
The next method is wrapping the twine around the wood sign. Start by tying a knot at one end of the twine and wrap it around the wood sign in a criss-cross pattern. Make sure you’re wrapping it tightly and secure it at the end with another knot. This method requires patience and attention to detail, but the end result is worth it.
6. Use Binder Clips to Secure the Twine
Binder clips are a great way to attach twine to a wood sign without having to use glue or staples. Simply open up the binder clip and place it on the back of the twine, then press it firmly against the wood sign. This method is incredibly easy and secure, and it won’t damage the wood sign.
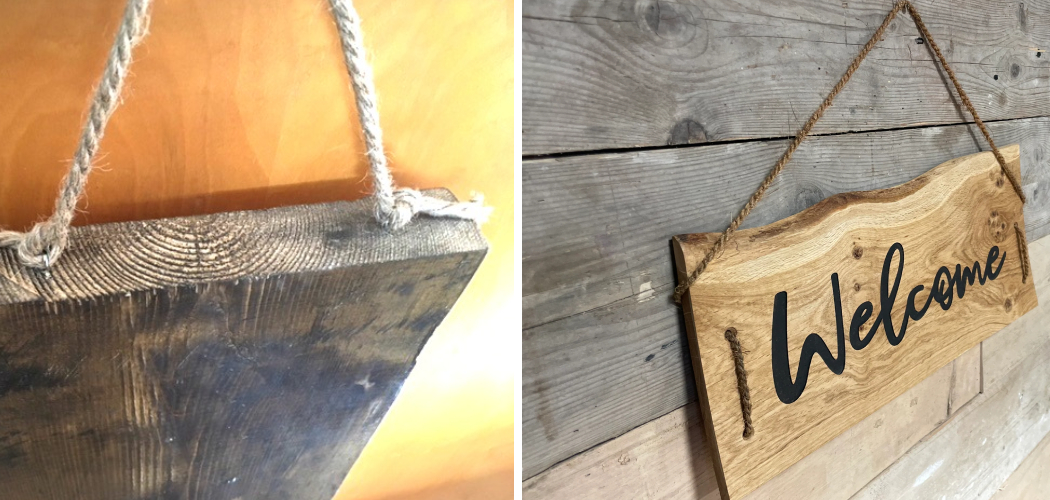
7. Hang the Twine from Holes in the Wood Sign
If you want to add a decorative touch to your wood sign, try hanging twine from holes in the wood sign. Make two small holes on each side of the wood sign (you can use a drill or a hammer and nail). Then, thread a piece of twine through the holes and knot it at the back. This will create a beautiful, rustic look on your wood sign.
Now that you know how to attach twine to wood sign like a pro, why not give it a go? You’ll be amazed at how beautiful and unique your wood sign will look with some twine! If you need any more help, feel free to reach out and we’ll be happy to help.
5 Considerations Things When You Need to Attach Twine to Wood Sign
1. Type of Wood
When attaching twine to a wood sign, it is important to consider the type of wood that the sign is made from. Different types of wood require different methods for attaching twine and some may be more difficult than others.

For example, softwoods such as pine or cedar are easier to work with than hardwoods such as oak or mahogany. It is also important to make sure that the wood is dry and free from any moisture before attempting to attach the twine.
2. Type of Twine
The type of twine used when attaching it to a wood sign will also have an impact on how successful the attachment will be. Natural fibers such as cotton or jute are good choices for softer woods, while synthetic materials such as nylon or polyester are better suited for harder woods.
Additionally, thicker twines tend to be more durable than thinner ones and can handle heavier loads without breaking.
3. Adhesive
When attaching twine to a wood sign, it is important to use an appropriate adhesive that will hold up over time and in different weather conditions. Hot glue is often used for this purpose due to its fast drying time and strong bond, however, other adhesives such as epoxy or super glue can also be used depending on the application.
Make sure that whichever adhesive you choose is suitable for use with both the type of wood and twine being used in order to ensure a secure attachment.

4. Knots & Loops
Knots and loops are commonly used when attaching twine to a wood sign in order to create a decorative effect or provide additional support for heavier items being hung from the sign.
Common knots include square knots, sheet bends, bowline knots, half hitches, and figure eight knots while common loops include lark’s head knots, figure eight loops, slip knots, and cow hitch knots.
It is important to ensure that all knots are tied securely so they do not come undone over time which could lead to damage or injury if something were to fall off the sign unexpectedly.
5. Finishing Touches
Once the twine has been attached securely using an appropriate adhesive and knotting technique it is important not to forget about finishing touches such as trimming away any excess material or adding decorations like beads or charms for a more attractive look. This step can help take your project from average looking craft piece into something truly unique!
Benefits of Attach Twine to Wood Sign
Adding twine to a wood sign not only adds a lovely rustic touch but also provides some practical benefits. The twine allows for the sign to easily hang from various surfaces like nails, hooks, or knobs. This flexibility is great for those who like to switch up their decor often or for those who don’t want to commit to drilling holes into the wall.
Additionally, the twine adds a subtle texture to the sign which can enhance the overall aesthetic of the piece. So not only does attaching twine to a wooden sign look beautiful, but it also provides added functionality for displaying the sign in different spaces.
Some Common Mistakes People Make When Trying to Attach Twine to Wood Sign
When it comes to attaching twine to a wood sign, there are a few common mistakes that people make that can be easily avoided. One of the most common mistakes is not using the right type of twine or adhesive for the job. It’s important to select a twine that is strong enough to hold the weight of the sign and won’t break or fray over time.

Another mistake is not ensuring that the twine is attached securely enough to the sign. It’s important to use enough adhesive and tie the twine securely to the back of the sign to prevent it from loosening or falling off. Taking these small but important steps can make a huge difference in ensuring your twine-attached wood sign stands the test of time.
Conclusion
Now that you know how to attach twine to a wood sign, you can start experimenting with different designs and patterns. Remember to choose the right twine, prepare the wood sign, and use the method that suits your project’s needs. With these simple steps, you can transform any plain wood sign into a rustic masterpiece! Thanks for reading our post about how to attach twine to wood sign.