
Are you curious about Norse mythology and its symbols of power? Are you looking for a creative way to connect with the ancient traditions of this fascinating culture? Runes, mystical letter-like symbols used in communication by early Nordic societies, can be an enlivening expression of wisdom and determination. If you’ve ever wanted to make your own runes, then follow these easy steps to discover how it’s done!

Rune-making is a simple but sacred process. It involves imbuing each symbol with your own intention and energy, which gives them their unique meaning. Creating runes can be an empowering experience as you connect with the natural elements and channel your inner creativity.
Learn more about how to make a rune as we guide you through the necessary materials and methods to craft your very own one-of-a-kind runes.
What Will You Need?
To make your own runes, you will need:
- Small stones or crystals
- A permanent marker or paint
- A pouch or small bag to store the runes in
Choose your preferred material for the stones or crystals, making sure they are smooth and of similar size.
9 Easy Steps on How to Make a Rune
Step 1. Cleanse Your Material:
Before you start making your runes, cleaning your chosen stones or crystals is essential. This can be done by rinsing them with water, letting them sit in the sunlight, or smudging them with sage. This process removes any negative energy and prepares them to absorb your intentions.

Step 2. Select the Runes Symbols:
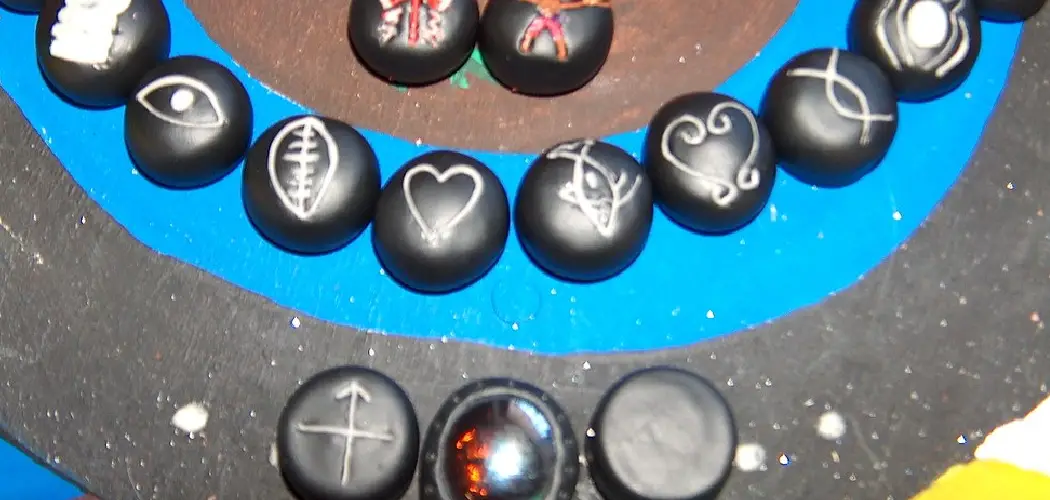
Once your stones or crystals have been cleansed, the next step is to choose which rune symbols you wish to inscribe. Several ancient runic alphabets exist, but the Elder Futhark is the most commonly used in rune-making. It consists of 24 symbols, each with a specific meaning and energy. Take time to study and understand the different symbols before making your selection. You can create a full set of runes or focus on a few specific symbols that resonate with you.
Step 3. Mark the Runes Symbols:
After selecting your rune symbols, it’s time to mark them onto your stones or crystals. Using a permanent marker or paint, carefully draw each rune symbol onto a separate stone or crystal.
Ensure your lines are clear and thick enough to withstand frequent handling. It may be helpful to practice drawing the symbols on paper until you are comfortable with their shapes. Remember to imbue each rune with your intention as you inscribe it, as this gives the rune its power.
Step 4. Allow the Runes to Dry:
After marking the rune symbols, let them dry completely. This process will ensure that the markings do not smudge or fade away. During this time, you may meditate on the meanings and energies of each rune, further infusing them with your intentions. Once dry, these runes are ready for use.

Step 5. Store Your Runes:
Once your runes are dry, finding a suitable place to store them is crucial. A pouch or small bag is perfect for this purpose, as it provides protection and makes it easy to carry your runes around. When choosing a pouch, consider using a fabric that resonates with you, as this will further enhance the personal connection to your runes.
You could also decorate the pouch with symbols or colors that are personally significant to you. Once the pouch is ready, place your runes inside, and they are prepared for use in divination, meditation, or any other personal ritual you prefer.
Step 6. Energize Your Runes:
This step involves infusing your runes with energy. You may do this through visualization, meditation, or simply holding them in your hands and focusing your intent. Imagine a white light flowing from your hands into each rune, imbuing them with your energy and intention. This process personalizes and deepens your connection to the runes, preparing them for their intended purpose.
Step 7. Use Your Runes:
Now that your runes are energized and ready to be used, you can start incorporating them in your daily life. This can be through divination, meditation, or as an inspiration for personal reflection. If you’re using them for divination, shuffle the runes in their pouch and then draw one or more in a reading. Each rune you draw will provide insight or guidance based on its meaning. Similarly, you can meditate on a specific rune, focusing on its symbol and energy, to better understand its significance in your life.

Step 8. Respect Your Runes:
It’s important to remember that runes are not merely stones with symbols painted on them. These are sacred objects imbued with intent and energy. They should be treated with respect. Avoid throwing them around or handling them carelessly. Instead, take a moment each time you use them to appreciate their power and significance.
Also, it’s highly recommended to regularly cleanse your runes, much like you did in the very first step of creating them. Running them under water, smudging, or simply setting them in sunlight can keep their energy clean and potent. This practice ensures the longevity of your rune set and maintains its effectiveness during use.
Step 9. Regularly Recharge Your Runes:
Like any other metaphysical tool, runes can lose energy over time, mainly if used frequently. Therefore, it is crucial to recharge your runes regularly. This can be done in various ways. Some people prefer to restore their runes by setting them under the full moonlight, which is known to have potent, energetic properties.
Others may choose to bury them in the earth, allowing the grounding energy of the planet to replenish their potency. Alternatively, you can hold each rune, meditate, and visualize energy flowing into it. Choose a method that resonates with you; remember, the intention is critical in this process. Recharging your runes replenishes their energy and re-establishes your connection with them.
Following these nine simple steps, you can create your own powerful runes. Remember, the key to their effectiveness lies in your connection and intention.
5 Additional Tips and Tricks
- Choose the suitable material: Crafting a rune requires a material that can withstand the energy inscribed into it. This can be anything from stones and crystals to pieces of wood. Select a material that resonates with your purpose.
- The power of symbolism: When making your rune, remember the design’s symbolic importance. Each rune has a unique meaning and energy associated with it.
- Focus and Intention: While carving out your rune, focus on it. This will imbue the rune with your energy and purpose.
- Cleaning and consecration: After you’ve made your rune, it’s crucial to clean and consecrate it. This process purifies the rune and aligns it with your energy and intention.
- Practice and Patience: Making a powerful rune takes time and practice. Take your time with the process. Remember, it’s a journey of learning and growth.
With these additional tips and tricks, you can enhance your rune making skills and create powerful tools for manifesting your desires.

5 Things You Should Avoid
- Using Unfit Materials: Avoid using brittle materials that cannot hold the carved symbols. Materials like thin glass, plastic, or materials that quickly erode can hamper the longevity of your rune.
- Rushing the Process: Take your time with carving your runes. Remember, making a rune is as significant as the end product itself.
- Irregular Cleaning: Neglecting the regular cleaning of your runes can hinder their effectiveness. Dust and dirt can accumulate and block the energy channels.
- Lack of Focus: Avoid creating runes when you’re distracted or stressed. The energy you put into the rune can affect its potency, so being in the right state of mind is crucial.
- Disregarding Symbolism: Refrain from undermining the importance of the correct symbols. Misrepresentation of a rune symbol can lead to unintended energies being invoked. Each rune has its unique representation, and it’s crucial to respect that.
By avoiding these common mistakes, you can ensure that your runes are powerful and aligned with your intentions. Remember to approach the rune-making process with patience and respect; you will create potent tools for manifestation.
Conclusion
From avoiding taking the easy way out and falling into bad habits to stepping away from toxic people, staying positive, and working hard to achieve one’s goals – these are five things everyone needs to avoid to lead a happy and successful life. Taking risks in life can often yield great rewards. But even then, we must be mindful of the risks we accept and ensure that we’re not putting ourselves in a position for greatness or failure – especially if the risk is entirely unnecessary.
Hopefully, the article on how to make a rune has provided you with valuable knowledge and insight into the process of rune making. With patience, practice, and a solid connection to the symbolism of each rune, you can create powerful tools for manifesting your desires in life.
Use these tips and tricks as a guide, but always trust your intuition and let it guide you in creating your own unique runes. Happy crafting!
You can check it out to Crochet a Puff Stitch