
Are you looking for a fun and creative way to spruce up your home decor? If so, why not try making a punch needle rug? Punch needle rugs are easy to make and require minimal supplies – all you need is some fabric, yarn, backing material, and your trusty punch needle! Perfect for any level of craftsperson, this tutorial will teach you how to create beautiful punch needle rugs from start to finish.

Whether you’re in search of a one-of-a-kind handmade item or just want an engaging project that the whole family can participate in, learning how to make a punch needle rug sure to provide both satisfaction and enjoyment. So grab your supplies – let’s get started on creating some beautiful art!
The Importance of Punch Needle Rug
When making a punch needle rug, it is important to consider the backing material that will be used. This is because the backing will affect the overall look of your rug and how durable it is.
The ideal backing material should be able to provide enough support for all your punches without caving in or becoming too stiff. It should also have a tight weave so that the loops of your punch needle design won’t slip through.
In addition to choosing the right backing material, it is important to use the correct tools when making a punch needle rug. These include an embroidery hoop and a special punch needle tool. The right size of punch needle must also be chosen depending on the type of rug you are creating. This will ensure a consistent look for all of your stitches as well as make your work easier and faster.
Benefits of Making a Punch Needle Rug
Punch needle rug making allows you to create a unique and beautiful piece of art for your home, all while having fun. Punch needle rugs are durable and can last for many years with proper care. They also provide an easy way to add texture and color to any room. The process of making the rug is relatively simple and can be done in a few hours, depending on the size of the project.
Additionally, punch needle rugs are relatively affordable compared to other types of handmade rugs, so it’s a great way to save money while still enjoying a luxurious interior decor item. Finally, they are perfect for anyone who loves crafting or wants to learn new skills; once you master the basics, there’s no limit to the creative possibilities.

With a few tools and supplies, you can make an impressive punch needle rug that adds character and comfort to your home.
Importance of Selecting the Right Fabric and Rug Backing
When making a punch needle rug, it is important to select the right fabric and rug backing. The fabric should be tightly woven so that the loops of yarn don’t pull through; natural fabrics such as cotton or linen work best. When selecting rug backing, you can choose from canvas, burlap, wool felt or non-skid matting. These materials provide structure and stability to your completed project.
To make sure the rug backing holds firm while stitching, lightly spray with an adhesive before starting your project. This will help keep everything in place as you work.
In addition to providing structural support for your work, having the correct backing also affects how much wear and tear your piece will endure over time. A good quality backing will ensure that your rug stays together for years to come.
Be sure to select a fabric and rug backing that is appropriate for the project and intended use. This way, you can be sure you’ll have a beautiful piece of art that will last for generations.
10 Steps How to Make a Punch Needle Rug
Step 1: Gather Materials
To make a punch needle rug, you will need the following materials: a punch needle tool, rug yarn or bulky-weight yarn, a fabric base (such as monk’s cloth or rug warp), a non-slip rug pad (optional), embroidery hoop or frame, scissors, and a design or pattern for reference.
Step 2: Select a Design and Prepare the Pattern
Choose a design or pattern that you would like to create on your punch needle rug. This could be a simple geometric pattern, an intricate motif, or a custom design of your own. Transfer the design onto the fabric base using a washable marker or transfer paper. Ensure that the design fits within the dimensions of your rug.
Step 3: Prepare the Fabric Base
Cut the fabric base to the desired size for your rug, leaving extra allowance for binding or finishing. If using monk’s cloth, secure it onto an embroidery hoop or frame to keep it taut during the punching process. If using rug warp, ensure it is securely stretched and anchored.

Step 4: Thread the Punch Needle
Thread the punch needle tool with the rug yarn or bulky-weight yarn of your choice. Cut a length of yarn and thread it through the eye of the needle, leaving a tail of approximately 2-3 inches. Hold the needle with the punch side facing down and adjust the needle’s depth setting according to the thickness of your fabric.
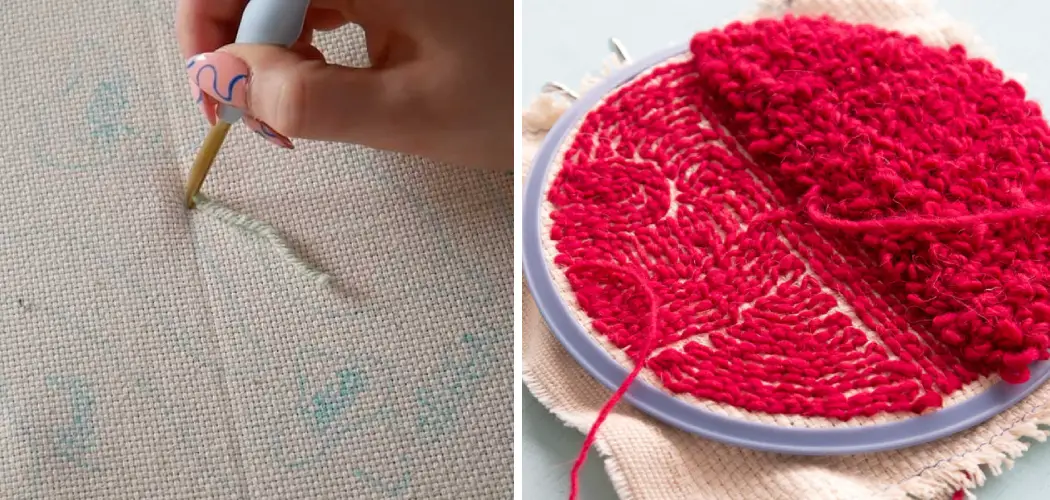
Step 5: Punch the Design
Starting from the backside of the fabric, insert the punch needle tool into the fabric at the starting point of your design. Push the needle through the fabric until it reaches the desired depth. Pull the needle back, but not all the way out, allowing the loop of yarn to stay on the surface. Repeat this process, following the design lines and filling in the areas with loops of yarn.
Step 6: Work in Sections
Divide your design into manageable sections to ensure even tension and consistent stitches. Punch one section at a time, moving from left to right or top to bottom, depending on your design. Keep the loops of yarn evenly spaced and avoid overlapping or pulling the loops too tight, as this can distort the design.
Step 7: Vary Colors and Textures
Experiment with different colors and textures of yarn to add depth and visual interest to your punch needle rug. Mix solid colors, variegated yarns, or even incorporate different types of fibers to create unique effects. Blend colors together or create gradients by transitioning from one color to another.
Step 8: Finish the Edges
Once you have completed the punching process, carefully remove the fabric from the embroidery hoop or frame. Trim the excess fabric, leaving a border of approximately 1-2 inches around the design. Fold the border to the backside of the rug and secure it with a whipstitch or blanket stitch to finish the edges.
Step 9: Backing and Finishing (Optional)
If desired, attach a non-slip rug pad to the backside of the rug to prevent it from sliding on smooth surfaces. Alternatively, you can sew or glue a fabric backing to the backside of the rug for added durability and stability. Trim any excess fabric or backing as needed.

Step 10: Display and Enjoy
Find the perfect spot to display your handmade punch needle rug and enjoy the fruits of your labor. Whether it’s in a living room, bedroom, or entryway, your rug will add a touch of handmade beauty and warmth to your space. Take pride in your creation and admire the intricate details and textures that make your punch needle rug a unique work of art.
Some Common Mistakes When Making a Punch Needle Rug
Punch needle rugs can be a fun and rewarding craft project, but they need to be done carefully in order for the results to look professional and attractive. Here are some common mistakes that people make when making their own punch needle rug:
1. Not Using the Right Type of Fabric:
Punch needle rugs require a tightly woven fabric, such as monk’s cloth or linen, to provide a smooth surface for the loops to form on. Using an unsuitable fabric could result in uneven loops or even pulling through of the material.
2. Not Doing Regular Maintenance:
To ensure your punch needle rug looks great and lasts long, it is important to do regular maintenance on it. This includes trimming any loose loops, brushing the rug to even out the loops and checking for any signs of wear. This should be done at least once a month.
3. Not Using Enough Thread:
Punch needle rugs require more thread than you might think. Make sure to use enough thread so that all the loops are secured in place and the rug is evenly covered with your design. If you run out of thread halfway through, then your rug will look uneven and unfinished.

Conclusion
Punch needle rug making is not as daunting as it may seem. With the right tools and a little know-how, anyone can do it. It’s a satisfyingly simple DIY project for all skill levels that adds a beautiful handmade touch to your home décor.
Not to mention, its a great creative outlet, too! Whether you’re looking for full on carpet coverage or just an accent touch of texture, punch needle rug making is definitely something that’s worth giving it a shot.
So don’t be afraid to roll up your sleeves, start punching and let your creativity go wild! Try out making one yourself with our inspiring tutorial on How to Make a Punch Needle Rug today and bring some unique personality into your home layouts like never before.