
Handkerchief dolls are a fun craft project for kids and adults alike! Not only can they be used as decorations, but these dolls also provide hours of creative playtime. The good news is that making your handkerchief doll is easy to do with just a few supplies. You only need some fabric, thread, stuffing material, and creativity.

Making a handkerchief doll can be a great way to teach children about sewing. It is also a fun and creative activity that can bring the entire family together. Not only does it teach children important skills such as stitching, but it also allows them to express their creativity uniquely. In this blog post, You will learn how to make a handkerchief doll in detail.
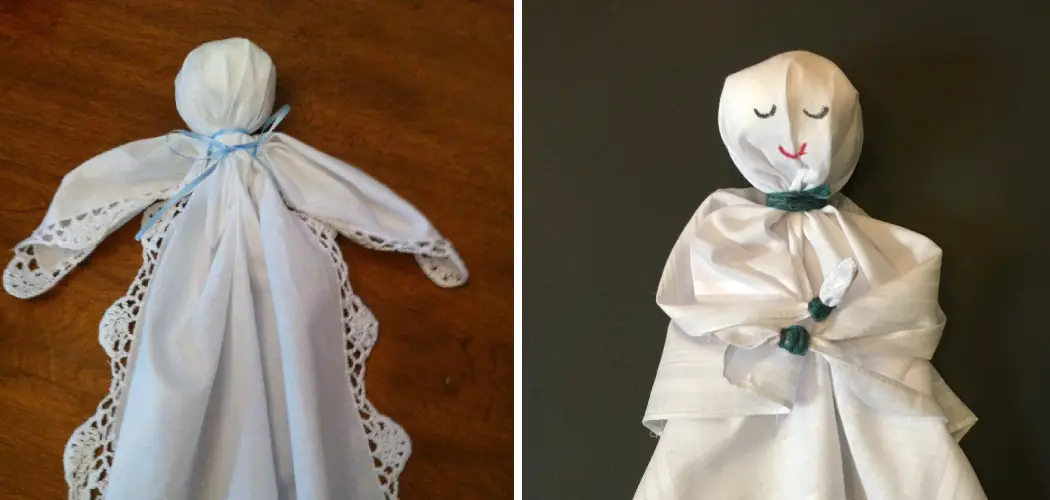
Step-by-Step Processes for How to Make a Handkerchief Doll
Step 1: Inspect the Handkerchiefs
Before starting to make a handkerchief doll, scrutinize the material of the handkerchief. You should check for any tears or holes that might have been made in it while being used as a normal handkerchief. Be sure to discard any questionable pieces before you begin constructing your doll.
Step 2: Cut Out Doll Pieces from Handkerchiefs
Now it’s time to start cutting out the pieces that will make up your handkerchief doll. Start by cutting the main body of the doll, head, and arms from one of the handkerchiefs. Then use a second handkerchief to cut out clothing for your doll, such as a dress or shirt and pants.
Now start to sew the pieces of your handkerchief doll together. Start with the body and head before adding the arms. Be sure to use a running stitch along all seams for added strength.
Step 3: Stuff Your Doll with Fiberfill
Next, you will need to stuff your handkerchief doll with fiberfill. This will give it a nice shape and keep its shape when moved around. Be sure to take care not to overfill your doll so that it still has flexibility for movement.

Now, you can add facial features such as eyes, nose, and mouth with felt or fabric scraps. Use a running stitch to sew these pieces on, and don’t forget to add eyelashes, eyebrows, and other facial details.
Step 4: Add Clothing To Your Doll
Now take the clothing items cut out in step 2 and attach them to your doll. You can use fabric glue or small stitches for this process. Ensure the clothes fit well and that you tuck in all fabrics for a nice finish. Now sew the doll’s hair onto the head of your handkerchief doll using yarn, ribbons, or other materials. Use any material you feel will give your doll personality and flair.
Step 5: Accessorize Your Doll
Add accessories such as hats, scarves, jewelry, and other items to your doll. Ensure the accessories are small enough not to weigh down the finished product. Finally, create a stand to display your handkerchief doll. You can make a stand out of a piece of dowel rod or use a block of wood that has been painted or decorated.
You have created your handkerchief doll. Now it’s time to show off your work and display it in a special place. Your friends and family will be sure to love this unique creation. Creating a handkerchief doll is fun and creative to upcycle an old handkerchief into something special.
It is also a great project for kids to help with, as it allows them to use their imagination and learn new skills such as sewing, cutting, and crafting.

Safety Tips for How to Make a Handkerchief Doll
- Read your pattern instructions carefully before beginning the project to ensure you understand what tools and materials are needed. Follow the instructions closely as you work, ensuring all the pieces line up correctly.
- Choose a fabric with a tightly woven texture so any small objects or decorations don’t get lost in it. Additionally, consider buying a pre-washed and preshrunk fabric to ensure the size of the doll won’t shrink after you make it.
- Use matching thread when sewing the pieces together to ensure each seam is durable and secure. Additionally, always use sharp scissors for cutting fabric, as dull scissors may cause fraying or misshapen fabrics.
- Choose any additional decorations carefully, considering the receiver’s age and the doll’s intended use. Avoid using small objects such as buttons or beads that may present a choking hazard to younger children.
- Stuff your handkerchief doll with hypoallergenic stuffing material to ensure its recipient isn’t allergic. Consider removing any tags or labels on the stuffing material before inserting it into the doll.
- To avoid choking, stitch the opening of the handkerchief doll securely shut so that none of its contents can come out. Alternatively, sew a fabric button over the opening to ensure it won’t open up unexpectedly.
- Ensure to supervise children when they play with the handkerchief doll. This is especially important for younger children to ensure that they don’t put pieces of the doll in their mouth or try to take it apart.
By following the above safety tips, you can ensure that your handkerchief doll is safe and enjoyable for all its users.

Is There a Particular Way I Need to Tie the Pieces Together at the End of the Project?
When it comes to tying the pieces of your handkerchief doll together, a few different techniques are available. The most common technique involves using a simple knot to tie each piece securely. Hold the fabric pieces in one hand and tie them together with a knot at the end, ensuring the knot is tight enough that it won’t come undone.
Additionally, you can use ribbon or tape to secure the pieces further. However, this is more of a decorative option than a practical solution, as it will only hold the pieces in place for a short period. Whichever tying technique you choose, ensure it is safe and secure to ensure that your handkerchief doll can withstand lots of playtime and hugs.
How Should You Store Your Handkerchief Doll to Keep It Safe and Secure?
Storing a handkerchief doll properly is essential to keeping it safe and secure. Here are some tips that can help:
- The best way to store a handkerchief doll is in a dust-free environment. An airtight container or box with acid-free tissue paper works best. Avoid storing them in cardboard boxes that tend to attract dust and moisture.
- Hang the handkerchief doll in a special garment bag or box. This will help protect it from being damaged by moths, insects, and other critters.
- Place the handkerchief doll in a cool, dry area away from direct sunlight or heat sources. This will help reduce fading of any fabrics used.
- Store the handkerchief doll away from objects that might cause damage or wear and tear when not in use. This includes items such as sharp edges, magnets, and other metals.
- If you must travel with your handkerchief doll, try to wrap it up in a soft material like acid-free tissue paper to protect it from dust and dirt. Make sure to also use a sturdy, padded bag or box for transport.
- If you want to go the extra mile with your handkerchief doll’s safety, consider investing in special storage products such as acid-free tissue paper, archival boxes, and garment bags. These items are designed specifically to help preserve collectibles and vintage items.
- Finally, inspect your handkerchief doll periodically for signs of wear and tear. You may need to repair or replace some parts if they become damaged over time. This will help ensure your doll stays in good condition for years.

These tips can help you keep your handkerchief doll safe and secure for many years. Your handkerchief doll can remain beautiful and treasured for generations with proper care and maintenance.
Is It Possible to Give Your Handkerchief Doll a Unique Look and Personality?
Yes. Handkerchief dolls are a great way to give your little one a unique and special look. You can create a handmade doll full of personality and charm with just a few simple steps. Start by choosing fabric for the body of your doll. You can use any fabric such as cotton, linen, or silk. For an even more unique look, you can choose a fabric that has been printed with a fun pattern or one in a bright color.
Next, pick out buttons for the eyes and nose of your doll. You can also use felt to create the mouth or add extra personality to your doll by stitching on a small flower or ribbon. Finally, stuff your doll with polyester filling or cotton balls.
Once you have finished stuffing, it’s time to stitch the body together. Use a sturdy thread and leave enough room for the stuffing so it doesn’t come out when your doll is handled.
Conclusion
In conclusion, making a handkerchief doll is an easy and fun craft to do with your kids and a great opportunity for them to be creative and imaginative. With just a few basic items like fabric scraps and stuffing, you can create something extraordinary that will bring your family joy for years.
Plus, it’s a great way to teach your children about upcycling and recycling materials, so they can think of ways to make their toys out of things that would otherwise go to waste. I hope reading this post has helped you learn how to make a handkerchief doll. Make sure the safety precautions are carried out in the order listed.
You Can Check It Out to Doll Dress