
Welcome, all queens and kings in the making! Have you ever wanted to experience what it’s like to wear a fancy crown but didn’t have a royal jewel collection to build one?

Well, fret not; with just a simple paper plate and some basic craft supplies, you can create your very own shiny crown fit for any prince or princess. A paper plate crown is a fun DIY project that both kids and kids-at-heart will enjoy making.
In this post, I’ll walk you through the easy step-by-step process of how to make a crown out of a paper plate. By the end, you’ll be ready to hold your own royal ball or tea party! So what are you waiting for – let’s get crafting and turn that paper plate into a crown fit for you.
What Will You Need?
Before we start, make sure you have the following materials on hand:
- One paper plate (preferably a sturdy one)
- Scissors
- Paints or markers
- Glue or tape
- Decorative items (such as stickers, glitter, gems, etc.)
Now that we have our supplies ready, let’s dive into the steps of making our paper plate crown.
10 Easy Steps on How to Make a Crown Out of a Paper Plate
Step 1. Gather Materials
The first step in making a crown from a paper plate is gathering all the necessary materials. You will need a paper plate, scissors, markers or crayons, and any additional decorations you may want to add, such as glitter or stickers. Try to use a sturdy paper plate to make your crown more durable.
Step 2. Cut Out the Crown Shape
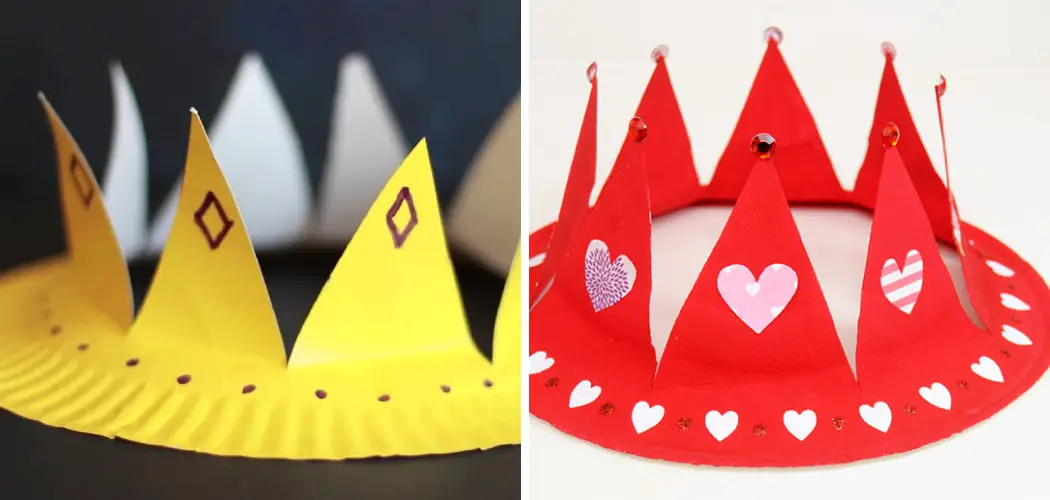
Next, take your paper plate and cut out the center circle using scissors. Then, cut the remaining outer ring into triangular points to create the crown shape. Leave enough space at the bottom for the crown to fit comfortably on your head.

Step 3. Decorate Your Crown
Now it’s time to get creative and decorate your crown! Use markers or crayons to color your crown with your desired design and colors. You can add decorations such as glitter or stickers to make your height stand out even more. Once you’re happy with its appearance, try it on and adjust if needed for a perfect fit. Now you have a handmade paper plate crown fit for royalty!
Step 4. Secure Your Crown
After you’ve decorated your crown to your satisfaction, it’s time to ensure it fits snugly. Carefully wrap the crown around your head to find the right size. Mark the points where the ends meet, ensuring it’s not too tight.
Securely tape or glue the ends together, overlapping the marked points. Once done, let your crown dry if you’ve used glue. Now, you officially have a regal paper plate crown! Wear it with pride as you join the ranks of creative DIY royalty.
Step 5. Show Off Your Crown
Finally, it’s time to display your handcrafted paper plate crown proudly. Whether it’s for a playful photo session, a fun costume accessory, or simply for a royal strut around the house, your crown is a testament to your creativity and craftiness.
Remember, each crown will be unique, reflecting your personal style and imagination. Be proud of your achievement, and have fun! Why not make another one and invite a friend or family member to join in the royal fun? With this simple guide on making a crown from a paper plate, you can turn any ordinary day into a royal celebration.
Step 6. Make Variations
Once you’ve mastered the primary paper plate crown, why not experiment with different variations? You could try making a crown with rounded points for a softer look or use different types of decorative items to create a unique theme.
For example, you could make a nature-themed crown by gluing on leaves and flowers or a festive holiday crown by using themed stickers or colors. There’s no limit to the creative possibilities when you know make a crown out of a paper plate!

Step 7. Clean Up
Remember to clean up your workspace after you have happily exhibited your handcrafted crown and received oodles of compliments. Carefully collect any loose pieces of paper, glitter, or unused stickers and dispose of them properly.
Wipe down your workspace to keep it neat. This step is as important as the crafting process, as keeping a clean workspace ensures you’ll be ready for your next creative project. After all, even royalty have a responsibility to be organized!
Step 8. Teach Others
Now that you’ve mastered creating crowns from paper plates, why not share this fun and creative activity with others? Teaching others not only allows you to pass on a skill, but it also provides an opportunity for social interaction.
You can organize a small crafting party where everyone can make their crowns, or you can teach this to kids as a fun craft project. Remember, creativity is always more fun when shared!
Step 9. Reflect and Appreciate
After the crafting session is over and everyone’s had their fill of royal fun, it’s time to reflect and appreciate your work. Look at your paper plate crown and take a moment to admire your creativity and skill. This simple exercise of transforming a common household item into a symbol of royalty is a testament to your resourcefulness.
Whether you made the crown for yourself or helped someone else make theirs, take pride in the accomplishment. Remember to take a moment to appreciate the joy and fun that came in the process of making and wearing the crown. After all, the journey is as valuable as the destination!
Step 10. Store Your Crown Safely
After all the fun and excitement, storing your paper plate crown properly for future use is crucial. Find a safe, dry place where it won’t be crushed or damaged. You could consider storing it in a specially designated craft box or a display case. Always handle your crown with care to keep it looking its best.
Remember, your crown isn’t just a craft project. It’s a cherished creation that reflects your creativity and imagination. So, keep it safe and bring it out whenever you need a little boost of royal energy!

With these easy steps on how to make a crown out of a paper plate, you can unleash your inner creativity and have fun while doing it.
5 Additional Tips and Tricks
- Choose the Right Plate: Not all paper plates are created equal. For a sturdy crown, opt for heavy-duty, thick paper plates that can hold up to cutting, folding, and decorating.
- Decorate Before Cutting: Before you start cutting your plate into the shape of a crown, consider decorating it first. Coloring, gluing, or sticking things on a flat surface is easier.
- Safety First: Always supervise children using scissors or other sharp objects. Encourage them to take their time cutting out their crown to avoid accidents.
- Add Some Bling: Enhance the look of your paper plate crown with some ‘jewels.’ This could be anything from stick-on gems, glitter, or even brightly colored buttons.
- Secure Properly: When attaching the band to the crown, ensure it’s done securely. You might need to use tape or glue. Check the fit before finalizing – you don’t want the height too tight or loose!
Following these additional tips and tricks, you can create a stunning and unique paper plate crown that will be the talk of any event.
5 Things You Should Avoid
- Avoid Thin Paper Plates: While they may be more economical, thin paper plates will not hold up well to the process of making a crown. They might tear or become deformed quite easily, spoiling your craft.
- Avoid Rushing the Process: Patience is vital when it comes to crafting. Take your time with the cutting, folding, or decorating process. Haste can lead to mistakes or even accidents, especially when scissors are involved.
- Avoid Overcrowding Decorations: While adding as much bling as possible is exciting, make sure to overcrowd your crown with enough decorations. Simplicity is often more elegant, and the height will be more comfortable.
- Avoid Using Weak Adhesives: Weak adhesives or insufficient amounts of glue could result in the decorations falling off or the crown itself falling apart. Always use a sturdy adhesive suitable for paper crafts.
- Avoid Making the Crown Too Tight or Too Loose: Incorrect measurement can cause discomfort. A too tight crown may be uncomfortable to wear, while one too loose may not stay on the wearer’s head. Always double-check measurements before finalizing the height.
By avoiding these common mistakes, you can ensure that your paper plate crown turns out beautifully and is enjoyable to wear.

Conclusion
In conclusion, how to make a crown out of a paper plate is not only easy, but it also allows for creativity and imagination. With just a few materials and simple steps, anyone can have their own royal crown fit for a queen or king. Not only is it a fun craft activity, but it also serves as a great costume accessory for parties or playtime.
So why not give it a try and unleash your inner royalty? And remember to share your creations with us in the comments below. We would love to see the unique designs you come up with! Remember, the possibilities are endless for arts and crafts, so let your imagination run wild and see where it takes you. You may even discover your hidden talent for DIY projects.
So go ahead and try this craft – what do you have to lose? It’s time to grab those paper plates and start crafting like a true king or queen!
Expertise:
Crafting expert with a focus on innovative techniques and diverse materials.
Specialization:
- Textile arts (weaving, embroidery, and fabric dyeing)
- Woodworking and furniture design
- Mixed media and upcycling projects
Recognition:
- Featured in local art exhibits showcasing innovative craft projects
- Collaborated with community organizations to promote crafting workshops
- Received accolades for contributions to sustainable crafting initiatives
Mission:
- To inspire and empower crafters of all levels to discover their creative potential
- Encourages experimentation and self-expression through hands-on projects