
Are you looking for a fun and creative activity to do? Have you ever wanted to make something unique that will have your friends turning their heads in awe? Look no further than learning how to crochet a dinosaur. Not only is this craft project fun and engaging, but it is also simple enough that anyone can learn the basics!

With the help of some colorful yarn and our step-by-step instructions, you’ll be able to easily create your very own crocheted dinosaurs—perfect for displaying around your home or using as decorations on other items like t-shirts, bags, and hats…the possibilities are endless!
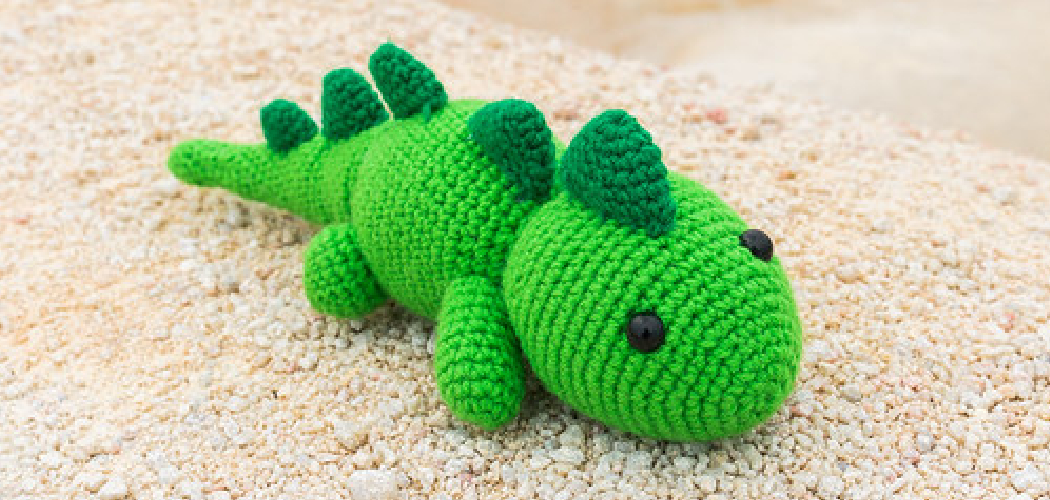
In this blog post, I will show you how to make a crochet dinosaur using very basic materials. No prior knowledge or experience with crochet is necessary; just grab your hooks and yarn and come along on this adventure with me!
What Will You Need?
To make a crochet dinosaur, you will need the following materials:
- Crochet hook (size G or 4mm)
- Worsted weight yarn in two colors for the body and one color for the eyes, nose, and spikes.
- Yarn needle
- Fiberfill stuffing
- Scissors
- Tapestry needle
Once you have all the supplies needed, it’s time to get started!
10 Easy Steps on How to Make a Crochet Dinosaur
Step 1. Make the Body:
Begin by making the body. Make a magic ring using a G hook and your worsted-weight yarn in two colors. You can also make a chain and slip stitch it together to form a loop.
Step 2. Crochet in Rounds:
Work 6 single crochet stitches into the ring. Pull the ring tight to close it and continue to crochet in rounds. If you are using two colors, change the color for each round.
Step 3. Increase Rounds:
Continue by increasing the number of stitches in each round until you’ve reached a total of 24 stitches. Don’t forget to switch colors for each round. This will make the body of your dinosaur.

Step 4. Decrease Rounds:
Now, decrease the number of stitches until you’ve reached a total of 9 stitches. Use the same color as before. Because this is the head of your dinosaur, you will want to stuff it with fiberfill stuffing before you close it.
Step 5. Make the Tail:
Next, make the tail by crocheting in rows instead of rounds. Work 2 single crochet stitches in each stitch across from the side of your dinosaur body. You should have 18 stitches at this point.
Step 6. Shape the Tail:
Shape the tail by increasing and decreasing a few stitches until you’ve reached a total of 24 stitches. Try to use the same color throughout. If you’re using two colors, feel free to switch them up.
Step 7. Crochet in Rounds Again:
Now, switch back to crocheting in rounds for the neck and head. Work 4 single crochet stitches in each stitch around the side of your dinosaur body. You should have 24 stitches at this point.
Step 8. Increase the Head:
Increase the number of stitches in each round until you’ve reached a total of 36 stitches. This will make the head of your dinosaur. You can add color or texture to this area if desired.
Step 9. Stuff and Close the Body:
Stuff your crocheted dinosaur with fiberfill and close the body by decreasing your stitches until you reach 9. Be careful not to overstuff it! As you decrease the stitches, insert safety eyes and a nose.

Step 10. Add Facial Features:
Finally, use the yarn needle to add eyes, nose, and spikes to your crocheted dinosaur. You can also make ears using small scraps of fabric or felt if desired. Ensure that all of the pieces are securely attached.
And that’s how you can make a crochet dinosaur! With just a few simple steps and using materials around the house, anyone can create unique and eye-catching creations! So grab your hooks and get started on your very own crochet dinosaur today!
5 Additional Tips and Tricks
1. Invest in Quality Materials: Quality yarn, crochet hooks, and stuffing will help ensure your dinosaur looks its best.
2. Start With the Legs: The body of a crochet dinosaur is composed of individual pieces that are connected together, so it’s best to start with the legs first.
3. Follow the Pattern Closely: Each part of a crochet dinosaur should be uniform in size and shape, so follow the instructions closely for the best results.
4. Use Stitch Markers: Stitch markers are helpful when crocheting to mark how many stitches you have made and how many rounds you have crocheted.
5. Measure Twice, Cut Once: To ensure accuracy when cutting fabric or yarn for sewing or embroidering details onto your crochet dinosaur, take time to measure twice and cut once. This will help you get the most precise results.
With these five tips and tricks, you can create a beautiful crochet dinosaur that will bring joy to all who see it! Have fun crafting your very own prehistoric masterpiece.
5 Things You Should Avoid
1. Skimping on Yarn: You need to use enough yarn to create a crochet dinosaur that looks realistic and can hold its shape. Avoid skimping on how much yarn you use, as this could impair the finished project’s look and durability.
2. Not Measuring the Tension of Your Stitches: For each project, measuring how tight or lose your stitches are is important. Too tight and the project can become distorted; too loose and you will not get the desired shape.

3. Being Afraid of Mistakes: Crocheting a dinosaur can be intimidating, but don’t be afraid to make mistakes. Mistakes happen, and it’s how you learn from them that matters. If something isn’t going right, take it apart and start over again until you find the right pattern for you.
4. Not Using a Pattern: It’s very easy to crochet without following a pattern if you know how to create basic shapes in crochet, such as circles and triangles, however having a pattern will give you a better foundation on which to build upon when creating your dinosaur.
5. Not Having Enough Patience: Crocheting a dinosaur can be time-consuming and takes a lot of precision, so take your time and don’t rush it. Remember that the finished project will be much nicer if you are patient and ensure it is done correctly. You won’t regret taking your time!
Creating a crochet dinosaur can seem daunting at first, but with careful planning and attention to detail, you will soon have a unique and realistic decorative piece that has been handmade with love! Follow these tips to help you avoid some common crochet mistakes when making your own crocheted masterpiece.
5 Different Styles of Crochet Dinosaurs
One of the most exciting and rewarding endeavors a crocheter can undertake is to make a crochet dinosaur. While it may seem like a daunting task at first, there are several ways to go about making a beautiful crocheted creation! Here we’ll cover five different styles of making a crochet dinosaur:
1. The Basic Shape: For those with basic knowledge of how to create shapes in crochet, the best way how to make your own crochet dinosaur might be to start with the basics and build outward from there. Beginners should create simple shapes resembling dinosaurs, such as an oval body, four legs, and a tail. Then use details like color changes and other embellishments to give your dinosaur that unique look.

2. Amigurumi: A popular way to make a crochet dinosaur is through the art of amigurumi, or crocheting 3-dimensional figures. Crochet a basic head and body shape with yarn, then use safety eyes and other details to create facial features and texture. Remember to stuff your creation as you go for extra realism!
3. Threaded Dinosaurs: If you’re more comfortable working with thread than yarn, making a crochet dinosaur in this medium can be just as rewarding. Create outlines of the shapes you desire, then fill them in with intricate stitches like backstitch or satin stitch for added dimension and texture.
4. Realistic Dinosaurs: For those looking at how to make a more realistic-looking crochet dinosaur, try creating “skeleton” shapes with yarn and then wrapping them in felt or fabric for the finished look. This method allows you to create complex body shapes that resemble the dinosaurs of millions of years ago!
5. Aran-Style Dinosaurs: Another way to make a crochet dinosaur is by using an aran or cabled stitch pattern. Use this advanced technique to create interesting details on your creature’s body, such as bumps and ridges, that will give it extra realism.
No matter how you choose how to make your own crochet dinosaur, have fun and enjoy the creative process!
Conclusion
Crafting is a fun and meaningful way to bring your child’s imagination to life. Now, thanks to this guide on making a crochet dinosaur, you have the knowledge to craft an adorable crochet dinosaur of your own.
Crafting with your children can be a wonderful bonding experience as you pass on your skills and leave them with an adorable handmade creature they can keep forever. The creativity, coordination, and patience needed for crochet can also be rewarding for you and give you a sense of accomplishment.
Have fun with it, and use this guide as a starting point for so much more! So, now that you know how to make a crochet dinosaur, why not celebrate by crafting one today?