
Welcome, fellow crafters and DIY enthusiasts! Get ready to unleash your creativity as we dive into the beautiful world of cornucopia crafts. Whether you’re a seasoned crafter or just starting out, this blog post is for you.

Cornucopia crafts are a fun and festive way to celebrate any fall holiday. The cornucopia, also known as the “horn of plenty,” symbolizes abundance and harvest, making it the perfect centerpiece for your holiday table.
Today, we will be sharing with you a step-by-step guide on how to make a cornucopia craft that will add a touch of charm and tradition to your home or Thanksgiving table. We’ve got you covered, from selecting the perfect materials to expert tips and tricks.
So grab your glue guns, and let’s embark on this crafting adventure together! But fair warning, be prepared to impress your friends and family with your newfound crafting skills.
What Will You Need?
To make a beautiful cornucopia craft, you will need the following materials:
- Wicker or paper mache cornucopia-shaped basket
- Floral foam block or styrofoam cone
- Assortment of artificial flowers, leaves, and berries in fall colors (such as red, orange, yellow, and brown)
- Ribbon in coordinating color
- Hot glue gun and glue sticks
- Scissors
Once you have gathered all your materials, let’s get started on the crafting process.
10 Easy Steps on How to Make a Cornucopia Craft
Step 1. Assemble the Cornucopia

Begin by cutting your chosen fabric or paper into long strips. These strips will be used to cover the cone-shaped basket. Start at the bottom of the cone and wrap one strip around, securing it with glue. Continue wrapping and gluing until the entire cone is covered. You can also use different fabrics or papers for a more colorful and textured look.
Step 2. Add Final Touches
Once your cornucopia is assembled, you can add any final touches to make it even more festive. Consider adding a bow made from ribbon to the top of the cornucopia or attaching faux leaves along the sides.
You can also fill your funnel with small decorative items, such as mini pumpkins or pinecones, for an added touch of autumnal charm. Display your finished cornucopia on a table as a centerpiece, or hang it on a door for a welcoming fall decoration.
Step 3. Prepare the Floral Foam
Place your floral foam block or styrofoam cone inside the cornucopia to ensure it fits correctly. Trim any excess foam so that it fits snugly within the cone. This will serve as the base for your decorative elements.
Step 4. Choose Your Flowers and Greenery
Select an assortment of artificial flowers, leaves, and berries in fall colors that complement your cornucopia design. Consider using sunflowers, mums, roses, or any other flower with warm autumn hues. You can also incorporate different types of greenery to add texture to your arrangement.

Step 5. Cut Your Flowers and Greenery
Use scissors to cut the stems of your artificial flowers, leaves, and berries to the desired length. Remember that the branches should be long enough to secure into the floral foam but short enough to fit within the cornucopia. As a guideline, most stems should be about 3-4 inches long. Prepare a variety of lengths to create depth and interest in your arrangement.
Step 6. Arrange Your Flowers and Greenery
After preparing your decorative elements, start arranging them in floral foam. Begin by inserting the larger flowers first, then fill in the gaps with your smaller flowers, leaves, and berries. Make sure to distribute colors and textures for an aesthetically pleasing arrangement.
Rotate the cornucopia as you work to ensure that it looks good from all angles. This step is about creativity, so feel free to rearrange as much as needed until you’re happy with your design.
Step 7. Secure Your Arrangement
Once you are satisfied with your arrangement, it’s time to secure it. Using your hot glue gun, apply glue to the base of the stems and insert them firmly into the floral foam. This will keep your flowers, leaves, and berries in place. Be careful during this step, as the hot glue can be quite hot. Letting the glue dry for a few minutes before moving on to the next step is also a good idea.
Step 8. Add Filler Elements
Consider adding filler elements to fill in any gaps and add more depth to your cornucopia craft. These can be small artificial fruits, like mini pumpkins, acorns, or berries, that match the autumn theme.
Simply apply a small dot of hot glue to the filler item and carefully place it between the flowers and leaves. This enhances the fullness of your cornucopia and adds a touch of realism to your craft. Remember to place these filler elements thoughtfully, ensuring they are visible and complement the overall design.
Step 9. Add the Finishing Touches
Now that your cornucopia is filled, it’s time to add those all-important finishing touches. Consider tying a beautiful bow with your coordinating ribbon and attaching it to the mouth of the cornucopia.

Also, add a few more leaves, berries, or blossoms to the exterior, securing them with hot glue for an added pop of color and texture. Remember, this is your creation – feel free to embellish and add personal touches as much as you wish. This is your chance to let your creativity shine!
Step 10. Display Your Cornucopia
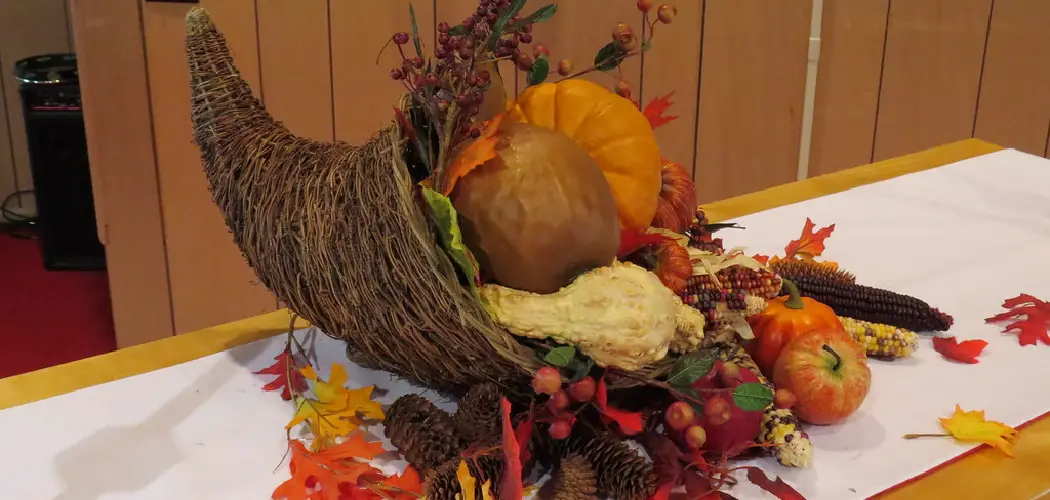
Your cornucopia craft is complete, and it’s time to show it off! Find the perfect spot in your home to display your creation. It could be the center of your dining table, a mantlepiece, or even at your front door as a unique fall wreath. Remember, the cornucopia symbolizes abundance and prosperity, making it the perfect decoration for Thanksgiving.
As you admire your handiwork, bask in the satisfaction of creating something beautiful with your hands. There you have it – a delightful and easy way to bring the spirit of the harvest into your home!
By following these steps, you can create a beautiful cornucopia craft that will add warmth and charm to your fall decor. With endless possibilities for customization, this craft is perfect for anyone looking to add a personal and unique touch to their seasonal decorations. Gather your materials and let your creativity run wild as you make your one-of-a-kind cornucopia!
5 Additional Tips and Tricks
- Use Fresh Materials: Try to use fresh autumn produce for your cornucopia whenever possible. Things like miniature pumpkins, multicolored corn, and vibrant autumn leaves can add a real pop of color to your craft.
- Choose the Right Basket: The basket is the base of your cornucopia craft. A wicker one with a pointed end works best. Remember, the size of your basket will determine the size of your cornucopia.
- Secure Your Decorations: Ensure all items are securely attached when arranging your autumn produce inside the cornucopia. You can use floral wire or hot glue to keep things in place.
- Add Personal Touches: Personalize your cornucopia with unique decorations like handmade autumn leaves or custom messages.
- Preserve Your Craft: To make your cornucopia last longer, spray it with a protective sealant. This will help the fresh produce to last longer and keep your craft looking its best.
With these additional tips and tricks, you can take your cornucopia craft to the next level and create a beautiful centerpiece for your Thanksgiving celebration.

5 Things You Should Avoid
- Avoid Using Perishable Items: As tempting as using natural fruits and vegetables might be, remember that they will start to rot over time. Opt for artificial or dried options instead.
- Don’t Rush the Process: Crafting a cornucopia is not something you want to rush. Take your time to arrange the items in a way that is pleasing to the eye.
- Avoid Overcrowding: While having a complete and abundant cornucopia is essential, be careful not to overcrowd it. Too many items can make it look cluttered and detract from the overall aesthetic.
- Do Not Use Flammable Materials: If you plan on placing your cornucopia near a heat source or candle, ensure that none of the materials used are flammable.
- Avoid Direct Sunlight: If you’re using artificial fruits and vegetables, keep the cornucopia away from direct sunlight, which can cause the colors to fade.
Remember, crafting a cornucopia should be a fun and creative process. Avoid these common mistakes to ensure a beautiful and lasting result.
Conclusion
In conclusion, how to make a cornucopia craft is not only a fun activity, but it also serves as a reminder to be grateful for the abundance in our lives. We have explored various materials and techniques that can be used to make this traditional symbol of harvest.
From using paper maché and cardboard to incorporating natural elements like twigs and leaves, the possibilities are endless. I hope this blog post has inspired you to try different variations of the cornucopia craft and get creative with your decorations.
As we approach the holiday season, let us remember the true meaning of gratitude and spread joy by sharing this delightful project with our family and friends.
So go ahead, grab some supplies and try it! Trust me, the result will not only look beautiful on your table but also fill your heart with warmth and appreciation. Let’s celebrate the bountiful blessings in our lives by making a cornucopia craft together! Thank you for reading, and happy crafting!
Expertise:
Crafting expert with a focus on innovative techniques and diverse materials.
Specialization:
- Textile arts (weaving, embroidery, and fabric dyeing)
- Woodworking and furniture design
- Mixed media and upcycling projects
Recognition:
- Featured in local art exhibits showcasing innovative craft projects
- Collaborated with community organizations to promote crafting workshops
- Received accolades for contributions to sustainable crafting initiatives
Mission:
- To inspire and empower crafters of all levels to discover their creative potential
- Encourages experimentation and self-expression through hands-on projects