
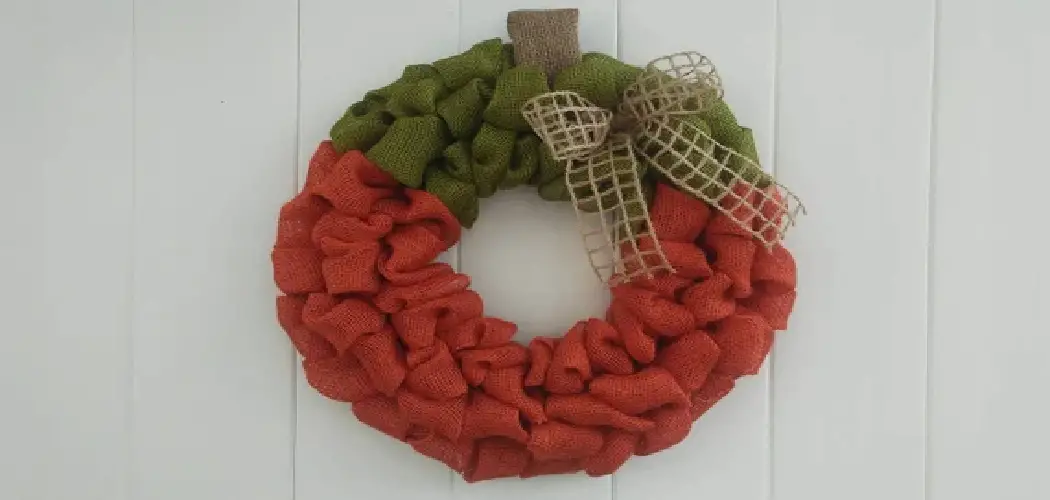
There are many benefits to learning to make a burlap pumpkin wreath. Not only is it a fun and creative activity, but it also allows you to add a personal touch to your home decor. Plus, by making your own wreath, you can save money compared to buying one from a store. Additionally, making a burlap pumpkin wreath is a great way to get into the festive spirit and add some fall charm to your home.
The main advantage of making a burlap pumpkin wreath is the opportunity to customize it according to your own preferences and style. You can choose the size, shape, and color of the pumpkins, as well as add other embellishments like ribbons or flowers.
Moreover, by making your own wreath, you can ensure its quality and durability, rather than relying on a store-bought wreath that may not last as long. In this blog post, You will learn in detail how to make a burlap pumpkin wreath.
Materials You Will Need
- A wire wreath frame
- Burlap ribbon
- Scissors
- Floral wire or pipe cleaners
- Hot glue gun and glue sticks
- Artificial leaves, berries, or flowers (optional)
- Wooden letters to spell out “Welcome” (optional)
- Paint and paintbrushes (optional)
- Twine or ribbon for hanging
- Gloves (optional)
Step by Step Processes for How to Make a Burlap Pumpkin Wreath
Step 1: Inspect Your Materials
Before you begin, make sure you have all the necessary materials to make your burlap pumpkin wreath. You will need a wire wreath frame, orange burlap ribbon, floral wire or pipe cleaners, scissors, hot glue gun and sticks, artificial leaves and twine.
Step 2: Cut Burlap Ribbon into Strips
Cut the burlap ribbon into 6-inch strips. You will need around 40-50 strips, depending on the size of your wreath frame. Take a strip of burlap and fold it in half lengthwise. Then fold it again to create a loop at one end (this will be the top of your pumpkin). Secure with floral wire or pipe cleaner.

Step 3: Add More Strips
Keep adding more strips of burlap to the wire frame, securing them with floral wire or pipe cleaners as you go. Make sure the loops are facing outwards to create a full and fluffy pumpkin shape. Continue adding strips until you have filled the entire wreath frame. Make sure the burlap strips are evenly distributed and there are no empty spaces.
Step 4: Secure the Loops
Once you have filled the entire frame, go back and secure all the loops with hot glue to ensure they stay in place. Take a strip of green burlap ribbon and cut it into a small rectangle. Fold it in half and roll it up tightly to create a stem. Secure with hot glue.
Step 5: Add Leaves
Using hot glue, attach artificial leaves to the top of your pumpkin wreath, around the stem. Cut a length of twine and tie it onto the wire frame at the top to create a hanger for your wreath. Make sure it is secure and can hold the weight of the wreath.
Step 6: Fluff and Adjust
Fluff out the burlap strips to create a full and round pumpkin shape. You can also adjust the loops to make them more even or add more strips if needed. Add any additional decorations you desire, such as fall-themed ribbon, faux berries or a wooden welcome sign. Get creative and make it your own!

Once you are happy with the final result, or in a prominent place in your home. Admire your handmade creation and enjoy the festive autumn vibes it brings.
Safety Tips for How to Make a Burlap Pumpkin Wreath
- Always use caution when working with hot glue and scissors.
- Make sure to cut the burlap strips evenly for a symmetrical wreath.
- Use artificial leaves instead of real ones to avoid wilting.
- Ensure your wire frame is sturdy enough to hold the weight of the wreath and any additional decorations.
- Keep an eye on children and pets while crafting to prevent any accidents.
- Allow the hot glue to dry completely before hanging or handling the wreath.
- When hanging your wreath, make sure it is secure and will not fall off or cause harm.
By following these safety tips, you can ensure a fun and accident-free experience while making your burlap pumpkin wreath.
What Techniques Can You Use to Prevent Frayed Edges on the Burlap?
When making a burlap pumpkin wreath, one of the most important things to keep in mind is preventing frayed edges on the burlap. This not only ensures a cleaner and more polished look for your wreath, but it also makes the crafting process easier and more enjoyable. There are several techniques you can use to prevent frayed edges on your burlap. Here are a few of them:
1. Use Pinking Shears
Pinking shears have zigzag blades that cut the fabric in a way that reduces fraying. When cutting your burlap for the wreath, use pinking shears instead of regular scissors to get clean and neat edges.

2. Apply Fray Check
Fray check is a liquid solution that can be applied to the edges of fabric to prevent fraying. Simply run a small amount along the edges of your burlap before cutting or manipulating it for your wreath.
3. Use a Hot Glue Gun
If you’re attaching pieces of burlap together for your wreath, consider using a hot glue gun instead of sewing them. The heat from the glue can help seal and prevent fraying on the edges.
4. Stitch the Edges
For a more secure method, you can stitch the edges of your burlap using a sewing machine or by hand. This will not only prevent fraying but also add a decorative touch to your wreath.
By incorporating these techniques into your burlap pumpkin wreath making process, you can ensure that your wreath will have clean and professional-looking edges. Experiment with different methods to find the one that works best for you and your crafting style.
What is the Best Way to Create the Pumpkin Shape With the Burlap?
Once you have prevented frayed edges on your burlap, the next step is creating the pumpkin shape for your wreath. There are a few different techniques you can use to achieve this:
1. Use a Pre-made Wire Wreath Form
This is the easiest and most efficient way to create a pumpkin shape with burlap. Simply wrap the burlap around the form, gathering and shaping it to create the pumpkin texture.

2. Cut Out a Pumpkin Shape from Cardboard
If you don’t have a wreath form, you can use cardboard instead. Draw or trace a pumpkin shape onto the cardboard and cut it out. Then, wrap the burlap around the cardboard and secure it with hot glue or stitching.
3. Create Your Own Wire Form
If you’re feeling more ambitious, you can create your own wire form using floral or craft wire. Bend and shape the wire into a pumpkin shape, leaving some space between the wires for the burlap to be wrapped around.
No matter which method you choose, make sure to adjust and manipulate the burlap as needed to achieve a full and round pumpkin shape. Don’t be afraid to play around with different techniques until you find the one that works best for you.
What Finishing Touches Can You Add to Your Burlap Pumpkin Wreath?
The final step in creating a burlap pumpkin wreath is adding some finishing touches to make it stand out and truly shine. Here are a few ideas:
1. Add a Bow
A simple and elegant ribbon bow can be the perfect addition to your wreath. You can use burlap ribbon for a cohesive look or choose a different color or pattern to add contrast.
2. Attach Faux Leaves and Other Embellishments
Faux fall leaves, small pumpkins, or other seasonal embellishments can add some extra charm to your wreath. Simply use hot glue or wire to attach them to the burlap.
3. Personalize It
Consider adding a monogram, welcome sign, or any other personal touch to your wreath. This can make it unique and special for your home.
Let your creativity run wild and have fun with these finishing touches. You can also change them up each year to keep your wreath looking fresh and new.
How Do You Store the Burlap Pumpkin Wreath When It’s Not in Use?
Once you have successfully created your beautiful burlap pumpkin wreath, you may be wondering how to store it when the season is over. As burlap is a delicate material, it’s important to take care of it properly in order to preserve its shape and overall appearance. Firstly, if possible, try to keep your wreath in a temperature-controlled environment. Extreme temperatures can cause the burlap to become brittle and lose its shape.
So, if you have a storage room or closet that remains at a consistent temperature, that would be an ideal place to store your wreath.
Next, make sure to remove any decorations or embellishments from the wreath before storing it. These items can add extra weight and strain on the delicate burlap, potentially causing damage.

To keep your wreath in optimal condition, it’s best to store it in a container or box that is large enough to accommodate its size without squishing or bending the burlap. You can also use tissue paper or bubble wrap to provide extra padding and protection for your wreath.
Conclusion
In conclusion, learning to make a burlap pumpkin wreath is a fun and creative project that can add a touch of charm to any home decor. However, like any craft or DIY project, there are some disadvantages to consider before diving into this activity.
One of the main drawbacks is the time it takes to create a burlap pumpkin wreath. From gathering materials, cutting and shaping the burlap, to assembling the wreath, this project can be time-consuming and may require a significant amount of patience. Additionally, working with burlap can be messy, as it tends to shed fibers and leave behind a lot of residue.
I hope this article has been beneficial for learning how to make a burlap pumpkin wreath. Make Sure the precautionary measures are followed chronologically.