
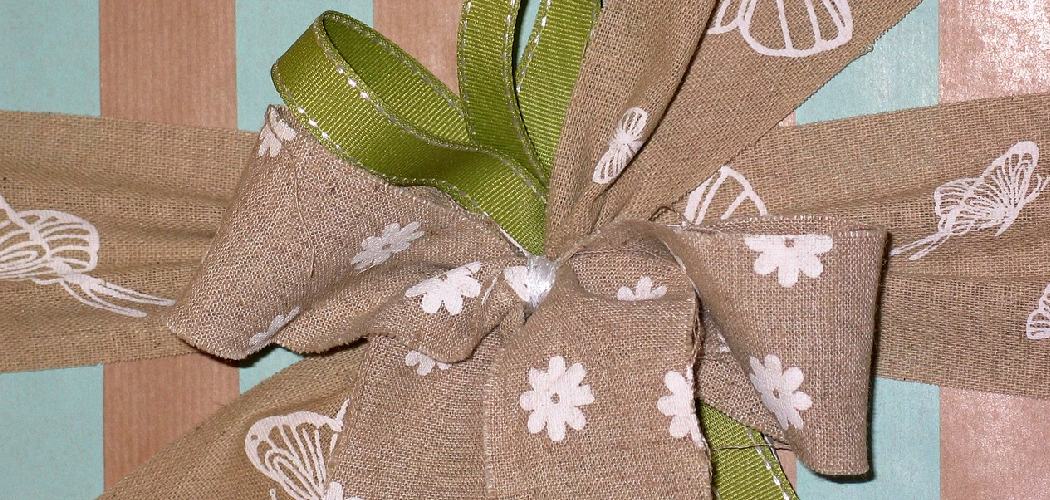
Creating the perfect bow for any occasion is a great way to add a finishing touch to your decorations! Bows made from burlap are especially popular in modern style decor, as they give off a unique rustic charm.

In this post on how to make a burlap bow, we’ll lay out all the steps you need to follow to make your own beautiful burlap bow – no sewing necessary! Whether you’re making bows for wreaths, gift boxes or flower arrangements, these step-by-step instructions will help guide you through the entire process and have you creating stunning bows in no time.
What is Burlap Bow?
A burlap bow is simply a bow made out of burlap fabric. They can be used for a variety of different decorations, from wreaths and gift boxes to flower arrangements and more! Burlap bows are often seen in rustic-style decor, thanks to their unique texture and color. It’s easy to make a burlap bow, and it doesn’t require any sewing.
Materials Needed
Burlap Fabric
It’s important to choose a burlap fabric that is thick and tightly woven, as this will create a more durable bow.
Scissors or Rotary Cutter
You’ll need a sharp pair of scissors or a rotary cutter to cut the burlap to the desired shapes.
Ruler
A ruler will come in handy when measuring and cutting precise measurements for your bows.
Safety Pins
Safety pins are used to hold everything in place while you finish making your bow.
Hot Glue Gun (Optional)
Using hot glue is optional, but it helps keep everything together and makes sure that the bow won’t unravel over time.

11 Step-by-step guidelines on How to Make a Burlap Bow
Step 1: Cut the Burlap
Using a ruler and scissors (or rotary cutter for larger bows), cut two strips of burlap fabric. Make sure both strips are the same length, and measure to the desired width of your bow. If you need a bigger bow, cut the strips wider. This will create the “tails” of your bow.
It’s important to make them the same length and width, so they look even once tied. But, you can adjust the length and width to fit your specific needs. If you need a smaller bow, cut the strips narrower.
Step 2: Make a Loop
Fold each strip in half and secure it with a safety pin near the ends. This will create two loops that will be used for making your bow. It’s important to make sure both loops are the same size. It’s also important to make sure the loops are tight and secure. Otherwise, your bow may look uneven.
Step 3: Tie a Knot
Take one of the loops and tie a knot at one end. Make sure you pull it tight so that the knot is nice and secure. Repeat this step with the other loop as well. It’s important that both knots are the same size and secure.
Although you can adjust the size of the knot after it’s tied, it’s best to get it right the first time. But, if you do need to adjust it later on, just loosen the knot and re-tie it. This is where the safety pin comes in handy – it helps keep everything secure while you make your adjustments.
Step 4: Cross Both Loops
Cross both of the loops so that they form an “x” shape when viewed from above. Secure them together with another safety pin in the center. sure they are both even. If one loop is longer or wider than the other, it may look uneven once you tie the bow.
But, if they are the same size and shape, it should look perfect! It’s important to make sure everything is secure, as this will help keep the loops together when you tie the bow.
Step 5: Fluff Your Bow
Gently pull on the loops to fluff up your bow, making sure that it is symmetrical and even on all sides. You can also use a comb or brush to shape your bow if needed. This step is all about making sure your bow looks perfect! It’s important to make sure everything looks even and symmetrical before you tie the bow. If it looks uneven, you can always adjust it by pulling on the loops to make them even.

Step 6: Tie-off Ends
Take one of the ends and tie it around the other loop, near the center of your bow. Pull tightly to secure everything in place. Repeat with the other end as well. It’s important to make sure both ends are secure and even. If they look uneven, you can always adjust them by pulling on the loops or tying an additional knot.
Step 7: Finish off Center
Once you have tied off both ends, wrap them together in the center with twine or thread for extra security. Make sure that they are pulled tight so that everything stays in place. It’s important to make sure the center of your bow is secure, as this will help keep everything together when you hang it up. This is also the time to add any embellishments, such as ribbon or fabric flowers.
Step 8: Trim Ends
Trim the ends of both loops so that they are even and the same length. This will give your bow a more finished look. It’s important to make sure both ends are even, as this will ensure that your bow looks symmetrical and professional.
It’s also important to make sure that the ends are not too long, as this will make your bow look unbalanced. But, if you need to adjust the length of the ends, you can always do that after trimming.
Step 9: Hot Glue (Optional)
For extra security, you can hot glue any of the loose threads to help keep everything together and in place. This is optional but recommended. It will also help keep the burlap from unraveling over time. You can use a hot glue gun or fabric glue to secure the threads. But, make sure you don’t use too much glue, as this may ruin the look of your bow.
Step 10: Attach to Decoration or Craft Item
Once your bow is finished, you can attach it to whatever decoration or craft item you want! Use safety pins, twine or hot glue depending on what type of item you are attaching your bow to. If you are attaching it to fabric, then hot glue is best. And if you are attaching it to wood or metal, then safety pins or twine are the best options.
Step 11: Enjoy Your Creation!
And that’s it! You now have a beautiful burlap bow to add to your decorations. Enjoy the rustic charm that your new bow brings and marvel at your handiwork! Always remember to use sharp scissors or a rotary cutter when cutting burlap, as this will make it easier and more precise.

And don’t forget to use safety pins and hot glue to secure your bow in place. With a little bit of patience, you can make beautiful burlap bows for any occasion. Have fun and enjoy!
We hope this tutorial has been helpful in showing you how to make a burlap bow! With these easy steps, you’ll be creating stunning bows for all of your projects in no time.
Frequently Asked Questions
Q. What is the Best Type of Burlap to Use for Bows?
A. The best type of burlap to use for bows is a thick and tightly woven fabric. This will create a more durable bow that won’t unravel over time.
Q. What is the Easiest Way to Make a Burlap Bow?
A. The easiest way to make a burlap bow is through the steps outlined in this tutorial! With just scissors, safety pins and some twine or thread, you can make your own beautiful burlap bow quickly and easily.
Q. How Do I Keep My Bow from Unraveling Over Time?
A. To keep your bow from unraveling over time, we recommend hot gluing any of the loose threads together for extra security. This will help ensure that your bow stays intact for years to come!
Q. Can I Make a Burlap Bow with Sewing?
A. Yes! You can definitely make a burlap bow with sewing if you’d prefer. This tutorial focuses on the no-sew method, but you can easily make a bow with sewing by following the same steps and using thread instead of safety pins to secure everything in place.

Conclusion
Crafting your own burlap bow may seem intimidating, but with the few simple steps mentioned in this blog post, it becomes an easy task! Thanks to tools like a hot glue gun and a pair of scissors, you can start creating beautiful bows today. Before long, you will be able to impress friends and family with your creative twists on burlap decorations.
We hope this guide on how to make a burlap bow has been helpful and that you have fun making your own unique designs out of these workhorses of craft material. So what are you waiting for? Head to the crafts store or rummage through your supplies at home and get ready for some bow-making fun! Good luck!