
Have you ever knit something that looked perfect until you noticed an unsightly hole in it? Don’t worry – this is a common mistake made by experienced knitters and beginners alike. But unfortunately, it can be tricky to fix, especially if you’ve already stitched the item up. Fortunately, our tips and tricks for how to fix a hole in knitting will help save your project from disaster!
In this blog post, we’ll take you step-by-step through techniques like weaving yarn into place, adding duplicate stitches to the affected area, or introducing several smaller holes as separate design elements. Read on to find out more about how to give your project new life with expert repair advice and keep crafting without fear of failure!

Step-by-Step Guidelines on How to Fix a Hole in Knitting
Step 1: Weave Yarn Into Place
For smaller holes, the easiest solution is to use a tapestry needle and some leftover yarn from your project. Cut off a length of yarn that’s twice as long as the hole and thread it through the tapestry needle. Insert the needle near one side of the hole, pushing it through the entire knit stitch, and out again near the other side of the hole.
Pull the yarn tight and weave it back and forth to fill up the hole. When you’re done, trim off any excess yarn and use a crochet hook to tuck in any loose ends.
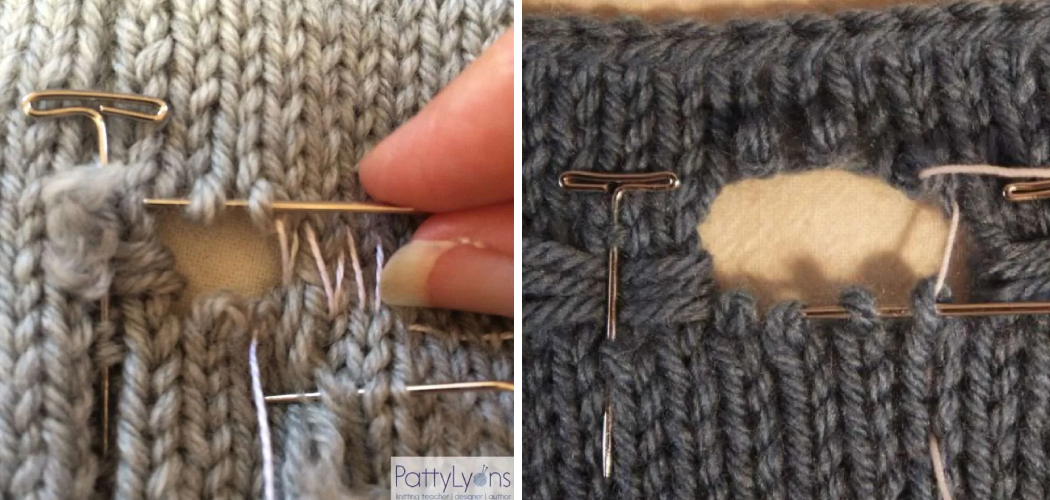
Step 2: Add Duplicate Stitches
For larger holes, you can use duplicate stitches to patch up the area. Start by using a tapestry needle and yarn to weave across the entire hole, just as you did with the smaller one before. Then, begin working in duplicate stitches around the hole by threading your yarn through each knit stitch in turn.
As you stitch, make sure to pass your needle over two strands of yarn at a time for extra reinforcement. When finished, tie off the yarn and tuck in any loose ends.
Step 3: Introduce Several Smaller Holes as Separate Design Elements
You can also use your holes to create interesting designs instead of covering them up. For example, if you have a large hole near the end of your knitting, you could introduce several smaller holes around it to create a unique pattern. To do this, use a sharp pair of scissors to cut small openings in the fabric and then finish off the edges with a few stitches using duplicate stitches or weaving.
Step 4: Accessorize Your Project
Finally, if all else fails, you could disguise the hole with an accessory like a button or bow. Thread a piece of yarn through the back of your project and use it to tie on a decorative element that hides the hole. This is a great way to add contrast and texture to your knitting without drawing too much attention to the area in question.

Following these steps will help you tackle any holes that may have formed while knitting. Whether you choose to fill it in or turn it into an interesting design element, your project is sure to look better than ever! So don’t let a hole ruin your crafting experience – get creative and fix it up with our handy tips.
Additional Tips and Tricks to Fix a Hole in Knitting
1. To make sure your knitting stitches are even, use a stitch marker or row counter. This will help you keep track of the number of rows and ensure that you don’t miss any stitches when fixing a hole.
2. If you can’t find the exact color yarn needed to fix a hole in your knitting piece, try using a contrasting color instead. This will help to create a unique and eye-catching design.
3. When fixing a hole in knitting, use the same technique that you used when creating your project. This will ensure that your repairs are seamless and blend in with the original piece.
4. If you’re unsure of fixing a hole in knitting, watch some tutorial videos online for helpful tips and tricks.
5. Be sure to use a needle that’s the same size as your knitting needles when fixing holes in knitted items. Using a different size needle may cause the item to appear lopsided or uneven.
6. When fixing holes, use an invisible stitch technique to make sure your repairs are not noticeable. This will help create a more professional-looking repair.
7. If you’re having trouble finding the right stitch to fix a hole in knitting, look up some diagrams or charts for help. This will make it easier to select the correct stitch and ensure that your repair is flawless.

8. To add extra reinforcement when fixing holes in knitting, use a strand of yarn at least one size smaller than the original stitch used when creating your item. This will ensure that your stitches remain secure and solid.
9. Be sure to use a wool-safe yarn when fixing holes in knitted items, as this will help keep them looking new and fresh for longer.
10. Once you’ve completed fixing the hole in your knitting piece, be sure to weave in any loose ends. This will help keep your repair neat and secure.
Following these tips and tricks will ensure that you can fix any hole in knitting with ease, so you can enjoy your knitted pieces for years to come!
Precautions Need to Follow for Fixing a Hole in Knitting
- Make sure that the yarns used for patching and knitting are of the same weight. Using a different yarn weight can make the hole look bigger or mess up your pattern’s stitches.
- Select the needles carefully so they match in size with those you have already been using for knitting. You may need to switch to double-pointed needles if you don’t have the same size.
- Carefully pick up the stitches on either side of the hole, so that your pattern won’t look distorted or lopsided once you start knitting with it again.
- If the yarn used to patch starts pilling, simply cut away any excess fuzz and trim down as needed for a neat-looking repair.
- To ensure a neat-looking patch, make sure to weave the ends of the yarn in through both pieces and tie them off securely with a knot.
- Once you’re done with the patching process, gently steam it using an iron set on low heat to help flatten out any bumps or edges that were created during the patching process.
- Avoid using any bleach or harsh detergents to wash your knitted garment; they can damage the yarn fibers and unravel your patchwork.
- If you wish to use a washing machine, make sure to put it in a gentle cycle with cold water and then lay flat on a towel for drying, so that your patchwork remains intact.

Following these precautions can help make sure that your holes get patched up quickly and easily, leaving you with a perfect knitted garment. Happy knitting!
Frequently Asked Questions
What Are Some Common Causes of Holes in Knitting?
The most common cause of holes in knitting is yarn tension. If you pull the stitches too tightly, they will be strained and may result in a hole. Additionally, if you’re using an inexperienced knitter or have dropped a stitch, it can create a hole that will need to be fixed.
What Are Some Ways to Prevent Holes in Knitting?
The best way to prevent holes in knitting is to check your tension and stitch size regularly. It’s also important to pay attention to where you are in the pattern so that you can catch any mistakes early on. Additionally, make sure you’re using a good quality yarn that won’t break easily and can take the strain of being pulled.
Are There Any Special Techniques for Fixing Large Holes?
Yes, if you’re dealing with a large hole, it may require more advanced techniques to fix. As a first step, you can try the duplicate stitch method which involves using a crochet hook to weave yarn around the existing stitches and cover up the hole. If that doesn’t work, then you might need to unravel the knitting back to where the mistake was made and reknit the section.

Conclusion
In conclusion, fixing a hole in your knitting project can feel like an intimidating and overwhelming task, but with this step-by-step guide, you may find that it’s actually quite straightforward. Whether you choose to use the drop stitching method or the duplicate stitch technique, it’s important to remember to take your time with each step.
The more patience you have and the closer attention you pay to detail while mending your project, the smoother the finished product will look. So why not take some time today to try out these techniques and repair whatever crafty mishaps come your way? You won’t regret learning how to fix a hole in knitting!