
Have you ever wanted to make a garment pattern just the right size for you? If so, stitching up something custom-made in your own measurements can be incredibly rewarding! But when it comes to enlarging sewing patterns, there’s no one-size-fits-all approach. From getting the measurements just right to understanding how fabric behaves with particular designs and styles – the process has its nuances.

While it may feel overwhelming at first, we’re here to tell you that mastering this technique will give any budding seamstress or tailor an incredible sense of accomplishment. So keep reading as we walk you through our top tips and tricks on how to enlarge sewing pattern.
Why Enlarge Sewing Patterns?
Before we dive into the process of enlarging sewing patterns, let’s discuss why and when you might need to do it. Typically, commercial sewing patterns come in standardized sizes and may not always fit your body type perfectly.
It could be frustrating to have a pattern that is either too tight or too loose in certain areas. Enlarging the pattern can ensure a better fit and give you the freedom to make customizations according to your unique measurements.
Things to Remember Before You Start
Take Accurate Measurements:
This is the most critical step in enlarging sewing patterns. Make sure to have someone else take your measurements for better accuracy. Otherwise, stand in front of a full-length mirror while taking measurements to ensure consistent results.
Factor in the Seam Allowance:
When measuring and enlarging sewing patterns, remember to include seam allowances. These are typically around 5/8 inches for most patterns. If your pattern does not have seam allowances included, factor them in while enlarging. It’s always better to have a little extra fabric to work with than not enough.

Understand Grainlines:
Grainlines are an essential aspect of sewing patterns. They indicate the direction in which the pattern should be placed on the fabric for optimal results. Make sure to keep grainlines in mind while enlarging patterns, as altering them can significantly impact how the garment fits and drapes.
Safety Measures:
When working with sewing patterns, it’s always best to handle them with care. Use pattern weights or pins to secure the paper in place while tracing and cutting out the pieces. This will help avoid any slips or mistakes that may occur during the process.
It’s also a good idea to keep the original pattern intact, so you have a reference in case something goes wrong. You can trace the pieces onto a separate paper and work with the traced version.
10 Simple Step-by-step Guidelines on How to Enlarge Sewing Pattern
Step 1: Gather Your Supplies
You’ll need :
- The Sewing Pattern You Want to Enlarge
- Tracing Paper or Tracing Wheel
- Scissors
- A Measuring Tape
- Pencil/pen
- Ruler (Preferably a Clear One)
- Scotch Tape
Step 2: Calculate Your Measurements
Using a measuring tape, measure your bust, waist, hips and any other relevant body parts. Write these down, along with your height and desired garment length. It’s always helpful to have these measurements handy while working on the pattern. You can also refer to a measurement chart for reference.

But keep in mind that these are usually based on standardized sizing, so it may need a few tweaks for the perfect fit.
Step 3: Measure the Pattern
Lay your pattern on a flat surface and measure each piece with a measuring tape. Be sure to add seam allowances while taking measurements. Once you have all the measurements, compare the pattern measurements with your own. This will give you an idea of how much to enlarge the pattern. You can use a size chart to determine the difference in measurements between sizes.
Step 4: Determine the Enlargement Ratio
Based on the comparison of your measurements and those of the pattern, you can calculate how much larger you need to make it. You can divide each measurement by your body measurement to get an enlargement ratio for each piece or use a ruler with an enlarged scale. It is also helpful to note the ratio down for future reference. However, it’s always better to measure twice and cut once!
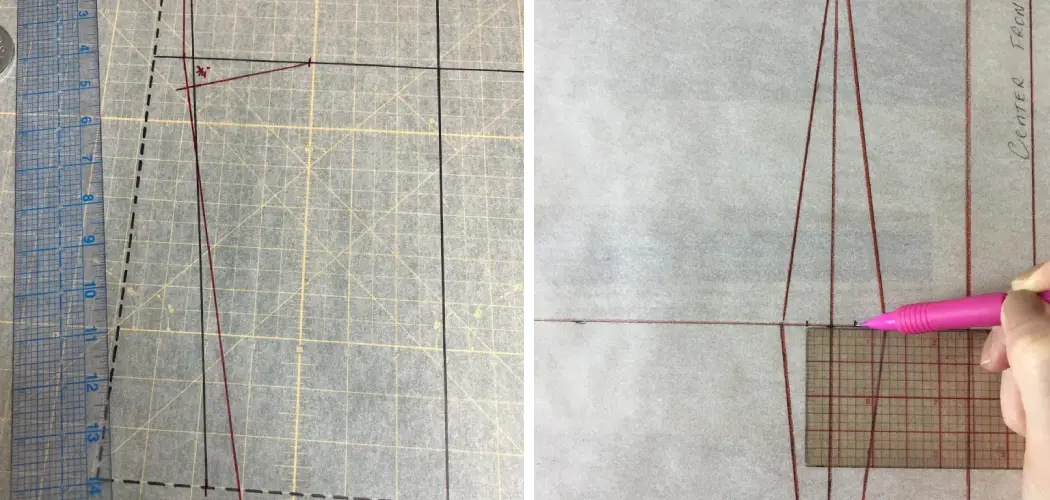
Step 5: Enlarging the Pattern
Using a clear ruler, draw lines on your pattern following the enlargement ratio you calculated. Make sure to extend these lines to all edges of the pattern pieces. It’s best to use a tracing wheel and carbon paper for this step, as it allows you to transfer markings accurately.

But if you don’t have these, a pencil and ruler will do the job. You can also use a photocopier to enlarge the pattern if you don’t have the time or patience for this step.
Step 6: Redraw Your Pattern
Using the line as a guide, redraw your pattern edges to enlarge them. You can also use the tracing paper and wheel method here if you have it. Make sure to mark any notches or markings on your original pattern for accurate placement. Otherwise, you can also use a ruler to measure and transfer these markings.
It’s essential to be precise during this step as any mistakes can affect the fit of your final garment.
Step 7: Add Seam Allowances
Once you’ve enlarged all the pieces, add seam allowances to the edges you just drew. If your pattern already has seam allowances included, skip this step. You can use a clear ruler for this to get accurate and consistent seam allowances. It’s always better to have a little extra than not enough.
But if you end up with too much, you can always trim it down. This step is crucial for achieving the right fit and seam placement.
Step 8: Cut Out Your Pattern
Using scissors, cut out your newly enlarged pattern pieces. Make sure to cut along the new lines and not the original ones. You can also add labels or markings on each piece to keep track of which is which. This will come in handy when you start to assemble your garment.
Although it may seem tedious, this is an essential step to avoid confusion and potential mistakes while sewing. It’s always better to have a plan in place.
Step 9: Test Your Pattern
Before using your new enlarged pattern for the final garment, we recommend testing it out on a muslin or scrap fabric. This will allow you to make any necessary adjustments before cutting into your expensive fabric. You can also use this as an opportunity to test out any customizations you want to make, such as changing the neckline or sleeve length.

Step 10: Sew Your Garment
Once you’ve tested and made any necessary adjustments to your pattern, it’s time to sew your garment. Follow the instructions on how to enlarge sewing pattern provided with the original pattern for assembly. But remember to keep in mind any changes you made while enlarging the pattern. And don’t forget to try on your garment as you go and make any final tweaks for the perfect fit.
Additional Tips
- If You Are New to Pattern Alteration, It’s Always Helpful to Practice a Simple Pattern First Before Moving on to More Complex Ones.
- Keep the Original Pattern Intact and Store It Separately From Your Altered Version. This Way, You Can Always Go Back to the Original if Needed.
- When Enlarging Patterns With Multiple Pieces, Be Sure to Keep Track of Each Piece and Label Them Correctly. You Can Also Use Different Colored Pencils or Markers for Each Size to Avoid Confusion.
- It’s Always Better to Make Adjustments in Small Increments Rather Than Large Ones. You Can Always Add More if Needed, but It’s Difficult to Take Away Fabric Once Cut.
- If Your Pattern Has a Lot of Intricate Details Like Darts or Pleats, It May Be Easier to Redraw the Pattern Rather Than Enlarging Each of These Details Individually.
- Don’t Be Afraid to Experiment and Make Changes, as Everyone’s Body is Unique and May Require Different Alterations for the Perfect Fit. Enlarging Sewing Patterns Can Seem Intimidating at First, but With Practice, It Can Become Second Nature. Once You Have Mastered This Skill, You’ll Be Able to Confidently Create Garments That Fit Your Body Perfectly.
Frequently Asked Questions
Q: Can I Use This Method to Enlarge Patterns in More Than One Size?
A: Yes, You Can Use This Method to Enlarge Patterns by Any Number of Sizes. Just Be Sure to Keep a Record of the Ratio Used for Each Piece So That You Can Refer Back to It in the Future.
Q: What Other Tools Can I Use to Enlarge Patterns?
A: In Addition to a Clear Ruler, Tracing Paper, and Carbon Wheel, You Can Also Use Patternmaking Curve Rulers or French Curves. These Tools Are Especially Useful When Enlarging Intricate Details on Patterns.

Q: Can I Also Use This Method to Enlarge Knit Patterns?
A: The Method Outlined Above is Best for Woven Fabric Patterns. For Knit Patterns, It’s Better to Use a Stretched Grid or Graph Paper to Enlarge the Pattern Pieces.
Q: Can I Still Make Adjustments to My Enlarged Pattern if It Doesn’t Fit Perfectly?
A: Yes, You Can Always Make Small Changes to the Final Garment After Sewing. This Is Why It’s Important to Test Your Pattern First and Make Any Necessary Adjustments Before Cutting into Expensive Fabric.
Conclusion
The journey of altering a sewing pattern can be intimidating, but with the right mindset and approach it can be a fun and interesting experience. Breaking down each step into manageable chunks is the key to success. Take some time for yourself to explore and experiment with alteration techniques until you find something that works best for you.
Remember, even small modifications to your sewing patterns can make a big difference when it comes to creating the outfit of your dreams. So why not give it a try?
With perseverance, practice, and patience you’ll soon find yourself designing garments that truly are unique to your own style and taste. Give enlarging your sewing pattern a shot, you’ll never know what amazing creations will come out of it! Thanks for reading this article on how to enlarge sewing pattern.