
Feather stitch is a delicate and decorative embroidery technique that adds elegance and dimension to your sewing projects. Often used for embellishing seams, hems, or creating beautiful patterns, mastering the art of feather stitch opens up a world of creative possibilities for crafters and embroiderers. This article will guide you through the steps and techniques of how to do feather stitch.

From selecting the right materials and preparing your fabric to creating the stitch itself, you’ll gain the knowledge and skills necessary to incorporate this intricate and graceful embroidery into your projects.
Whether you’re an experienced embroiderer looking to expand your repertoire or a novice eager to explore new stitch patterns, feather stitch is a versatile and visually appealing addition to your embroidery toolbox, allowing you to add a touch of artistic flair to your creations.
Importance of Feather Stitch in Embroidery
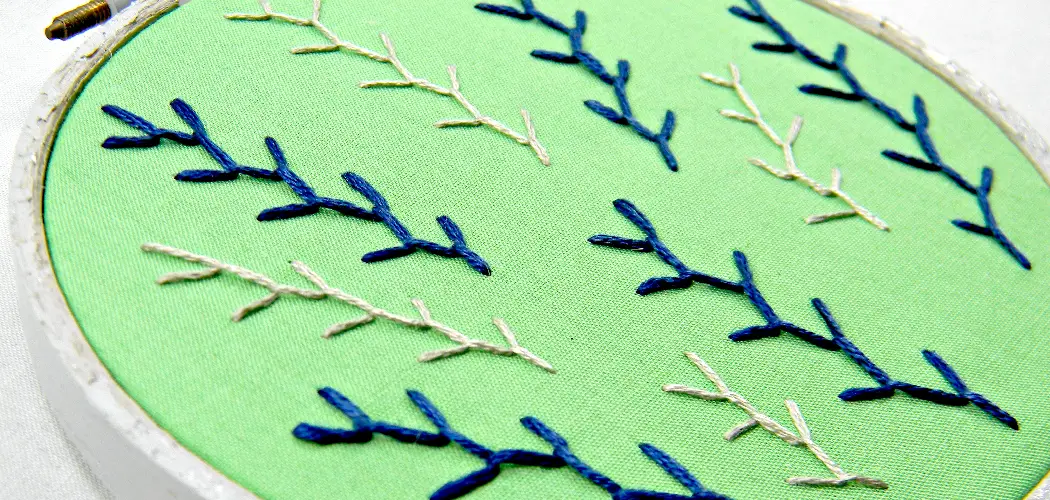
Feather stitch is an essential technique in embroidery and has been used for centuries to create beautiful, intricate designs. It is a type of decorative stitch that resembles the texture of feathers, thus its name. This stitch can be done using different types of thread and fabric, making it versatile and suitable for various embroidery projects.
Historically, feather stitch was used to embellish clothing and household items such as tablecloths, napkins, and curtains. It was also commonly used in traditional folk embroidery from different cultures around the world. With the rise of modern embroidery, feather stitch has not lost its popularity and is still widely used by embroiderers today.
10 Methods How to Do Feather Stitch
1. Gather Your Supplies
The first step in learning how to do a feather stitch is to gather your supplies. You will need a needle, thread, and fabric of your choice. It is also helpful to have a hoop or other frame to hold the fabric while you stitch. Once you have all of your supplies ready, you can start stitching!

2. Thread Your Needle
Once you have all of your supplies ready, you will need to thread your needle with the thread of your choice. Make sure that the thread is securely tied at the end so it won’t come undone as you stitch.
3. Mark Your Fabric
Before starting the feather stitch, it is helpful to mark where each stitch will go on the fabric. This will help ensure that each stitch is even and consistent throughout the design. You can use a pencil or other marking tool to mark the fabric before starting the stitch.
4. Start Stitching
Now that your fabric is marked and your needle is threaded, it’s time to start stitching! To begin the feather stitch, bring your needle up through the back side of the fabric and pull it through until there is a small loop at the top of the fabric.
Then, insert your needle into this loop and pull it through until there are two loops on top of each other on either side of where you inserted your needle into the fabric. Pull tight and repeat this process for each stitch in order to create a continuous line of stitches across your fabric.
5. Create Feathers
To create feathers with a feather stitch, start by making two small stitches next to one another on one side of where you want them in order to form an anchor point for creating feathers from each side of this anchor point.
Then, make three more stitches that come out from either side in order to form wings that look like feathers when complete. Repeat this process for as many feathers as desired across your design!
6. End Your Stitch
When finished with stitching, make sure that all threads are securely knotted at both ends in order to secure them in place and prevent unraveling over time due to wear or washing later on down the road! It may be helpful to use a few extra knots just for added security if desired, as well!

7. Trim Excess Threads
Once all threads are securely knotted off at both ends, trim any excess threads from around the edges using scissors in order for them not to show when the finished piece is displayed later on down the road!
This will help give a much cleaner finish overall and make sure that no stray threads are visible when the finished piece is displayed proudly later on down the road!
8. Press Your Work
After trimming off any excess threads, press work lightly with an iron set on low heat setting if needed in order for any wrinkles or creases caused by the stitching process earlier on not to be visible when the finished piece is displayed later on down the road! This will help give a much neater finish overall and make sure that the final product looks its best when displayed proudly later on down the road!
9. Enjoy Your Work
Once everything has been pressed and trimmed up nicely, enjoy looking at beautiful work created using the feather stitch technique earlier on down the road! This type of embroidery technique can be used for many different types of projects, such as clothing items or home decor pieces which makes it a great option for those looking to add some unique flair to their projects going forward!
10. Share With Others
Finally, once everything has been completed, nicely share work made using the feather stitch technique with others who may be interested in seeing what was created earlier on down the road!
Sharing work done helps spread knowledge about craftsmanship techniques such as this one, which helps ensure they don’t get lost over time due to a lack of interest or knowledge about them going forward!
Things to Consider When Doing Feather Stitch
Feather stitch, also known as single coral or briar, is an embroidery technique that creates a beautiful and delicate chain-like line. It is often used to create decorative borders, fillings for floral designs, and even standalone motifs. This versatile stitch can be done in different styles and variations, such as open or closed feather stitch, to give different effects.

Gather the Right Materials
Before starting any embroidery project, it is crucial to gather all the necessary materials. For feather stitch, you will need an embroidery hoop, fabric, embroidery needle, and embroidery floss. It is essential to choose a fabric with a tight weave so that the stitches are secure and do not unravel easily.
Choose the Right Needle
Choosing the right needle is crucial when doing feather stitch. The ideal needle for this stitch is a sharp or crewel embroidery needle, as they can easily pierce through the fabric without causing any damage.
The size of the needle will depend on the thickness of your thread and fabric. A general rule of thumb is to use a smaller needle for delicate fabrics and a larger one for thicker fabrics.
Practice Tension for Neat Stitches
The tension of your stitches is essential in creating neat and consistent feather stitch lines. Too loose stitches will result in a messy appearance, while too tight stitches can pucker the fabric. It is essential to maintain an even tension throughout the stitching process by pulling the thread firmly but not too tightly.
Common Mistakes to Avoid When Doing Feather Stitch
Feather stitch is a beautiful and versatile embroidery stitch that can add texture, dimension, and interest to any project. However, like any other embroidery technique, it takes practice and patience to master. In this section, we will discuss some common mistakes that beginners make when learning how to do feather stitch.
Not Using the Right Thread or Needle
One of the most common mistakes when doing feather stitch is using the wrong type of thread or needle. Feather stitch requires a medium-weight embroidery floss and a sharp needle to create clean and even stitches. Using a thin thread or a dull needle can result in loose, uneven, or distorted stitches.
Not Tensioning the Thread Correctly
Another common mistake when doing feather stitch is not tensioning the thread correctly. When working with multiple strands of thread, it’s essential to keep them taut to create neat and even stitches. Failure to do so can result in loose or uneven stitches, making your project look messy and inconsistent.
Skipping Steps
Feather stitch is a series of small stitches that create a V-shape, resembling the appearance of a feather. One common mistake beginners make is skipping steps and not following the correct sequence of stitching. This can result in an incorrect or lopsided stitch, ruining the overall look of your project.

Conclusion
In conclusion, mastering the art of feather stitching can greatly enhance the beauty of any leather project. With practice, you can master this technique and use it to enhance all types of leathercrafts. Once you feel comfortable with your newfound skills, why not try dyeing or embossing your feather stitching?
Or if you’re feeling particularly ambitious, why not combine both techniques to truly advance your leatherwork projects? All that’s needed is some patience and a steady hand. With enough hard work and dedication, anyone can learn how to use the feather stitch for stunning results! Thanks for reading, and we hope this has given you some inspiration on how to do feather stitch!