
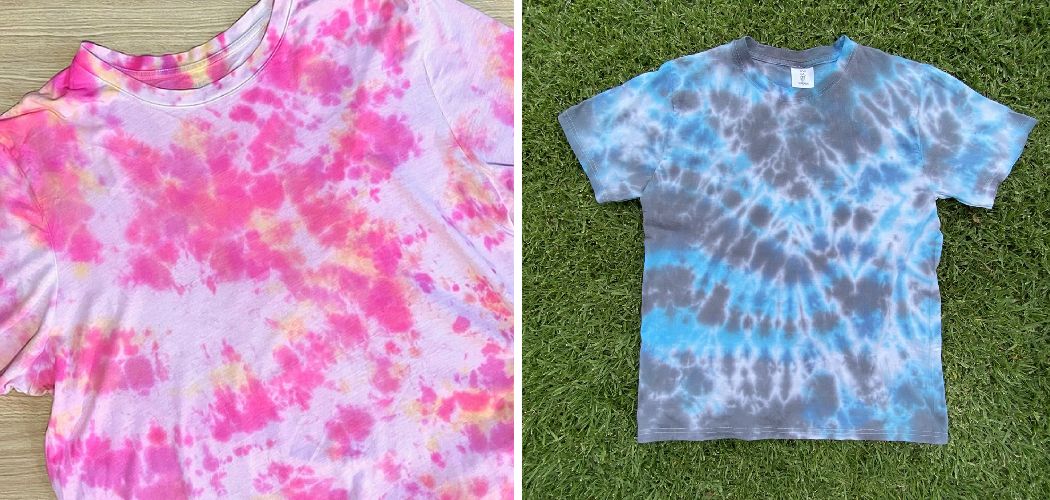
Are you looking to add a unique twist to your wardrobe? If so, then crumple tie dye is the perfect technique for you! This type of tie-dyeing creates beautiful, vibrant patterns with minimal effort and supplies. Plus, there’s no better way to ensure your clothes stand out in a crowd.

From classic bullseye designs to multicolored swirls, crumple tie dye can help turn your clothing into one-of-a-kind art. In this blog post, we’ll walk through all the steps necessary to create stunningly vivid fabric art using nothing more than string and dye!
So grab your materials, and let’s start – it’s time to learn how to crumple tie dye like a pro!
What Will You Need?
Before you can start tie-dyeing, you’ll need the following:
- Dye
- Rubber bands
- Water
- A bucket or container big enough to submerge the fabric you’re dyeing
- Gloves (to avoid staining your hands)
- Fabric of your choice, prewashed and dampened
Once you have all the materials ready, we can move on to the tie-dyeing process!
Tie Dye Crumpling Process
10 Easy Steps on How to Crumple Tie Dye
Step 1: Choose Your Fabric and Prepare It
Choose a fabric that is 100% cotton, as it best absorbs the dye. After selecting your fabric, wash it to remove any residual dirt or oils that could interfere with the dyeing process. Once washed, keep the fabric damp, as this helps the dye to spread evenly.
Step 2: Lay Out Your Fabric and Crumple It

Spread out your damp fabric on a flat surface, ensuring it is completely unfolded. Start crumpling the fabric by picking it up from the center or any random point and continue until the entire fabric is crumpled. This does not have to be perfect. The more random the crumples, the more unique your tie-dye pattern will be. Secure the crumpled fabric with rubber bands to hold the crumples together. This will create the spaces where the dye cannot reach, thus forming the pattern.
Step 3: Apply the Dye
Put on your gloves to avoid staining your hands. Prepare the dye according to the instructions on the package. Hold your bundled fabric over the container and start applying the dye. Squeeze dye onto the fabric, ensuring it penetrates the crevices. You can use one color or multiple, depending on your desired design. Remember, the areas covered by the rubber bands will resist the dye and create the pattern. Once you’re satisfied with the color saturation, you can move on to the next step.
Step 4: Let It Sit
After the dye application, it’s essential to let your fabric sit and absorb the dye. For vibrant and lasting colors, wrap your dyed fabric in plastic wrap or seal it inside a plastic bag to keep it damp. Let it sit for at least 6 to 8 hours or overnight for best results. Remember, the longer it sits, the more intense the colors. Be patient and resist the urge to unravel your fabric too soon.
Step 5: Rinse and Dry
Wearing your gloves, carefully remove the rubber bands. Rinse the fabric under cold running water to wash out excess dye until the water runs clear. Be gentle to avoid disturbing the newly dyed fabric. Once thoroughly rinsed, wash the fabric in warm water with mild detergent. Finally, hang your fabric to dry naturally. Avoid using a dryer, as the heat can cause the colors to fade. Once your fabric is completely dry, your crumple tie-dye masterpiece is ready to be flaunted! Remember, the first few washes should be done separately as the dye may bleed.
Step 6: Care for Your Tie-Dye
Maintaining the vibrancy of your crumple tie-dye requires careful washing. Wash your tie-dyed fabric separately for the first few washes to prevent the dye from bleeding onto other clothes. Always use cold water and a gentle cycle. Avoid using harsh detergents or bleach, as they can fade the colors. Air-drying is recommended over machine-drying to preserve the vibrancy of the colors. With proper care, your crumple tie dye will stay vibrant and beautiful for years!
Step 7: Wear and Enjoy
Now that your crumple tie dye fabric is ready, it’s time to show it off! Whether you’ve transformed a T-shirt, a bag, or a pair of jeans, your unique creation will turn heads. Remember, each piece of crumple tie dye is a unique work of art – there are no repeats in this craft! So take pride in your creation and enjoy the color it brings to your wardrobe.
Step 8: Experiment and Have Fun

The beauty of crumple tie dye is that every design is unique. Feel free to experiment with different colors, fabric types, and crumple techniques. You may find that different fabrics absorb dye in unique ways, leading to exciting and unexpected results. Don’t be afraid to get creative and try something new – after all, the best part of tie dye is the surprise you get when you unfold your fabric to reveal the final design.
Step 9: Share Your Creations
After you’ve mastered the art of crumple tie dye, why not share your creations with the world? Post your designs on social media, gift them to friends, or even sell them at local craft fairs or online platforms. Spreading the beauty of crumple tie dye can inspire others to try this fun and creative technique. Remember, the joy of crumple tie dye is not just in the creation but also in sharing and admiring the vibrant, unique results.
Step 10: Repeat and Refine
Now that you’ve got the hang of crumple tie dye feel free to repeat the process with other fabrics or items. Each attempt allows you to refine your technique and experiment with different color combinations and crumple patterns. Practice truly makes perfect in the world of crumple tie dye. Most importantly, continue to enjoy the creative journey and the unique, stunning results of your efforts. Happy tie-dyeing!

By following these ten easy steps, you’ll soon be a master at crumple tie dye. Now go out and create some unique, one-of-a-kind designs! Remember to show off your creations – we can’t wait to see the stunning results of your craftsmanship.
5 Additional Tips and Tricks
- To get a tie-dye look with smooth edges, use a spray bottle to mist the fabric before you crumple it up. This will help discourage the dye from running and give your design more definition.
- When using old t-shirts or linens for tie-dye, prewash them in hot water with detergent to remove any dirt, oils, and product residue that could prevent the dye from sticking.
- Add a few drops of fabric softener to the bucket of water with your chosen dye color before submerging your garments. This will ensure even saturation and help the fabric absorb more dye so you get brighter colors.
- For maximum vibrancy, use a higher concentration of dye than the package instructions dictate.
- To ensure even dye distribution, make sure to turn your garment inside out and submerge it in the dye solution multiple times, letting it soak for at least 15 minutes each time. This will help you achieve a more vibrant design with deep hues that won’t fade easily over time.
Once the dye has been applied, rinse your fabric with cold water to remove any excess dye and let it air dry. Once it’s completely dry, you can iron or heat set your design to help lock in the color for long-lasting results.
5 Things You Should Avoid

- Don’t use a regular laundry detergent on your fabric before dyeing. Specialty dyes will require a dye fixative or soda ash to help lock in the color and prevent it from fading.
- Avoid using bleach or chlorine when pre-washing your fabric, as these products may react negatively with the dye.
- Ensure not to over-crumple your fabric when tie-dyeing, as this can cause the dye to bleed.
- Don’t let the fabric sit in the dye for longer than recommended, or it may become mottled and discolored.
- Never use a heat source on any type of dyed garments before they have been completely washed and dried, as it can cause the dye to fade.
By following these tips and avoiding common mistakes, you can create beautiful tie-dye designs that will last for years to come.
What is the Scrunching Technique for Tie-dye?
The scrunching technique for tie-dye is a great way to create interesting patterns and textures in your designs. This method involves taking fabric, usually cotton or silk, and tightly gathering it together in small clusters while the dye is still wet. The folds of the fabric will attract the dye and create darker areas on the fabric, which can result in cool abstract shapes and patterns.
To achieve this look, start by gathering the fabric with your fingers and then tightly scrunch it up. You can also twist the fabric in one place while scrunching it to create more defined shapes. Once you have achieved your desired shape, use rubber bands or string to secure it and then submerge it in the dye bath. After a few minutes, remove the fabric from the dye bath and rinse it with cold water. Then, you can carefully unfold your fabric to reveal beautiful patterns that will be sure to impress!
What Is Fabric Fixative?
Fabric fixative is essential to tie-dyeing as it helps lock in color and prevents fading. It’s typically a powder or liquid added to the water before dyeing, along with other ingredients like salt and sodium carbonate. This solution helps keep the dye particles suspended in the water so they can easily penetrate your fabric’s fibers. Not only does this help ensure even saturation of color, but it also helps extend the life of your tie-dye designs for years to come.

When using fabric fixative, it’s important to follow the instructions provided with your chosen product as each one will vary slightly. Generally speaking, you’ll need to first dissolve the fixative in a bucket of warm water before adding the dye and then submerging your fabric. After removing the fabric from the dye bath, rinse thoroughly and allow it to air dry before heat setting.
By following these simple steps, you’ll be able to create beautiful tie-dye designs that won’t fade over time. Just remember – practice makes perfect!
Conclusion
In the end, how to crumple tie dye effect is easier than it looks and can produce dramatic results with just a small amount of extra effort.
Whether you are trying to add an element of surprise to your wardrobe, create the perfect piece of décor for the wall, or just have some creative fun, crumple tie dye is an easy way to do it.
So why not give crumpling a try? You can rest assured in knowing that even if it doesn’t turn out quite like you imagined, with colors bleeding outside of your designated patterns or certain sections being brighter than others, that was part of the plan and will only enhance the beauty of this unique method.