
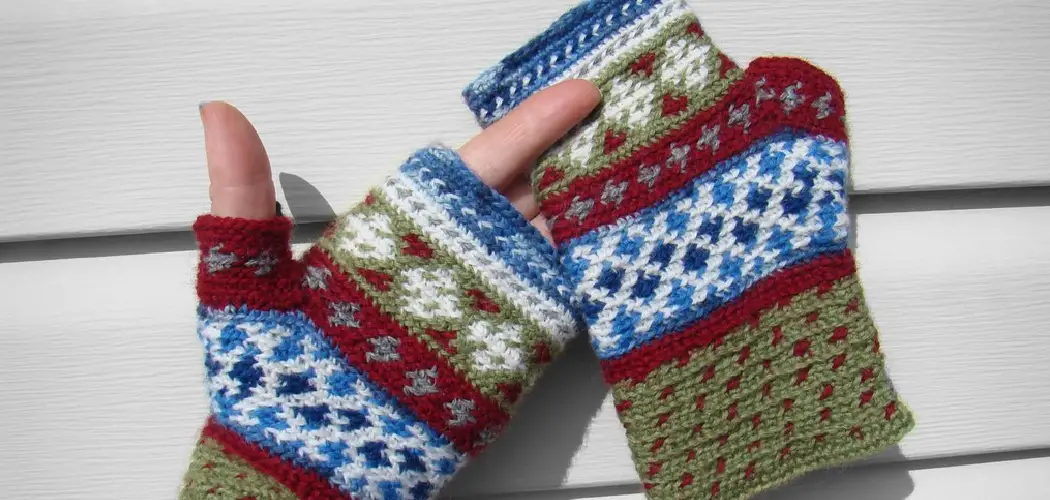
Are you looking to add a unique and personal touch to your home decor? Perhaps you have already mastered the art of knitting but want to explore something more complex. If so, the crocheting tapestry is a great way to expand your crafting skills! Tapestry crochet is a versatile technique that allows for unlimited possibilities when creating works of fiber art.

Through this tutorial, we’ll explain the basic steps of how to crochet tapestry with even beginner-level knowledge and supplies. Whether it’s for an elegant addition to your living room wall or just crafty fun—you can take pride in knowing that no two pieces will be exactly alike!
Is Tapestry Crochet Difficult?
No, tapestry crochet is not particularly difficult. It does require knowing the basics of crochet, such as how to make a chain stitch, single crochet and double crochet stitches. Once these are mastered, it’s relatively easy to learn how to make tapestry crochet patterns.
It can take time to get used to changing colors often and controlling tension in both yarns being worked at the same time, especially if the pattern includes multiple colors. However, with practice and patience, anyone can learn how to do tapestry crochet!
Tapestry crochet is an ideal way for people who want to add some colorwork into their projects without having to worry about carrying strands or weaving in ends like you would for stranded knitting or Fair Isle.
Plus, since it’s all crochet, the finished piece has a nice drape and texture that you won’t get from traditional stranded knitting techniques. So whether you’re new to colorwork or an experienced crocheter looking for something different, give tapestry crochet a try! You won’t be disappointed!
10 Methods How to Crochet Tapestry
1. Crochet a Gauge Swatch.
Before you start your project, it’s important to crochet a gauge swatch. This will help you determine the correct hook size to use and ensure that your finished project is the correct size. To crochet a gauge swatch, simply chain the recommended number of stitches for your hook size and work a few rows of single crochet.

Then, measure the swatch to see if it is the correct size. If it is too small, you can try a larger hook size. Although it may take some experimentation, making a gauge swatch is an important part of any crochet project.
2. Choose the Right Hook Size.
The hook size you use will depend on the type of yarn you are using and the gauge of your project. If you are using a thinner yarn, you will need to use a smaller hook. If you are using a thicker yarn, you will need to use a larger hook.
You can find the recommended hook size on the yarn label. It is important to choose the correct hook size because it will affect how your stitches look and how quickly you can work. With the right hook size, your stitches will be even, and it will be easier to work quickly.
3. Make a Slip Knot.
To make a slip knot, start by making a loop with the yarn and placing it over your hook. Then, insert the hook into the loop and pull it through to create a second loop. Next, insert the hook into the first loop and pull it through both loops on the hook. This will tighten the knot and secure it to your hook.
If you need to adjust the size of your slip knot, simply loosen or pull tighter until it’s just right. While working with tapestry crochet, it’s important that your slip knot is nice and tight so that the stitch pattern doesn’t become distorted. To prevent the knot from coming undone, make sure to slide it up against the end of the hook.
4. Chain Stitch.
To make a chain stitch, start by inserting your hook into the slip knot on your hook and pulling up a loop of yarn. Then, yarn over and pull through both loops on your hook to create a new stitch. Repeat this process until you have reached the desired length for your project. You can also add layers of different color yarns when making your chain stitch by alternating between colors for each stitch.
This will give a different effect to your tapestry, depending on the colors you use. While making the chain stitch, it’s best to keep your tension even throughout for a more even look when working with multiple colors. Make sure to keep your finished chain stitches nice and tight so they don’t unravel while you are working.
5. Single Crochet Stitch.
To make a single crochet stitch, start by inserting your hook into the next stitch and pulling up a loop of yarn (two loops on your hook). Then, yarn over and pull through both loops on your hook to create one new stitch (one loop left on your hook). Repeat this process in each subsequent stitch until you reach the end of the row or round.

If you are crocheting in rounds, remember to join the last stitch with a slip stitch before repeating the single crochet stitches. While this stitch is simple, it can be used to create beautiful patterns and designs. Though it may take a bit of time to master the technique, once you’ve got the hang of it, you’ll be able to make all sorts of amazing tapestry crochet pieces.
6. Half Double Crochet Stitch.
To make a half double crochet stitch, start by inserting your hook into the next stitch and pulling up a loop of yarn (three loops on your hook). Then, yarn over and pull through all three loops on your hook to create one new stitch (one loop left on your hook). Repeat this process in each subsequent stitch until you reach the end of the row or round. For pattern work, you will need to be familiar with how to chain stitch, single crochet, and double crochet.
7. Double Crochet Stitch.
To make a double crochet stitch, start by inserting your hook into the next stitch and pulling up a loop of yarn(four loops on your hook ). Then, yarn over and pull through two loops only (you now have three loops on your hook). Yarn over again and pull through the remaining three loops ( you now have one loop on your hook).
While the double crochet stitch may look intimidating at first, it is actually quite simple. With a bit of practice, you will soon be an expert. Make sure to count your stitches as you go to make sure each row is uniform and even.
8. Treble Crochet Stitch.
To make a treble crochet stitch, start by inserting your hook into the next stitch and pulling up a loop of yarn (five loops on your hook). Then, yarn over and pull through the first two loops on your hook. Next, yarn over and pull through the next two loops (three remaining). Finally, yarn over and pull through the last two loops (one remaining).

You have successfully completed a treble crochet stitch! If you need more guidance on how to make the treble crochet stitch, watch this helpful video. To create a pattern with the treble crochet stitch, simply follow the instructions specified in your pattern. Now you’re ready to get started!
9. Slip Stitch.
To slip stitch, insert your hook into the next stitches usual but don’t yarn over with yarn before pulling through to stitch no loops on the hook. To complete the stitch, yarn over and pull through both existing loops on your hook. Slip stitches are used to weave in ends or even create a pattern on the fabric.
Although they don’t create a large stitch, they are still important to the tapestry. While using slip stitches, be mindful of the tension you use, as this can affect how tight or lose your fabric is. Try to keep your tension consistent throughout the project.
10. Fasten off & Weave in Ends.
When you’re done crocheting your tapestry, you want to make sure it lasts. To do this, fasten off the yarn at the end of your work, leaving a long tail. To do this, chain one and then cut the yarn, leaving a few inches of yarn to weave in.
While weaving in ends, start by threading the yarn through a tapestry needle and weaving it in and out of the stitches. Then, pull gently on the yarn to secure it and make sure it’s hidden for a neat finish.

Conclusion
In conclusion, learning how to crochet tapestry is not a difficult task; with some creativity and expertise you can create beautiful pieces of art! Of course, the basics are essential to any successful project: the different types of stitches, specific techniques for joining multiple circles together, and details regarding yarn selection. Don’t be afraid to push yourself and get creative!
Have fun as you practice and create your own stunning tapestry. Your hard work will surely inspire others to try it out as well.