

Have you ever wanted to add some extra pizzazz to your crochet projects? One way to spice up your project is by adding stripes. Stripes can help create a unique design that adds depth and texture.
They can also be used as an effective way to incorporate more colors into a project. In this blog, we’ll show you the basics of how to crochet stripes in a few easy steps.
Can You Crochet Stripes?
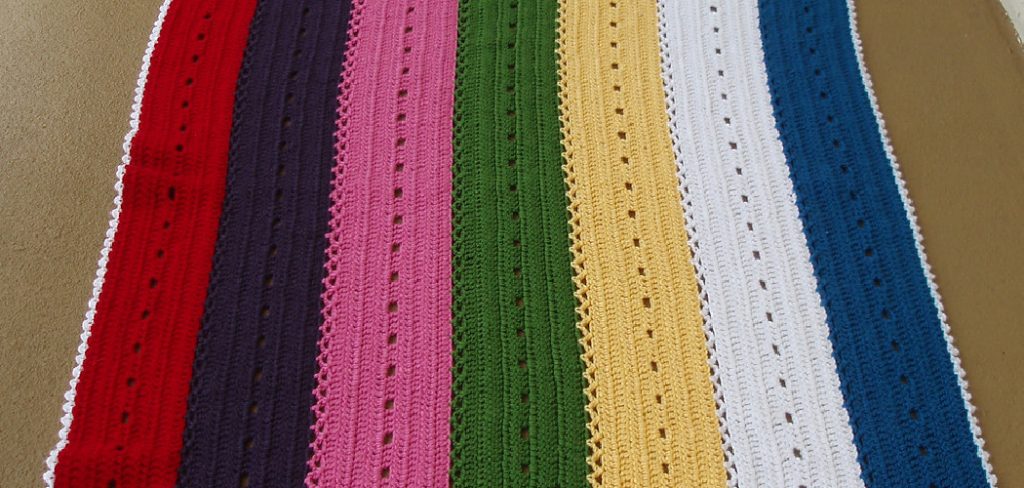
Crochet stripes can add a bit of color and design to any project! Unlike knitting, you can easily crochet stripes in any direction. To create horizontal stripes, move your yarn to the start of each row on the next color, ensuring the tension is tight. If you’d like vertical stripes, simply change colors after completing each round or stitch pattern.
Many tutorials exist for those who are new to crocheting that provides detailed instructions on how to achieve beautiful striped results. With just a bit of practice and patience, achieving perfect crochet stripes is easily achievable, no matter whether you’re a beginner or an experienced pro!
Why Should You Crochet Stripes?
Crocheting stripes are a great way to add visual interest and depth to your projects. Not only will it make your piece look more professional, but you can add color, texture, and dimension with this classic technique.
Working with multiple colors of yarn throughout the work not only helps create beautiful patterns and textures but also promotes creativity as well.

Stripes in crochet can become formal or informal depending on what colors and stitches you choose, so express yourself by adding some stripes to your project!
Additionally, crocheting stripes can be a great practice in working with color combinations that may never have occurred to you before. Have fun practicing skills like changing colors and understanding how the finished product looks different after adding stripes – the possibilities are endless.
7 Steps to Follow on How to Crochet Stripes
Step 1: Choose Your Yarn Colors
Before you get started with crocheting stripes, it’s important that you choose the colors of yarn that you want to use for your project. Keep in mind that the contrast between the two colors will make or break how the stripe looks after it’s finished.
Make sure that they are complementary colors – like black and white – so your stripe pattern stands out! Once you have chosen your yarn colors, it’s time for step two!
Step 2: Crochet Evenly
When crocheting stripes, it’s essential that each row is even. If one row is shorter than the next, then there will be gaps in your striped pattern.
To ensure even rows, count your stitches after every few rows and compare them with the number of stitches in previous rows. This way, if something goes wrong and you need to adjust it quickly, you can do so without having wasted too much time or yarn on an uneven pattern!
Step 3: Change Colors Once in a While
Once you’ve gotten used to crocheting even rows, it’s time for the fun part – changing colors! The best way to change colors while still getting an even pattern is by making sure that when switching from one color yarn to another color yarn, always switch at the beginning of a new row instead of halfway through one.
This will help keep all stitches uniform and prevent gaps from appearing between different colored sections. And don’t forget – if starting a new color section after a long string of one color section, make sure there is enough space between them; otherwise, they won’t stand out as much as they should!
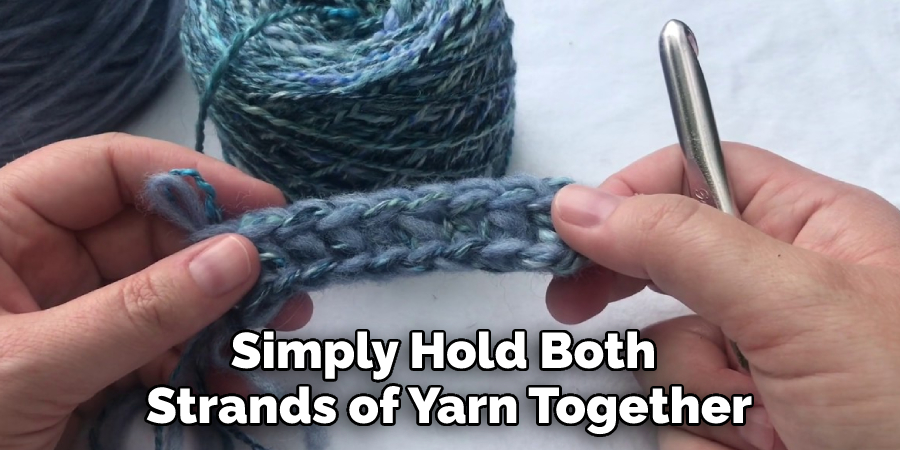
Step 4: Carry the Unused Color Along
When crocheting stripes, it’s important to carry along the unused color yarn as you go. This will help prevent gaps between colors and make sure that your pattern is seamless. To do this, simply hold both strands of yarn together while working the stitches. This way, you can work the stitches without having to cut and tie off the unused color yarn.
Step 5: Keep Your Tension Even
It’s also important to keep your tension even when crocheting stripes. If one stitch is tighter than another, then it will throw off the entire pattern. To make sure that this doesn’t happen, use a consistent amount of tension for all stitches. This will help keep the stripes clean and even, guaranteeing a beautiful pattern!
Step 6: Weave in Ends
Once you’re done crocheting your stripes, it’s time to weave in the ends. This is an important step that will ensure that your stripes look neat and tidy. Start by threading a yarn needle with the unused color yarn, then weave in and out of the stitches until all ends are tucked away.
Step 7: Block Your Work
No matter how carefully you’ve crocheted your stripes, it’s important to give your project a good blocking. This will ensure that all stitches are even and will help your pattern stand out even more. To do this, pin your work to the blocking board, then lightly steam it using an iron. Once it’s dry, your stripes should look perfect!
Now that you know how to crochet stripes, get out there and give it a shot! With patience and practice, you’ll be creating beautiful patterns in no time. Good luck!
Things You Need to Know Before Crocheting Stripes
Before crocheting stripes, it’s important to consider the color of the yarn you’re using. Brightly colored stripes can make a stunning statement or draw attention to certain shapes in a project, but you should be aware that yarn tends to bleed when wet, so mixing colors together might not give the desired result.
To avoid this, stick to yarns known to be colorfast or use different types of fiber and weave them together instead of creating single-strand stripes.
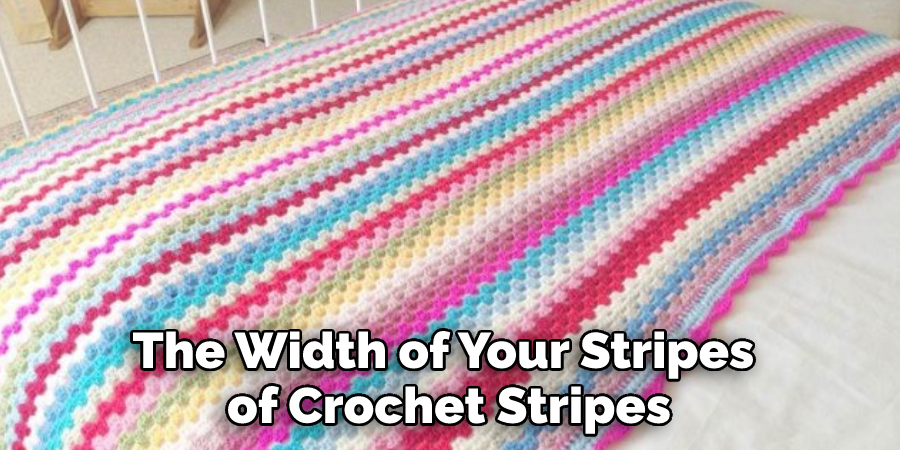
Additionally, varying the width of your stripes can really add character and life to a crocheted piece; more narrow stripes can create an interesting visual experience, while thicker ones call attention to particular details. Most importantly, have patience and enjoy creating colorful patterns!
Benefits of Crocheting Stripes
Crocheting stripes can create an infinitely customizable piece of artwork since you can control the number, size, and color of the stripes in your design. The stripes that you can create using crocheting are simple yet effective and have many benefits.
By mastering stripes in crochet, you will be able to give texture and depth to all of your creations. Additionally, you can use stripes as a way to join pieces together without having to do an additional seam or edge stitch.
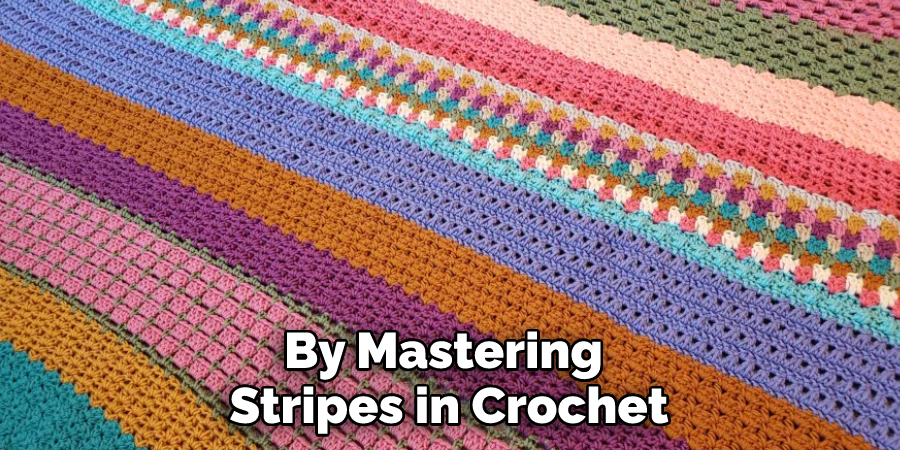
Stripes can also be used to create sections and panels in crochet projects, providing visual cues while reading instructions or patterns. With crocheting stripes, the possibilities are limitless!
6 Common Mistakes People Make When Trying to Crocheting Stripes
1. Not Planning Ahead
One of the most common mistakes people make when crocheting stripes is not planning ahead. It’s important to take the time to plan out your project before you start so that you know how many skeins of yarn you’ll need and in what order you’ll be crocheting the stripes. Otherwise, you might end up with too much or too little yarn or with stripes that are in the wrong color order.
2. Not Using the Same Yarn for Each Stripe
Another mistake people make is using different yarns for each stripe. This can create a striped project that looks messy and unfinished. To avoid this, make sure to use the same yarn throughout your project or at least the same type of yarn (e.g., worsted weight). This will give your stripes a clean, polished look.
3. Crocheting Too Tightly or Too Loosely
Another common mistake people make when crocheting stripes is crocheting too tightly or too loosely. This can cause the stripes to be uneven or to pucker. To avoid this, make sure to crochet each stripe with the same tension. This will give your project a neat and professional appearance.
4. Not Blocking the Project
Blocking is an important step in finishing any crochet project, but it’s often overlooked when it comes to striped projects. Blocking will help even out your stitches and give your project a nice, finished look. Be sure to block your project before you consider it complete!
5. Not Weaving in the Ends
Weaving in the ends is another important step that is often overlooked in striped projects. If you don’t weave in the ends, they will likely come undone and ruin all your hard work! Be sure to take the time to weave in all the ends before calling your project complete.
6. Not Being Consistent with Your Stripe Widths
The width of your stripes can have a big impact on the overall look of your project. If you want your project to have a professional and polished look, it’s important to be consistent with the width of your stripes. Make sure all of your stripes are roughly the same width and don’t be afraid to measure them if you need to!
Conclusion
Crocheting stripes add unique visual elements and personality to any project. It doesn’t have to be complicated either – simply follow these three steps, and soon enough, you’ll find yourself mastering this technique! With practice comes perfection – so don’t be afraid of getting started on those striped projects today!
By understanding how important picking complementary colors are and using counting techniques along with changing colors evenly throughout each row – anyone can easily achieve beautiful results with their crocheted stripes! Thanks for reading our post about how to crochet stripes.
You Can Check It Out to Make a Paper Dove