
Crocheting is an empowering skill that brings joy to so many people around the world. For those just starting out, it can seem like a daunting task; but don’t worry – you can be crocheting beautiful Hydrangea Flowers in no time!
This post will provide an easy-to-follow guide on how to crochet hydrangea flower, from gathering materials and getting started with the basics of crochet technique all the way through adding your own unique touch. Let us show you some simple steps that take your creations up a notch!

So if you think this crafty hobby could be for you, let’s get started creating lovely hydrangeas using crocheting skills!
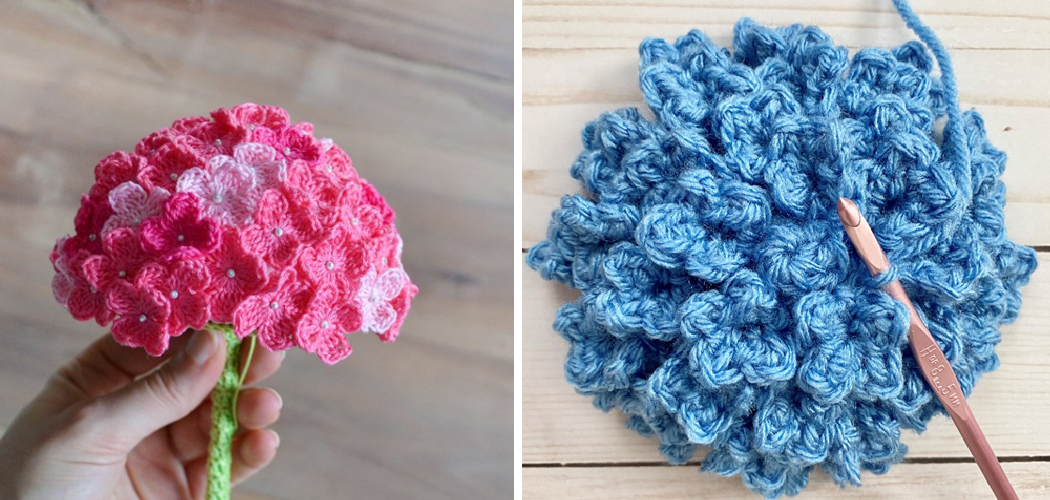
Recreating Nature’s Delicate Blooms: Crocheted Hydrangea Flowers
Hydrangea flowers are a beautiful addition to any crochet project. They are delicate, yet intricate in detail and can add a touch of nature’s beauty to a handmade piece. If you have been wondering how to crochet hydrangea flowers, this tutorial will show you the basics of how it’s done.
The first step in creating a crocheted hydrangea flower is to select a yarn of your choice. Most people use lightweight yarn for the petals, and then something heavier such as wool for the center. You will also need a crochet hook that is appropriate for your chosen yarn weight.
Once you have all the materials ready, it’s time to start crocheting! Start by making a slip knot in your yarn and chain four stitches onto your hook. Next, single crochet three times into the fourth stitch from the hook. Then, make two double crochets into each one of those three stitches. Finally, make two treble crochets into each one of those six stitches. This should give you twelve petals total.
10 Steps How to Crochet Hydrangea Flower
Step 1: Gather Materials
Before starting your crocheting project, gather all the necessary materials. You will need a crochet hook (size G or H works well for medium weight yarn), yarn in different colors for the petals and the center of the flower, scissors, and a yarn needle.
Step 2: Make a Slip Knot
To begin crocheting the hydrangea flower, make a slip knot by creating a loop with the yarn, then inserting the end of the yarn through the loop. Pull the yarn to tighten the loop around the hook.
Step 3: Chain Stitch Foundation
Create a chain stitch foundation by yarning over (bringing the yarn over the hook) and pulling it through the slip knot loop on the hook. Continue this process to make a chain of desired length, which will determine the size of your flower. A chain of about 6 stitches is a good starting point.

Step 4: Single Crochet in Second Chain
Insert the hook into the second chain from the hook, yarning over, and pulling the yarn through the chain stitch. Yarn over again and pull through both loops on the hook. This is a single crochet stitch. Repeat this process for each chain stitch in the foundation row.
Step 5: Single Crochet in Each Stitch
Continue working single crochet stitches in each chain stitch across the row until you reach the end. This will create a solid row of single crochet stitches.
Step 6: Continue Single Crochet Rows
Chain one and turn your work. Work single crochet stitches in each stitch across the row, chaining one and turning at the end of each row. Continue this process for the desired number of rows to achieve the height of your flower. Remember to keep the edges straight by maintaining the same number of stitches in each row.
Step 7: Shape the Petals
To shape the petals of the hydrangea flower, you will work shell stitches. Start by chaining three, which will count as the first double crochet stitch. Then, work two double crochet stitches in the same stitch.
Skip two stitches and work three double crochet stitches in the next stitch. Repeat this pattern across the row to create multiple shell stitches, which will form the petals of the flower. Once you have reached the end of the row, chain three and turn your work.
Step 8: Change Colors for the Center
Once you have completed the desired number of petal rows, change colors to create the center of the flower. Attach the new yarn color with a slip stitch and fasten off the previous color. Cut the yarn, leaving a tail for weaving in later. However, it is recommended to leave both tails of yarn (the beginning and the end) long for weaving in after finishing.
Step 9: Single Crochet in Each Stitch
With the new color, work single crochet stitches in each stitch across the row, chaining one and turning at the end of each row. Continue this process for a few rows to create the center of the flower. Adjust the number of rows based on the desired size of the center. Additionally, to create a puffier center, work double crochet stitches instead of single crochet stitches.
Step 10: Finish and Assemble
Once you have completed the center rows, fasten off the yarn, leaving a tail for weaving in later. Weave in all loose ends using a yarn needle. To assemble the hydrangea flower, roll the crocheted piece tightly, starting from one end.

Secure the rolled flower with a few stitches using the yarn needle and the tail left from the starting chain. Fluff up the petals and adjust their position to create a natural-looking flower.
Things to Consider When Crocheting Hydrangea Flower
When crocheting a hydrangea flower, there are a few things to consider. First, you need to choose the correct yarn for the project. It’s important to pick a yarn that is soft and comfortable, as well as sturdy enough to hold up the flower shape.
1. Choose the Right Hook
The right size hook helps create the correct size and shape of the flower. If you want a bigger flower, then pick a larger hook. If you want a smaller flower, then pick a smaller hook.
2. Consider the Color of Yarn
The color of the yarn can change how your hydrangea flower looks and feels. Choose a bright, cheerful color for a fresh, summery look. Or, choose a darker color for more of an autumnal look.
3. Pattern Selection
Take some time to look around and find the right pattern for your project. Once you have a pattern in mind, make sure to practice before starting on the actual flower. This will help you get used to the technique and feel comfortable with it before moving onto the actual flower.
4. Finishing Touches
Once your hydrangea flower is complete, think about how you want to decorate it. Add beads or ribbons for extra detail and texture! You can also add stems and leaves using different colors of yarn for extra dimension. The possibilities are endless!

By keeping these things in mind when crocheting a hydrangea flower, you’ll be able to create the perfect project that is sure to impress!
Some Common Mistakes When Crocheting Hydrangea Flower
When crocheting a hydrangea flower, it is important to remember that each stitch must be even and consistent.
1. Incorrectly Placing a Slip Stitch
When creating the center of the hydrangea flower, it is important to make sure that you are placing the slip stitch in the correct place. If you make your slip stitch too far from the center, it will be difficult to form the petals evenly.
2. Not Using Enough Stitches for Petals
When creating the petals of your flower, it is important to use enough stitches when forming each one. If there are not enough stitches in a single petal, then the petal may lack structure and shape.
3. Not Placing Your Stitches Close Enough Together
When crocheting your hydrangea flower, it is important to make sure that all stitches are placed relatively close together in order to create an even texture throughout the piece. If your stitches are not close enough together, then your flower may look uneven and sloppy.
By taking the time to avoid these common mistakes, you can ensure that your hydrangea flower will turn out beautifully! With patience and practice, you will be able to crochet a beautiful flower that looks as good as the real thing.

Conclusion
Crocheting a hydrangea flower might seem daunting to novice crocheters, but with the right supplies and guidance, anyone can do it. With a little practice, stitches will come more naturally, and design possibilities are infinite. Remember that not every flower needs to look like an exact replica of the real thing – be creative and express yourself through color and patterns!
After all, you have now officially learned how to crochet your very own hydrangea flower. Now go out there and explore all of the soul-satisfying creations that you can make using crochet techniques! Be sure to follow all instructions on how to crochet hydrangea flower carefully, and always consult an expert when in doubt. Happy crocheting!