
Do you want to learn how to crochet a star stitch? If so, this blog post is perfect for you! Crocheting the star stitch can seem intimidating at first glance, but once you get the hang of it, you might find that it’s easier than it looks.

In this post, we’ll go through each step of crocheting a star stitch and give helpful tips along the way. Whether you’re a beginner crocheter or an expert looking for a challenging new technique to try out, by the end of this article you’ll have all the knowledge necessary to confidently work up your own unique take on one of crochet’s most iconic stitches. So grab your hook and yarn and let’s get started!
Needed Tools and Materials
Given below are the materials and tools you need to get started:
- Crochet Hook
- Yarn of Your Choice
- Scissors
- Tapestry Needle
- Paper and Pen for Noting Down Your Progress
- A Chair or Other Supportive Surface
11 Step-by-step Guides on How to Crochet a Star Stitch
Step 1: Prepare Your Materials
Before you start crocheting, make sure you have all of the necessary tools and materials at hand. This will save you time later on if you need to look for something in the middle of a project. It’s also important to make sure that your hook size matches the yarn weight, otherwise, it can be difficult to work with.
Step 2: Begin Crocheting a Chain Sitch
To begin the star stitch, you’ll first need to crochet a chain stitch. To do this, take your yarn and wrap it around your crochet hook twice. Then pull the loop through the previous stitch until only one loop is left on your hook. This is considered a chain stitch. Keep repeating this process until you have the desired number of chain stitches for your project.

Step 3: Work Double Crochet Stitches
Once you have the required number of chain stitches, it’s time to start working on the double crochet stitch. To do this, insert your hook into the second stitch from the hook and yarn over. Pull the loop through the stitch and continue until you have two loops on your hook. Then yarn over again and pull the loop through both loops.
This completes one double crochet stitch, and you can continue doing this until you reach the end of your chain stitches.
Step 4: Complete Your Foundation Row
After working a row of double crochet stitches, it’s time to complete your foundation row. Turn your work so that the wrong side is facing you and begin working from right to left.
Chain one, then make three double crochet stitches in the same stitch space. This forms a V-stitch and should be repeated until you reach the end of the row. To complete your foundation row, chain three stitches and turn your work so that the right side is facing you again.
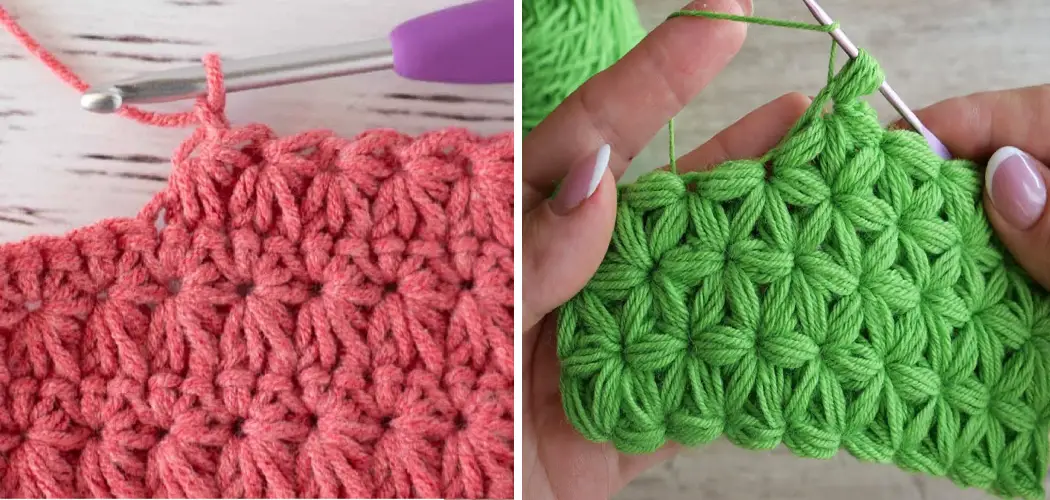
Step 5: Create Your Star Stitch
Now it’s time to start crocheting your star stitch. In order to do this, you’ll need to yarn over twice and insert your hook in the third double crochet stitch from the previous row below. Pull up a loop and continue doing this until there are five loops on your hook.
Then yarn over and pull through the first two loops. Yarn over again and pull through the next two loops, then yarn over one last time and pull through all five remaining loops. This completes a star stitch.
Step 6: Crochet Your Next V-Stitch
Once you’ve completed your star stitch, it’s time to crochet a V-stitch in order to connect it to the next star stitch. To do this, chain three stitches and make three double crochet stitches in the same stitch space.
This creates a V-stitch that will form your foundation for the next star stitch. It’s important to remember that you will always chain three stitches before making each V-stitch.

Step 7: Repeat Steps 5 and 6
Once you’ve completed your V-stitch, repeat steps five and six until you’ve reached the end of your row. Make sure to chain three stitches before starting the next star stitch and always make a V-stitch between each one. This will ensure that all of your stitches remain connected and even.
It’s also important to keep your tension even throughout the entire row in order to maintain a consistent look. This can be done by keeping your hook at the same tension throughout each stitch.
Step 8: End Your Row
When you reach the end of your row, it’s time to start finishing up. Chain three stitches, then make a double crochet stitch in the last stitch space of the previous row. This will provide your project with stability and help keep all of your stitches connected. It’s also important to note that in some patterns, the final stitch might be a single crochet rather than a double crochet – make sure to check for this before proceeding.
But in this case, we will be using a double crochet stitch. It’s important to keep your tension even when doing this stitch as well.
Step 9: Turn Your Work
Once you’ve completed your foundation row, it’s time to turn your work so that the wrong side is facing you again. Chain one, then make three double crochet stitches in the same stitch space and repeat until the end of the row.
This will complete your foundation row and provide stability for your project. But before you turn your work again, make sure to count the number of V-stitches in the row – this will help you keep track of where you are along your project.
Step 10: Fasten off Your Work
Once you’ve completed all of your rows, it’s time to fasten off your work. To do this, cut a piece of yarn long enough to weave in and out of the stitches. Thread the yarn through your tapestry needle and then carefully weave it in and out of each stitch until all the loose ends are securely tucked away.
Step 11: Enjoy Your Finished Project
You’ve done it! Now you have successfully crocheted a star stitch. Enjoy your masterpiece, or use it as part of an even bigger project such as a scarf or blanket! Always remember to take time for yourself and appreciate the beauty you have created. It’s time to show off your work and inspire others with your creativity.

These steps on how to crochet a star stitch should give you all the information you need to confidently crochet up your own unique take on the classic star stitch. Depending on how you choose to mix and match colors and textures, no two projects will be alike! So don’t be afraid to experiment and create something truly unique. Happy crocheting!
Tips for Crocheting a Star Stitch
- To Make Sure Your Stitches Stay Even and Consistent, It’s Important to Count the Number of Stitches in Each Row as You Go.
- If You Find Yourself Getting Frustrated While Working on This Stitch, Take a Break and Come Back to It When You’re Feeling Refreshed.
- Use the Same Yarn Weight Throughout Your Project to Ensure Consistency in Size and Texture.
- Don’t Be Afraid to Use a Variety of Colors to Add Some Extra Flair to Your Projects.
- Take Some Time Out of Each Day to Practice and Perfect Your Crocheting Skills, Even if It’s Just for a Few Minutes.
- If You Make a Mistake, Take Your Time to Fix It and Don’t Be Afraid to Ask for Help if You Need It.
- Have Fun! Crocheting Can Be an Incredibly Rewarding Hobby, So Enjoy the Process and Make the Most of Each Project.
Frequently Asked Questions
Q: What Types of Yarn Can Be Used For the Star Stitch?
A: Any type of yarn can be used for crocheting a star stitch, as long as it is the same weight and thickness throughout your project. It’s best to use a yarn with a medium weight such as worsted or aran for this stitch as it provides the most consistent results.
Q: Can I Crochet the Star Stitch in Rounds?
A: Yes! You can easily crochet the star stitch in rounds by simply joining the stitches at the end of each row and continuing to work in a circular motion. This is a great way to make hats, blankets, and other projects that require working in rounds.
Q: What Size Hook Should I Use For This Stitch?

A: The size hook you use for crocheting the star stitch will depend on your yarn weight. For most worsted or aran-weight yarns, a size H/8 (5 mm) crochet hook is recommended for best results. If you find that your stitches are too tight or loose with this size, try using a larger or smaller hook until you get the desired effect.
Q: How Can I Make My Star Stitch Look More Even?
A: To make sure your star stitch looks more even, it’s important to count the number of stitches in each row as you go and check for any inconsistencies. If there are any gaps between stitches or areas where the pattern is uneven, take the time to go back and fix them. This will help ensure that your star stitch looks flawless when it is complete.
Conclusion
Knitting and crocheting can be an incredibly rewarding and enjoyable hobby for anyone who wants to relax or learn a new skill. With the techniques covered in this article, you can now create a beautiful star stitch that will be a great addition to any of your projects! As with any skill, practice makes perfect, so don’t be discouraged if your first finished product doesn’t look quite like the one pictured above.
Spend some time experimenting with different yarn colors and textures to see how each type of material affects the aesthetics of your work. Have fun, relax, and enjoy yourself as you explore all of the possibilities that handcrafts have to offer! Thanks for reading this article on how to crochet a star stitch.