
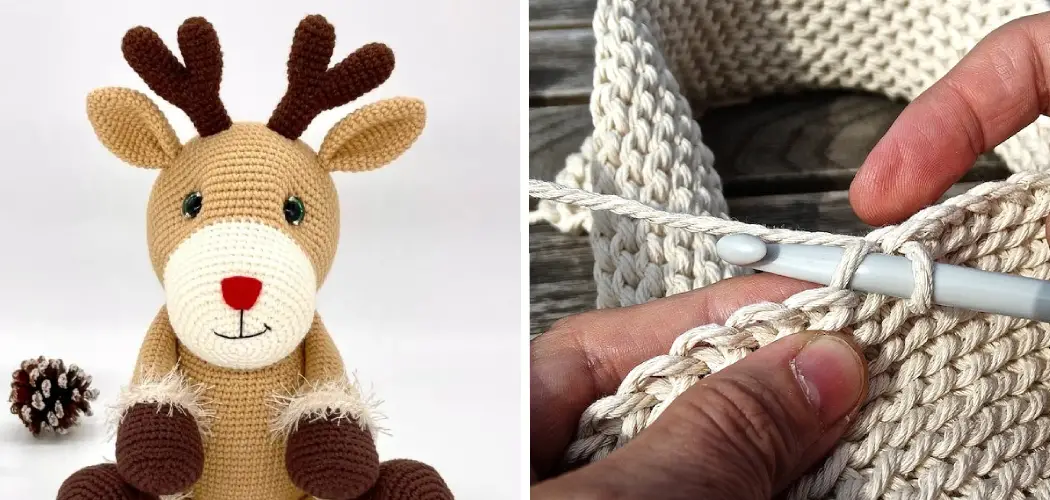
The holiday season is here; nothing gets you in the spirit like a handmade yarn craft! This simple reindeer crochet pattern is perfect for beginners. It can be done in a few hours, and it’s sure to bring some holiday cheer to anyone who sees it. So grab your yarn and hook, and let’s start crocheting! Keep reading to learn more how to crochet a reindeer.

Can You Crochet a Reindeer?
Believe it or not, crocheting a reindeer is simpler than you may think! If you know how to do crochet basics, you can easily make a charming one for yourself and your loved ones. You could even give it away as a special holiday gift! All you need is some basic materials like yarn, some stuffing, and perhaps some wire or pipe cleaner if you’d like to spice up your design.
By following an easy tutorial, you’ll be able to customize and create your very own crochet reindeer that will undoubtedly evoke wonderful memories and a cozy Christmas spirit!
Why Should You Crochet a Reindeer?
Crocheting a reindeer is the perfect holiday project for crafters of all ages. Whether you’re a novice looking for an interesting first pattern or an experienced hooker ready to take on something unique, the classic reindeer remains a popular staple. Not only is it fairly easy and relatively inexpensive to create, but with its timeless design and festive appeal, crocheting a reindeer can provide hours of heartwarming fun for the entire family.
And when it’s time to decorate your tree or spread some holiday cheer, your homemade reindeer will be sure to bring joy to everyone who sees it! So this season, why don’t you give crochet a try and give yourself the gift of creative satisfaction by making your own festive four-legged friend?
7 Steps to Follow on How to Crochet a Reindeer
Step 1: Choose the Right Yarn.
You’ll want to use a soft, worsted-weight yarn in a light brown color for the body of your reindeer. You can use either the same yarn or a contrasting color for the antlers. Be sure to get enough yarn to avoid running out in the middle of your project. If you’re unsure how much yarn you’ll need, take a look at the ball band or label on your skein of yarn for estimated yardage.

Step 2: Gather Your Supplies.
In addition to your yarn, you will also need some basic crochet tools to make your reindeer. These include a size H (5 mm) crochet hook, a yarn needle or tapestry needle, scissors, and some stuffing. You can also use some small buttons for eyes if desired. Gather everything up before you start so that you have it all ready when you need it. Now that you have everything ready let’s start on crochet a reindeer!
Step 3: Make the Body and Head.
Start by making a slip knot on your hook and then chain 15 stitches. Now single crochet in each chain to make the body, crocheting two stitches in each of the last four chains to form a round shape. Continue crocheting around until you have 14 rows, ensuring all your stitches are even and tight.
Step 4: Make the Legs.
To make the legs, crochet six single crochet stitches in each of the next two stitches. Then chain one and turn your work. Crochet 6 single crochets again in each of the next two stitches before chaining one and turning again. You should now have four loops for each leg – two on each side.
Step 5: Make the Ears and Antlers.
For the ears, crochet two single crochets in each of the next two stitches. Then chain one and turn your work. Continue crocheting around until you have a total of 6 rows for each ear. To make the antlers, start by chaining eight stitches before making a slip knot in the second chain from the hook. Then single crochet in each stitch to make a long chain. Repeat this process two more times to make three antlers.

Step 6: Attach the Parts Together.
Once all of your parts are complete, you can begin attaching them together. Start by stuffing the body with some filling, and then use your yarn needle to stitch the legs onto the sides of the body. Next, attach the ears to either side of the head and then sew on the antlers.
Step 7: Add Finishing Touches.
Finally, add some finishing touches to give your reindeer character. You can use buttons or beads for eyes, safety nose, mouth, or any other decorations you like. Once you’re finished, your reindeer is ready to play! Congratulations – you’ve learned how to crochet a reindeer!
Now that you know how to make your own adorable crochet reindeer, why not try making one as a special gift for someone else? Your reindeer is sure to be a hit!
Things You Need to Know Before Crocheting a Reindeer
Before crocheting a reindeer, it’s important to know the basics of crocheting. It may be helpful to start by reading some tutorials on the basic stitches and techniques. Having a good knowledge of the crochet language, such as abbreviations and symbols, is also essential so that when you read patterns or directions they make sense to you.
It’s also helpful to have an understanding of color changes, alternating colors as well as tools like different sized crochet hooks and yarn choices. Once you’ve mastered these steps, you’ll be one step closer to creating your very own charming reindeer!
Benefits of Crocheting a Reindeer
Crocheting a reindeer is an enjoyable and rewarding process. In addition to the satisfaction of creating something unique, crocheting a reindeer also has several benefits. It can help to reduce stress and improve your focus, as it requires close attention to detail and strengthens hand-eye coordination.

Each stitch builds strength in the wrists, hands and arms. Further, the repetitive pattern of crochet helps bring calmness and provide you with a sense of accomplishment. A DIY reindeer project offers plenty of opportunities for creative expression, allowing fabrication of the size, shape, colors and details that are precisely what you envision for your festive season décor.
6 Common Mistakes People Make When Trying to Crochet a Reindeer
1. Not Using the Correct Yarn
One of the most common mistakes people make when trying to crochet a reindeer is not using the correct yarn. The type of yarn you use can greatly impact the finished product, so it’s important to choose a yarn specifically designed for crocheting. If you’re not sure what type of yarn to use, ask a salesperson at your local craft store for help.
2. Not Using the Correct Hook Size
Another common mistake people make when crocheting a reindeer is not using the correct hook size. The size of your crochet hook will determine the size of your finished product, so it’s important to choose an appropriate hook for the yarn you are using. If you’re not sure what size hook to use, ask a salesperson at your local craft store for help.
3. Not Following the Pattern Exactly
When crocheting a reindeer, it’s important to follow the pattern exactly. Do not try to change the pattern or add your own personal touches, as this can result in an unfinished or misshapen product. If you’re having trouble following the pattern, there are many resources available online and in stores that can help you.
4. Getting Distracted
It can be easy to get distracted when crocheting, especially if you’re watching television or talking on the phone at the same time. However, paying attention to what you’re doing is important to avoid making mistakes. If you find yourself distracted, take a break and return to it when you can focus completely on the task at hand.

5. Not Checking Your Work Regularly
Another mistake people make when crocheting is not checking their work regularly. It’s important to check your work often in order to catch any mistakes early on. Once you get into a rhythm, it can be easy to zone out and Crochet without paying attention to what you’re doing. By checking your work regularly, you can avoid making costly mistakes that will require starting over from scratch.
6. Giving Up Too Soon
Giving up too soon is one of the biggest mistakes people make when crocheting. Crocheting can be challenging at first, but it gets easier with practice. If you are frustrated, take a break and return to it later. Don’t give up – with a little practice, anyone can learn to crochet a reindeer!
By following these tips, you can easily avoid common mistakes and learn how to crochet a reindeer. With practice and patience, you’ll be able to show off your finished product in no time! Good luck!
How Much Yarn Do I Need for Crocheting a Reindeer?
Most projects that require yarn come with a materials list, so if you’re looking to crochet a reindeer this holiday season, there’s no need to guess how much yarn you’ll need—all you have to do is find instructions for the specific project. Generally speaking, crocheting a reindeer will require 3-4 skeins of color-appropriate yarn because of the size and complexity of the project. It’s always better to buy more yarn than you think you’ll need in case your creative ideas take flight or you accidentally drop a stitch. That way, the body of the project won’t be interrupted by having to make an unexpected supply run!
Can I Make the Antlers Removable When Crocheting a Reindeer?
Crocheting a reindeer with removable antlers is definitely possible! All it takes is a little creative thinking, some extra yarn, and a bit of clever stitching. To achieve this, start cropping your reindeer’s body as you normally would. After that, instead of crocheting the antlers onto the head, attach two small buttons to where they should be and then crochet beanies for the antlers that fit over the buttons.

This way, if you need the antlers to be removable for any reason, such as storage or decoration purposes, you can easily take them off and put them back on again without having to unstitch any work. Have fun creating an adorable reindeer with removable antlers!
Can I Add Accessories to My Crochet Reindeer, Such as A Scarf or Hat?
Yes, you absolutely can accessorize your crochet reindeer! Put your creativity to the test by adding hats, scarves, pom-poms, or bells to your homemade decorations. Matching accessories can give them a more uniform look and make them stand out in whatever room they’re placed in. With a little bit of time and effort, you can have the perfect homemade holiday decoration featuring one or many of your crochet reindeer.
Let each one be unique while they stay coordinated with their accessories; get those creative juices flowing and see what cool combinations you can come up with!
Is It Possible to Change Colors and Patterns when Crocheting a Reindeer Design?
Crocheting a reindeer design can be a fun and creative way to customize your decor for the holiday season. The possibilities are endless when it comes to color and pattern choices. Whether you choose traditional festive reds, greens, and whites or try something more daring such as an all-blue reindeer, it’s possible to create your unique creations with crocheting!
Using colorful yarns of various thicknesses will help you customize the reindeer to your liking by adding different textures and dimensions that would otherwise be hard to achieve with a single color. While following detailed patterns from online tutorials helps guide novice crocheters into successful projects, seasoned hobbyists need only imagination and an understanding of basic stitches to craft their dazzling designs.

Conclusion
Making handmade gifts for friends and family is one of life’s greatest joys during the holiday season — especially when it comes from something as beautiful as crochet crafts! With these instructions in hand, even those new to crochet will be able to create an adorable reindeer that can be used as décor or gifted as a special holiday present!
So grab some yarn, dig out that hook from your craft box — happy crafting, everyone! Thanks for reading our post about how to crochet a reindeer.