
The art of crocheting, a tapestry woven with creativity and skill, extends its canvas to encompass even the most delicate and intricate of creatures – the hummingbird. Crafting a crocheted hummingbird is an enchanting journey that marries the elegance of these tiny birds with the timeless beauty of yarn and stitches. This project not only showcases the versatility of crochet but also invites crafters to capture the essence of nature in their own hands.

The mesmerizing dance of yarn and hook transforms into a lifelike representation of a hummingbird, embodying both the grace of the natural world and the artistry of human creation. In this article, we embark on how to crochet a hummingbird, guiding enthusiasts through each meticulous step of the process. From selecting the right materials to mastering intricate stitches, you’ll find yourself immersed in the magic of crocheting a miniature avian masterpiece.
The Idea of Crocheting Intricate and Delicate Creatures
Crocheting is a wonderful way to create intricate and delicate creatures, and the hummingbird is no exception. The crocheted version of this beautiful bird has delightful details that make it stand out from other crochet projects. Whether you are new to crocheting or an experienced pro, you can easily learn how to crochet a hummingbird with these easy-to-follow instructions.
Whether you are looking to create something special for a loved one or simply have fun experimenting with yarn and stitch, crocheting a hummingbird is sure to bring out your creative side. With the right materials and patience, even beginners can make a beautiful hummingbird in no time!
The Appeal of Crocheting a Hummingbird as a Project that Combines Nature’s Beauty with Yarn Artistry
Hummingbirds are one of the most fascinating and beautiful birds in nature, and many people enjoy seeing them flit about their gardens. Crocheting your own hummingbird is an excellent way to capture this beauty in yarn form while showing off your crochet skills. It’s a great project for beginners who want to learn how to crochet small projects, as well as experienced crocheters who want to create something that looks amazing.

Crocheting a hummingbird is a fun and creative project that you can use to adorn your home or give away as a thoughtful handmade gift. Crochet projects like this one allow you to get creative in selecting colors, textures, and even the design of the bird itself, making it unique and special. The project is also relatively quick to complete, compared to other crochet projects.
When crocheting a hummingbird, you can use the same stitches that you would use for any other crochet project and adjust them according to the pattern instructions. You’ll need to be familiar with basic stitches like single and double crochet as well as more advanced techniques such as decreasing and increasing.
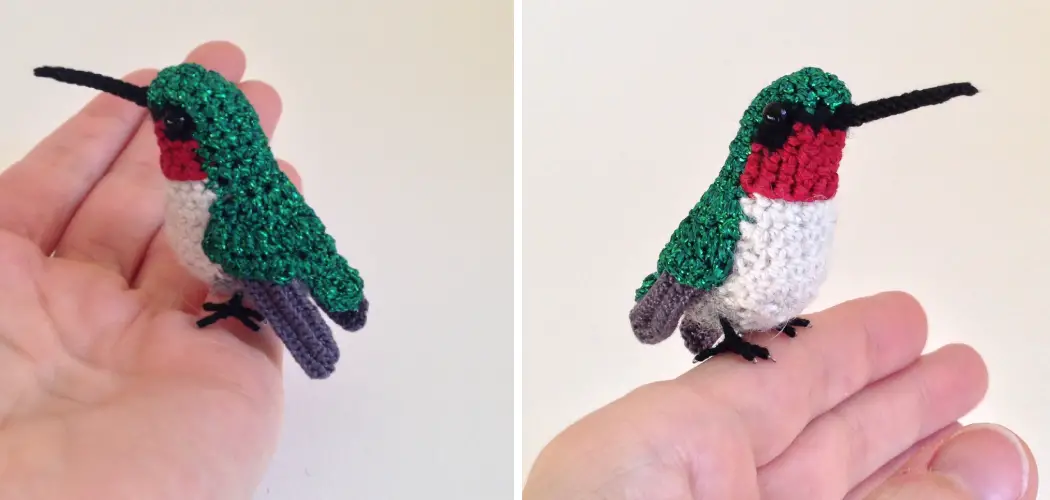
The most important thing to remember when crocheting a hummingbird is that the finished project should look realistic and capture the bird’s beauty as accurately as possible. This means paying close attention to details like the color of the wings, bill, and tail feathers and making sure each part looks true-to-life in size and shape.
The Opportunity to Capture the Elegance of Hummingbirds through Crochet
Crocheting a hummingbird is an excellent opportunity to create something beautiful, unique, and special. Whether you are someone who loves birds or just want to create something that looks delicate and elegant, crocheting a hummingbird is the perfect project for those with some basic crochet skills. With a few supplies and some careful instruction, any crafter can make a hummingbird that is sure to bring lots of joy.
This guide will take you through the process step by step, from gathering materials to finishing touches. Read on for tips on how to get started crocheting a hummingbird and make a beautiful work of art that will last for years to come if cared for properly.
11 Steps How to Crochet a Hummingbird
Step 1: Gather Your Materials and Find Inspiration
Before you embark on crocheting a hummingbird, gather all the necessary materials and seek inspiration for your project. Here’s what you’ll need:
Crochet hooks: Choose hook sizes suitable for the yarn you’re using. A range of sizes might be needed for different parts of the hummingbird.
Yarn: Opt for colorful yarns that resemble the iridescent feathers of hummingbirds. Choose shades of green, blue, and other vibrant colors.

Safety eyes or embroidery thread: Decide whether you want to use safety eyes for a realistic look or embroidery thread for more handmade details.
Fiberfill stuffing: This will give your hummingbird its shape and dimension.
Yarn needle and scissors: Essential tools for weaving in ends and sewing parts together.
Look for hummingbird-themed crochet patterns, images, and nature references to inspire your creation.
Step 2: Choose a Pattern or Design
Select a crochet pattern that matches your skill level and desired hummingbird size. Choose a pattern that includes clear instructions, stitch explanations, and any additional details like color changes or shaping.
Step 3: Start with the Body
Begin by crocheting the hummingbird’s body. Typically, you’ll start with a magic ring and work single crochet stitches in continuous rounds to create a seamless body. Follow the pattern’s stitch counts and rounds carefully to achieve the right shape.
Step 4: Add Fiberfill Stuffing

As you crochet the body, stuff it with fiberfill to give it volume and a three-dimensional shape. Make sure to stuff it evenly, but avoid overstuffing to maintain a realistic look.
Step 5: Create the Wings
Crochet the hummingbird’s wings using a combination of chains and stitches to achieve a wing-like shape. Depending on the pattern, the wings might be separate pieces that are attached to the body later.
Step 6: Form the Tail
The hummingbird’s tail can be created by crocheting chains and then working stitches into those chains. The length and shape of the tail feathers can vary based on the hummingbird species you’re replicating.
Step 7: Shape the Beak
The beak is an essential detail of the hummingbird’s face. Crochet a small, pointed shape using stitches that match the pattern’s instructions. Attach the beak to the front of the head.
Step 8: Adding Details
Attach safety eyes or embroider eyes onto the hummingbird’s head, positioning them according to the pattern. You can use small beads or buttons for eyes as well. Consider adding a small embroidered smile or using thread to create other facial features.
Step 9: Assembly
Carefully attach the wings to the sides of the hummingbird’s body, ensuring they are securely fastened. Similarly, attach the tail feathers to the back of the body, arranging them in a fan-like pattern.
Step 10: Finishing Touches
Weave in any loose yarn ends using a yarn needle. Take a moment to examine your crocheted hummingbird, making any necessary adjustments to the stuffing, shape, or attachment of components.
Step 11: Display Your Crocheted Hummingbird

Once your hummingbird is complete, you’ve achieved a remarkable crochet creation that captures the delicate beauty of these fascinating birds. Display your crocheted hummingbird on a shelf, use it as a decorative element, or give it as a thoughtful handmade gift to someone who appreciates the intricacies of crochet art.
Things to Consioder When Crocheting a Hummingbird
If you want to crochet a hummingbird, there are some key considerations that you should keep in mind. First, choose a pattern that is appropriate for your skill level. If you have never crocheted before, try using an easy-to-follow step-by-step tutorial. No matter what pattern you select, make sure to use the correct type of yarn and hook for your project. For hummingbirds, it is best to use a small crochet hook size, such as 2mm or 3mm, and fine-weight yarn.
Next, be mindful of color selection when crocheting a hummingbird. It can be helpful to look at pictures of real hummingbirds for inspiration. If you want to get creative with your project, consider using multiple colors to create a unique and eye-catching design.
Finally, it’s important to be patient when crocheting a hummingbird. It can take awhile for all the pieces of the project to come together but taking time and care will ensure that you have a beautiful end result. Don’t forget to crochet carefully around the delicate beak and wings of the hummingbird. When finished, you’ll have a lifelike replica that will bring a smile to your face every time you look at it.
In addition to following these tips, make sure to read all instructions carefully before beginning your project. This can save you from making rookie mistakes and ensure that your hummingbird comes out perfectly. With a bit of effort and patience, you’ll be able to create your own unique hummingbird that will be admired by all.
Safety Precautions for Crocheting a Humming Bird
Before getting started, it’s important to take the necessary precautions for working with small pieces of yarn and hooks. First, make sure that you wear gloves when handling the tiny piece of yarn, as it can cause friction burns on your skin if not handled properly. Also, ensure that the hook you use has a wide enough eye to accommodate the thin thread.
Wearing a pair of eyeglasses can help you to better manipulate the tiny pieces of yarn. Finally, if you’re not comfortable working with small pieces of yarn, it’s important to use larger hooks and thicker thread so that you won’t have any issues while crocheting your hummingbird.
When you first start out crocheting your hummingbird, it’s important that you use the correct type of yarn. Choose a lightweight cotton or acrylic yarn for the body, and a slightly thicker yarn for the wings and tail feathers. Depending on your preference, you can also choose to use a brightly coloured yarn for the body and brighter colours for the wings and tail feathers to give your hummingbird an eye-catching look.
Some Common Mistakes When Crocheting a Humming Bird
Crocheting a hummingbird is not particularly difficult, but there are some common mistakes that can be made during the process. The most common mistakes include:
- Not using the correct crochet hook size. It’s important to use the right size hook for your project because it will determine how tight or loose your stitches are. Too small of a hook can lead to tight stitches that don’t drape correctly, while too large of a hook may create loose stitches that can easily unravel.
- Not using the correct yarn weight. The wrong type of yarn can also affect the look and feel of your hummingbird. Yarns come in different weights which are labeled according to the thickness or thinness. Choose a yarn that is appropriate for the project you are working on.
- Not weaving in the ends correctly. When crocheting, it is important to weave in the ends of your stitches so they don’t come out later. Weaving in the ends correctly will ensure that your hummingbird looks as good as possible and won’t unravel prematurely.
- Using the wrong stitch technique. Different stitches are used for different parts of the project and each one has a specific purpose. Make sure to use the correct stitch in order to create a well-made hummingbird.
Conclusion
Crocheting is a fun and creative way to bring joy and beauty into your life. You can now recreate the beauty and grace of a hummingbird with the easy crochet instructions provided. Once you’ve mastered this powerful tool, you’ll unlock a whole new realm of creative possibilities.
From designing your own items to creating intricate patterns, the sky’s the limit with crocheting! So give it a shot today and find out what amazing pieces you can make when How to Crochet a Hummingbird. All that’s left to do now is grab those hooks, yarn, and get going!