
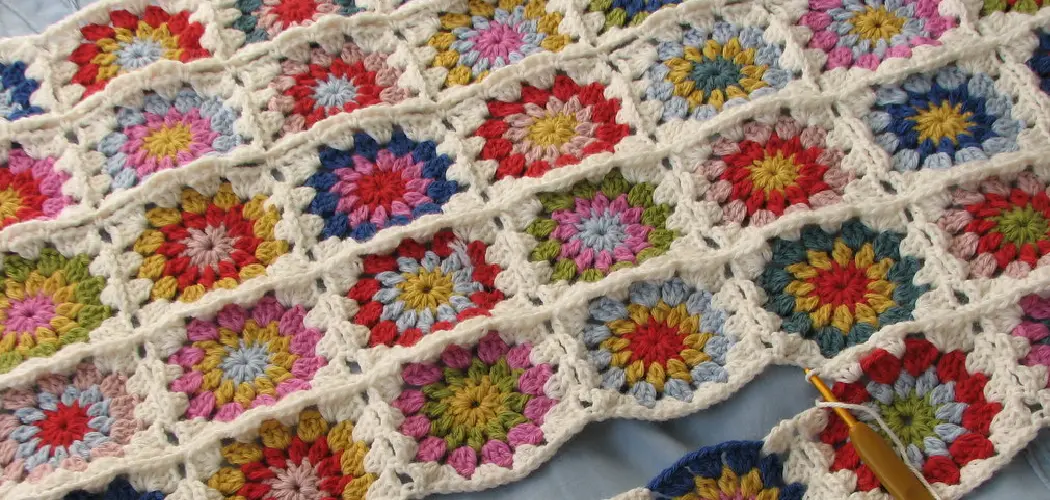
Crocheting a flower blanket is an inexpensive and rewarding way to create a unique decorative piece for your home or as a gift for someone special. A crochet flower blanket can be customized with the colors, shapes, and sizes of the flowers to best suit your style. It’s possible to make intricate designs that will last for years. Crocheting a flower blanket can be a great way to add unique and beautiful design elements to your home. The process of crocheting a flower blanket is fairly easy and requires minimal supplies. Not only is this craft fun and rewarding, but it also has many advantages that make it worth the effort.

One advantage of crocheting a flower blanket is the cost savings. Since you will be creating the project yourself, you do not need to spend money purchasing expensive pre-made materials or supplies. With just a few simple tools and some yarn, you can create something that looks beautiful and custom-made without breaking the bank. In this blog post, You will learn in detail how to crochet a flower blanket.
What Pattern Should You Use for the Flower Blanket?
When crocheting a flower blanket, the pattern is essential to the project. The pattern choice will determine how your finished product looks and how difficult it will be to complete. For beginners, it’s best to start with a simple floral motif, such as a daisy or tulip. These patterns are often small and easy to work with. Once you have mastered the basics of crocheting, you can move on to more complex patterns.
When choosing a pattern for your flower blanket, make sure it is suitable for the yarn and hook size that you are using. You should also keep in mind the type of stitch that will be used. If you use bulky yarn, you may need to adjust the pattern accordingly. Another thing to consider is the size of your flower blanket. A larger pattern will take longer to complete and may be too complex for beginners. If you are creating a smaller blanket, it’s best to use a simpler pattern with fewer stitches. This will make the project easier to finish, and you won’t have to worry about making any complex adjustments.

Needed Materials and Tools:
To crochet a flower blanket, you will need:
Yarn in Various Colors (Depending on the Chosen Pattern)
- It’s best to choose soft, lightweight yarn that is easy to work with. Cotton or acrylic yarn is recommended for beginners as it provides a nice texture and is not too thick or thin.
- You can use multiple colors of yarn for your flowers to make the blanket more eye-catching and unique.
Crochet Hook
- The size of the hook will depend on the yarn you choose and the pattern you will be using. The most common sizes for crocheting a flower blanket are G, H or I.
Scissors
- A pair of sharp scissors is needed to cut your yarn and tidy up any loose ends.
Yarn Needle
- A large-eye blunt needle is essential for weaving in ends and sewing your flowers together.
Stitch Markers
- These can be used to mark the beginning of each round or row, which is especially helpful when working with intricate patterns.
11 Step-by-Step Processes for How to Crochet a Flower Blanket
Step 1: Choose a Yarn Color and Texture
The first step in crocheting a flower blanket is to choose the yarn color and texture. This will ultimately determine the look and feel of your blanket. There are many color options available, so choose one that will complement the room or person you are making it for. You can also choose a range of colors to create a more vibrant and eye-catching blanket. It’s best to opt for soft, lightweight yarn that is easy to work with.
Step 2: Select a Pattern
Next, you will need to select a pattern for your flower blanket. As mentioned earlier, it’s best to start with a simpler floral motif if you are a beginner. Make sure the pattern is suitable for the yarn and hook size you have chosen. Otherwise, you may need to make some adjustments. You can find free patterns online or purchase them from your local craft store. Although it may be tempting to create your pattern, it’s best to follow a tried and tested one when first starting.
Step 3: Make a Slip Knot
To begin crocheting, make a slip knot on the hook. Leave a length of tail that is at least six inches long so that you can weave in the end later. You can also use a stitch marker to mark your first stitch. You will need to make a slip knot on your hook for each flower you create. It’s best to keep the slip knots about four inches apart so your blanket doesn’t become too tight or loose. The number of slip knots you make will depend on the size of your blanket.
Step 4: Chain Stitch
The chain stitch is the foundation of any crochet project. To create a chain stitch, wrap the yarn around your hook and pull it through your slip knot. Keep pulling yarn through each loop until you have the desired number of stitches. The number of stitches you make will depend on the pattern you are following. You can also use a chain stitch to create the petals of your flowers. It’s best to practice making a chain stitch before moving on to more complex stitches.
Step 5: Single Crochet Stitch
To create a single crochet stitch, insert your hook into the second chain from your hook and bring up a loop. Next, place the yarn over your hook and pull it through both loops on your hook. This completes one single crochet stitch. Repeat this process for each chain stitch in your row or round, depending on the pattern you are following. This stitch is used to create the center of most flower patterns. You can also use it to create borders or edges for your blanket.
Step 6: Double Crochet Stitch
The double crochet stitch is made by wrapping the yarn around your hook and then inserting it into the third chain from your hook. Bring up a loop and pull it through two loops on your hook. Wrap the yarn again and pull it through two more loops on your hook. This completes one double crochet stitch. You can use this stitch to create larger petals for your flowers or to add some texture to your blanket. It’s best to practice making a double crochet stitch before attempting it on your blanket.
Step 7: Half Double Crochet Stitch
The half double crochet stitch is similar to the double crochet stitch, but you will only wrap the yarn once before inserting it into the chain stitch. Then, bring up a loop and pull it through all three loops on your hook. This stitch is often used to create petals with a slight curve or to add some texture to your blanket. It’s best to practice making a half-double crochet stitch before incorporating it into your project.
Step 8: Treble Crochet Stitch
The treble crochet stitch is created by wrapping the yarn twice before inserting it into the fourth chain from your hook. Bring up a loop and pull it through two loops on your hook three times. This completes one treble crochet stitch. You can use this stitch to create larger petals or add some height to your blanket. It’s best to practice making a treble crochet stitch before attempting it on your blanket.
Step 9: Switching Colors
If you are using multiple colors of yarn for your flowers, you will need to switch colors as you work. To do this, complete the last step of your current stitch with the new color. For example, if you are switching from yellow to pink, complete the last step of a single crochet stitch with the pink yarn. Then, continue crocheting as usual with the new color. Make sure to weave in any loose ends so that they are hidden in your project.
Step 10: Assembling Your Flowers
Once you have made enough flowers according to your pattern, it’s time to assemble them into a blanket. Lay out your flowers in the desired pattern and use a yarn needle to sew them together. You can also use a slip stitch to join the flowers if you prefer. Make sure to secure all loose ends so that they are hidden in your project. Otherwise, they may come undone over time.
Step 11: Finishing Touches
To complete your flower blanket, weave in any remaining loose ends and add any additional details, such as a border or pom-poms. Once you are satisfied with your blanket, give it a gentle wash and dry to soften the yarn and set the stitches. Your beautiful flower blanket is now ready for use or gifting! Remember to have fun and be patient throughout the process – crocheting takes time and practice, but the end result is always worth it.
By following these simple steps on how to crochet a flower blanket, you will have a beautiful crocheted flower blanket in no time. Enjoy snuggling up in your new handmade creation.
Safety Tips for How to Crochet a Flower Blanket
- Make sure to carefully read all instructions and patterns before starting.
- Have your supplies laid out in front of you before beginning the project, ensuring that you have all the necessary materials on hand.
- Use the appropriate hooks for the yarn weight required by your pattern; this will ensure that your stitches are properly formed, and your project is neat and consistent.
- Be sure to keep track of the number of stitches you have worked on so far; this will allow you to easily identify where a mistake has been made, if necessary.
- Make sure to rest your hands regularly during crocheting; fatigue can lead to errors or sloppy workmanship.
- Cut off any loose threads as you go along; this will reduce the number of finishing touches required at the end.
- Use stitch markers to help you track where each flower motif begins and ends; this will allow you to identify which flowers are connected to each other easily.
- Take breaks often while crocheting the flower blanket; this will help you refresh and refocus, allowing you to create a beautiful final product.
By following these safety tips, it is possible to crochet a flower blanket that is both aesthetically pleasing and structurally sound.
How Long Does It Usually Take to Crochet a Flower Blanket?
The time it takes to crochet a flower blanket will depend on the size and complexity of the design. Generally, larger blankets with more intricate designs require more time to complete. If you are just starting with crochet, it may take several weeks or even months to finish a project of this size and difficulty. However, once you become familiar with the techniques, you can complete a flower-patterned blanket much faster. It is also important to remember that all crocheters have different skill levels, so the time it takes for one person may not be the same for another.

To help gauge how long it will take to crochet a flower blanket, consider factors such as the type of yarn used, the stitches involved, and the blanket size. Generally, yarn with a finer gauge or thicker weight will take longer to complete than those with a lighter weight. Additionally, certain stitches may require more time than others to create properly, so be sure to research each stitch before starting your project.
How Can You Make Sure That Your Flower Blanket Looks Professional and Finished?
- Use a high-quality yarn specifically designed for crocheting. Choose a color that complements the flowers you plan to use for your blanket, ensuring that the yarn is strong and durable enough to withstand regular washing.
- Select a crochet hook suitable for your yarn choice – thicker yarn usually requires larger hooks.
- For a beginner, starting with an easy pattern like granny squares or single crochet stitches is best. Doing so will make sure that your flower blanket is kept uniform and balanced in appearance.
- Make sure your tension remains consistent throughout the project by regularly checking the edges of your blanket to ensure they’re even.
- To ensure that your flower blanket looks professional, use a good quality thread for attaching the flowers. Make sure to tie secure knots and sew through both loops of the stitches or fabric to keep them in place.
- After attaching all your flowers, you can crochet around the edges of your blanket for a neat and clean finish. This can be done with either single crochet stitches or slip stitches, depending on the look you’re trying to achieve.

Finally, block the finished flower blanket to give it an even, professional appearance. Blocking helps secure all the components together and makes it easier to lay flat when displayed. Following these steps will ensure your flower blanket looks professional and finished, no matter the maker’s skill level.
How Do You Avoid Making Mistakes While Crocheting the Flower Blanket?
- Start with a basic crochet stitch, such as single crochet or double crochet, to ensure that you can follow the pattern. Doing so will help prevent any mistakes from occurring due to incorrect stitches being used.
- Read through the entire pattern before starting your flower blanket so that you know exactly what is required of each step and what will be expected of you at the end.
- Always measure your gauge before beginning, as this will help ensure that all of your pieces are the same size and that no mistakes occur due to incorrect measurements.
- Use a stitch marker whenever possible to track where you are in the pattern and prevent any placement errors from occurring.
- When making color changes, make sure to do so in a consistent manner to ensure that all of your flowers will look the same in the end.
Following these tips can help you avoid frustrating mistakes while crocheting your flower blanket and make it a much more enjoyable experience.
How Can You Prevent Your Crochet Hook From Slipping Out of the Stitches While Making a Flower Blanket?
- When crocheting a flower blanket, it is important to keep your crochet hook securely in the stitches so that they do not slip out or become too loose.
- Ensure you are using the right tension when pulling the yarn to prevent your crochet hook from slipping out of the stitches while making a flower blanket. Pull firmly, but not too tightly. If the yarn is too tight, it can cause the stitches to become too loose, making them harder to keep secure on your hook.
- You can also use a rubber band or tape to secure your crochet hook onto the stitch. This will help keep the stitches tight and prevent them from slipping off the hook.
- Finally, make sure that your crochet hook is a comfortable size for you to use. If it’s too small, it can be difficult to control and may slip out of the stitches more easily. It should also fit comfortably in your hand so that you can get a good grip on it while crocheting.

Following these simple tips can help ensure that your crochet hook stays securely in the stitches while making a flower blanket and will allow you to create beautiful works of art.
Conclusion
In conclusion, learning to Crochet a Flower Blanket is not as hard as it may seem. This project can be completed in a few hours with the right tools and supplies. When crocheting your flower blanket, it is important to use a good quality thread for attaching the flowers, block the finished product for an even and professional appearance, read through the entire pattern before starting, measure your gauge correctly, use a stitch marker whenever possible, and make color changes in a consistent manner.
Additionally, it’s important to use the right tension when pulling the yarn, secure your crochet hook onto the stitch with a rubber band or tape, and use a comfortable-sized crochet hook for easier control. I hope reading this post has helped you learn how to crochet a flower blanket. Make sure the safety precautions are carried out in the order listed.
You Can Check It Out to Embroider Leaves