
Crocheting a button is an excellent skill to have and is great for any crafter, even beginners. Not only is it relatively easy to learn, but the process of making your own custom buttons helps add a personal touch to any project. Once you get the hang of it, crocheting a button is incredibly fast and easy – it can be done in just a few minutes! The method can also be adapted to create different sizes and shapes of buttons as well.

Crocheting a button is also great for replacing buttons that have been lost, torn off or damaged in any way. Crocheting a button offers several advantages compared to traditional sewing techniques. First, it is much faster and easier to crochet the button than to use a thread and needle, as all you need is a crochet hook and some yarn.
Additionally, crocheting a button can give your clothing item an interesting design element that sets it apart from other garments. In this blog post, You will learn how to crochet a button in detail.
Step by Step Processes for How to Crochet a Button
Step 1: Inspect the Button
Before beginning, check the button to ensure it is in good condition. Check for any broken or weak parts that may cause your work to be unsuccessful. Gather the materials you will need to complete the project. These include a crochet needle, yarn, scissors, and the button you are using. Be sure to choose colors that match or complement each other.
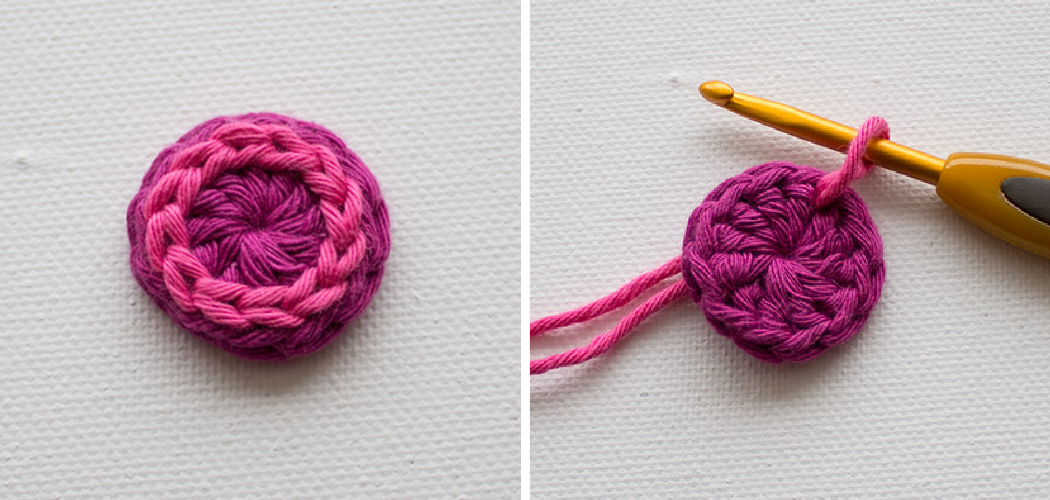
Step 2: Begin by Making a Chain Stitch
Begin your work by making a chain stitch. This will help secure the button and create an even edge for your work. Using yarn and needle, make a slip stitch around the entire circumference of the button. Ensure that each stitch is tight and secure so your work won’t unravel.

Step 3: Create a Row of Single Crochet Stitches
Using yarn and needle, create a row of single crochet stitches around the slip stitch. This will provide an even edge for your work and make sure that it is properly secured to the button. Continue making additional rows of single crochet stitches until you have reached the desired length. Make sure that all your stitches are tight and even.
Step 4: Tie off the Last Row with a Slip Knot
When you have finished making your rows, tie off the last row with a slip knot. This will ensure that your work stays in place and won’t unravel. Once you have finished the rows, cut off any excess yarn with a pair of scissors. Ensure not to cut too close to the button as this could cause it to come undone.
Step 5: Secure the Button with a Glue Gun
Use a glue gun to secure the button in place for extra security. This will ensure that it won’t come off even after repeated use. Finally, admire your work and enjoy it. You have now successfully crocheted a button and can use it for any project you wish.
Tips for How to Crochet a Button
- Make sure to read the instructions that come with your supplies thoroughly before starting. This will help ensure you use the right materials and follow safety protocols.
- Ensure that your workspace is well-lit and organized, making it easier for you to carry out precise work and avoid accidents or injuries.
- Wearing safety glasses is a must when crocheting buttons to protect your eyes from any possible flying debris or objects.
- Always use sharper tools designed for the task at hand, as dull tools can cause accidents and put you in danger of injury.
- Ensure that all of your tools are in good condition, as broken or damaged tools can be hazardous.
- Wear gloves when crocheting buttons to protect your hands from any possible cuts or injuries.
- Make sure to keep all of your materials away from children and pets, as they may be at risk if exposed to them.
- Make sure to take frequent breaks, as crocheting buttons require a lot of focus and concentration. This can help keep you from getting too tired or too focused on the task at hand and potentially making mistakes that can lead to injury.

What Type of Yarn is Best for Crocheting a Button?
When it comes to crocheting a button, the type of yarn used is important. A sturdy and strong yarn such as cotton or wool is recommended for this project since the button will hold some weight. Thinner yarns can also be used depending on the size of the button, but these should not be selected if the button will be used for any heavier tasks. It’s best to select the most suitable yarn for the project and one that will not unravel easily or become frayed over time.
Additionally, it’s important to consider the color of the yarn; buttons come in all sorts of colors, so make sure to choose a yarn that is complementary. With the right type of yarn selected, you can easily crochet a button that will be strong and stylish. Once the best type of yarn is chosen, the next step is to get the supplies needed for crocheting a button.
A standard crochet hook size G or H and a needle for weaving in the ends should suffice. You’ll also need a buttonhole punch and a piece of cardboard or other stiff material to make the hole in the center of the button.
How Do You Ensure That Your Crochet Button Will Be Secure and Durable?
After choosing a button, the next step is to ensure that it will be securely attached to your project. To do this, start by crocheting a few stitches around the shank of the button. You can use single crochet stitches or half double crochet stitches for this. Once you have done several rounds, insert your hook into the center of the button and make a few more stitches.
This will help keep it securely in place so that it won’t come off. You can also reinforce your crochet button with a bit of glue or fabric adhesive. After you have finished crocheting, apply a small amount of glue around the shank and let it dry. This will help ensure that your button is extra secure and durable.

How Can You Achieve a Raised Effect When Crocheting a Button?
When crocheting a button, you can achieve a raised effect using thicker yarn or thread. Looping the yarn around more times than usual when making your stitches, it will cause your finished button to have a slightly higher profile than normal.
Additionally, instead of simply stitching over and under each loop as is typically done with crochet, you can stitch through both loops for a more pronounced effect. This will make your finished button appear thicker and slightly higher than it would with regular stitches. You can also crochet additional rounds around the original round in order to add even more height to your button.
Finally, you may find that using a smaller hook will also result in a raised effect when crocheting a button. Using a smaller hook makes the stitches more concentrated, giving the finished button a slightly higher profile. This method can give your buttons an especially pronounced effect when combined with extra loops and stitching through both loops of each stitch.
How Can You Make Sure Your Crochet Button is Strong and Secure Without Using Glue or Other Adhesives?
One option is to use a thicker thread than usual and work your stitches tighter when crocheting the button so that it will hold securely without needing any extra help. You could also use a larger crochet hook than usual or even multiple strands of thread. This will make it more difficult to pull the button off, adding extra security.
Finally, you could use thicker yarn and do double crochets instead of single crochets when making the button – this will create a denser fabric and make it harder to remove the button. By taking these steps, you can ensure that your crochet button will stay secure without having to worry about using any glue or other adhesives.

Once the button is securely attached, it’s important to take care of it so that it lasts as long as possible. This means avoiding getting it wet and not exposing it to too much direct sunlight, as this could cause the colors to fade over time. Additionally, make sure not to pull or tug too hard on the button when you’re wearing clothing that it’s attached to – this is especially true for items like sweaters and coats since these fabrics can be heavier.
Conclusion
In conclusion, crocheting a button is a great way to add the perfect finishing touch to any project. It can be a fun and creative process that you can easily learn with practice. With the right materials, patience, and creativity, you can create beautiful buttons in no time!
Whether adding buttons to an old sweater or creating a unique piece of jewelry, crocheting your buttons is a great way to show off your skills and make something special for yourself or someone else. I hope this article has been beneficial for learning how to crochet a button. Make Sure the precautionary measures are followed chronologically.