
Transforming a mere ball of yarn into intricate patterns and designs is the magic of crochet. Yet, the journey doesn’t end with the final stitch. For every crochet project, whether it’s a delicate doily or a cozy blanket, the finishing touches play a pivotal role in achieving a polished and professional look.

Blocking, a technique often used by seasoned crocheters, is the secret behind achieving that flawless finish. If you’ve ever wondered how to make your crochet squares lay flat, appear more uniform, and enhance the overall aesthetic of your project, then mastering the art of blocking is your answer.
In this article, we’ll delve into the step-by-step process of how to block a crochet square, unraveling the mystery behind this technique and empowering you to elevate your crochet creations to new heights of beauty and precision.
Whether you’re a novice eager to enhance your skills or an experienced crocheter seeking to perfect your pieces, let’s embark on the journey of refining your craft through the transformative art of blocking.
Importance of Blocking in Achieving a Polished Final Product
Blocking is an essential part of crocheting and knitting projects. It helps to even out the stitches, ensure the edges are straight, and give your final product a polished look. Blocking can also help you to adjust the size or shape of your project if needed. In short, blocking is key for achieving a professional-looking piece.
When it comes to blocking crochet squares, there are a few important steps you should take. First, you’ll want to make sure that your square is dry before proceeding. You can either air-dry or use a hair dryer on the cool setting for quicker results.
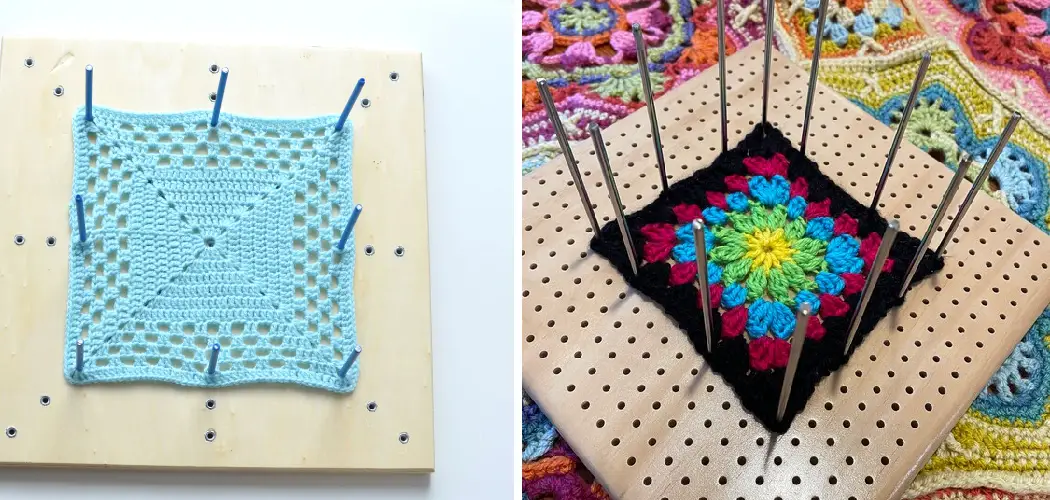
Once completely dry, pin the square in place on a blocking board or other flat surface. Make sure the pins are evenly spaced and secure, as this will help to keep your square in shape while it is drying.

Once pinned, lightly spritz the square with water from a spray bottle. You don’t want to saturate the piece completely – just enough for the fibers to relax and become more pliable. From here, you can adjust the shape of your square as needed. Once you are finished, let the square completely air-dry before unpinning it from the board.
The Benefits of Blocking Crochet Squares
Blocking a crochet square can help enhance the overall look and feel of your finished project. Blocking is essentially preparing or “setting” your stitches post-assembly, stretching and reshaping them into their final form.
This can help even out any bumps or dips in the surface of the fabric created by uneven tension when crocheting, as well as really helping define all the different stitches. It also makes for a crisper overall look and feel to the piece, creating cleaner edges and points when necessary.
To begin blocking your crochet square, you will need:
- A hard surface (i.e., a tabletop)
- Blocking pins/t pins
- A damp cloth or spray bottle of water
- Measuring tape
Start by laying the crochet square out on the hard surface. If your project requires a certain size, use the measuring tape to measure each side of the square and ensure that it is the correct size. Once you have confirmed that all sides are equal in length, you can begin pinning it down with blocking pins or t pins. Make sure to place the pins at regular intervals, as this will ensure that your square retains its shape.
11 Steps How to Block a Crochet Square
Step 1: Gather Your Materials

Before you begin the blocking process, ensure you have all the necessary materials at hand. These include the crochet square you intend to block, a suitable blocking mat, stainless steel or T-pins, a measuring tape, a spray bottle filled with water, and a clean towel. Having these materials ready will make the blocking process smoother and more efficient.
Step 2: Choose Your Blocking Method
Blocking offers flexibility in choosing the method that best suits your project and yarn type. There are two primary blocking methods: wet blocking and steam blocking.
Wet blocking involves moistening your crochet square with water to reshape it, while steam blocking uses steam to reshape the fibers. Consider the properties of your yarn and the desired outcome of your project to determine which method is most appropriate.
For wet blocking, use a spray bottle filled with water to evenly moisten your crochet square. Gently press the fabric into shape and allow it to air-dry completely before moving on.
Step 3: Prepare Your Crochet Square
Before blocking, it’s crucial to prepare your crochet square. If your square has been handled during the crochet process, there might be oils or residues on the fibers. Gently wash your crochet square according to the yarn’s care instructions. This ensures that your square is clean and ready for blocking. After washing, gently squeeze out excess water, but avoid wringing or twisting the fibers, as this can cause distortion.
Step 4: Pin Your Crochet Square
For wet blocking, lay your crochet square on a clean towel and roll it up gently to remove additional moisture. Unroll the towel and place your damp square on the blocking mat. Using a measuring tape, carefully measure the dimensions of the square to ensure accuracy.

Start pinning your square, beginning with the corners. Place pins at each corner and along the edges, ensuring the square lies flat and even. If your square features a specific pattern, use pins to define and emphasize those elements.
Step 5: Shape Your Crochet Square
As you pin your square, gently tug and shape it to match the desired dimensions. Take care not to stretch the yarn too forcefully, as this can cause distortion. Focus on ensuring that the corners and edges are straight and even. The shaping process is crucial for achieving a polished final result.
Once you’re happy with the shape of the square, leave it to dry overnight. This will help the piece “set” and hold its shape. After a few hours, you can remove any remaining pins and admire your work! Now that you have learned how to block a crochet square, you are well on your way to creating beautiful pieces of crochet art.
Step 6: Allow to Dry
Once you’ve pinned and shaped your crochet square, leave it in a well-ventilated area to dry completely. Depending on the humidity level and the type of yarn used, this process may take anywhere from a few hours to a day or more. Avoid placing your square in direct sunlight, as this can cause colors to fade over time.
Once the square has completely dried, carefully remove the pins and admire your work! You may find that blocking has enhanced your stitch definition, making your crochet square look even more beautiful. Now you can proudly display it or use it as part of a larger project like a blanket or scarf.

Step 7: Steam Blocking
For steam blocking, prepare your steam iron by ensuring it’s clean and in good working condition. Hover the steam iron over the pinned crochet square, being careful not to touch the yarn directly.
The steam will gently moisten the fibers, allowing you to reshape the square by lightly tugging and adjusting its dimensions. After you have blocked the square, allow it to dry completely before unpinning and admiring your beautiful work!
When choosing a blocking method for crocheted items, remember that it’s important to consider the type of yarn you used. Wool responds well to wet or steam blocking while acrylic yarns should not be exposed to hot temperatures. For best results, always read the yarn label for care instructions and use the blocking method which best suits your crochet project.
Step 8: Allow to Set
After steam blocking, leave your crochet square in its pinned and reshaped state until it’s completely dry. This ensures that the fibers have a chance to set in their new shape. The setting process is essential for achieving a long-lasting result. Once the square is completely dry, you can unpin it and admire your work!
You might notice that after steam blocking, your crochet square looks slightly different than when it was just finished. This is normal the fibers have been blocked into a new shape, so there will be slight changes in appearance.
Step 9: Check Your Work
Once your crochet square is completely dry, carefully remove the pins. Take a moment to appreciate the transformation that blocking has brought about. Compare the blocked square to the unblocked one to observe the difference in terms of flatness, uniformity, and overall appearance. If you’re happy with the results, your square is now ready to be used in whatever project you have planned!

Another way to ensure that your crochet squares are as flat and uniform as possible is to use a blocking board. Blocking boards allow you to really get into all the nooks and crannies of your workpiece, giving it a perfect shape and size. This option can be useful if you need to work with very precise measurements or patterns.
Step 10: Incorporate into Your Project
Now that your crochet square is perfectly blocked, you can seamlessly incorporate it into your project. Whether you’re assembling a blanket, pillow, or any other item, your squared masterpiece will blend harmoniously with the rest of your creation. The blocked square’s enhanced appearance will elevate the overall aesthetic of your project.
Be sure to use a fiber that is suitable for the project you’re creating, such as cotton for items that will be handled frequently. If your square will be washed often, look for durable fibers like wool or acrylic. This way, your project will maintain its shape and texture even after numerous wash cycles.
Step 11: Experiment with Variations
While these steps offer a traditional blocking process, don’t hesitate to experiment with variations based on the specific requirements of your project. Different yarn types, stitch patterns, and project sizes may respond differently to blocking. Consider using a gentle detergent for wet-blocking delicate fibers, and explore different blocking mats and pinning techniques to achieve various effects.
Things to Consider When Blocking a Crochet Square
Blocking is an important step when making a crochet square as it helps to even out the stitches, create masterfully shaped pieces of work, and give your project that professional finish. When blocking your crochet squares, there are a few things you should consider:

- The Right Size – Before you start blocking your squares, make sure that they have been worked in the correct stitch pattern and are the desired size. Generally, if your square is slightly too small, a light steam blocking can help to stretch it out to the right size.
- The Right Yarn – Make sure that you are using a yarn that will not shrink or stretch when wet-blocked. Some yarns will shrink drastically when exposed to moisture and heat, so be sure to check the washing instructions before you begin.
- The Right Blocking Board – When blocking your crochet squares, a foam board is ideal as it will help to keep the tension even throughout. If possible, try and use a blocking board that is slightly bigger than your square so that you can pin it in place without stretching out of shape.
- The Right Pins – For the best results, use rust-resistant pins when blocking. This will ensure that your project is securely pinned in place and won’t slip out of shape when wet-blocked.
Conclusion
It is important to take the time to block crochet squares, as it can help enhance stitches and make the finished project look amazing. This tutorial has given you all the information you need on how to block a crochet square in five simple steps. Blocking crocheted pieces, such as squares, can really bring out intricate patterns or shapes that would otherwise be hidden by uneven stitch sizes.
Be sure to try this method of blocking out for yourself next time you want your work to look polished and professional. With a simple toolkit of pins, blocking mats, and some water, perfecting your beautiful crochet squares is achievable with minimal effort! So get creative with your designs, and finish off each piece with an easy block for that perfect finishing touch. Good luck!