
Have you ever noticed that plastic wrap and aluminum foil just don’t quite cut it when it comes to wrapping up leftovers? They always seem to tear up at the worst moments, wasting both food and materials. And while wax paper and plastic bags get the job done, they are single-use items that create lots of waste. What if there was a more sustainable and effective alternative? As it turns out, beeswax food wraps are the perfect solution.

Made from organic cotton coated in natural beeswax, plant-based resins and essential oils, these reusable wraps provide a non-toxic way to keep food fresh that avoids the piles of discarded plastic and foil building up in our landfills. In this post on how to use beeswax wraps, I’ll share everything you need to know about using beeswax wraps to get your kitchen on a more eco-friendly track.
What are Beeswax Wraps?
Beeswax wraps are a sustainable and eco-friendly alternative to single-use plastic wrap and aluminum foil. These versatile wraps are made from organic cotton infused with beeswax, plant-based resins, and essential oils.
The combination of these natural ingredients creates a malleable and slightly sticky surface that can easily be molded around food or dishes to create an airtight seal. This makes them perfect for preserving leftovers, packing lunches, or covering food while it’s stored in the fridge.
Necessary Materials
To use beeswax wraps effectively, you will need:
- Beeswax Wrap(S)
- Clean Dishcloth
- Scissors (Optional)
Note: Beeswax wraps can be purchased in different sizes and shapes to accommodate various food items. It’s always a good idea to have a few different sizes on hand for versatility.
11 Step-by-step Guidelines on How to Use Beeswax Wraps
Step 1: Prepare Your Beeswax Wrap
Before using your beeswax wrap for the first time, you will need to “prime” it. This helps to ensure the maximum durability and effectiveness of the wrap. To do this, you will need to crumple the wrap-up tightly for about a minute to activate the beeswax coating. You can also use a blow dryer on low heat to speed up the process. But be careful not to overheat the wrap as it can cause the wax to melt and become less effective.

Step 2: Choose the Right Size
Select a beeswax wrap that is large enough to cover your food or dish completely. If needed, you can always use multiple wraps to cover larger items. It’s okay to cut the beeswax wrap to fit your specific needs. The wrap can be easily resized using scissors, and the edges will reseal with the warmth of your hands. It’s important to note that cutting the wrap will not affect its effectiveness.
Step 3: Place Your Food or Dish in the Center of the Wrap
Place your food or dish in the center of the beeswax wrap. Be sure to leave enough space around the edges for folding and sealing. Otherwise, the wrap may not create an airtight seal. But don’t worry, if this happens, you can always use a second wrap to cover any exposed areas. It’s better to overlap the edges of two wraps than have any exposed food.
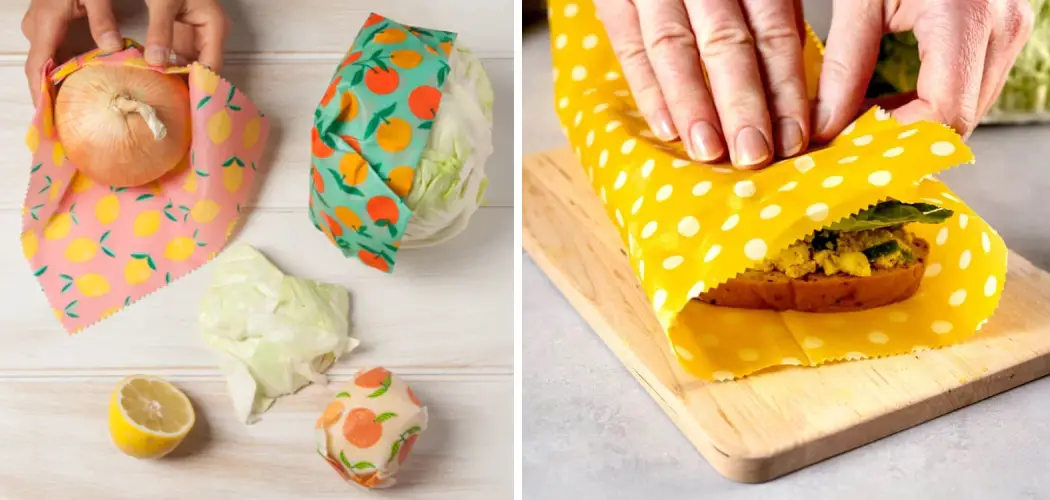
Step 4: Fold the Edges up and over Your Food or Dish
Fold one side of the wrap-up and over your food or dish. Use gentle pressure to mold the wrap around the shape, creating a snug fit. Repeat this step with each remaining edge until your food or dish is completely covered. You can also use the warmth of your hands to help mold the wrap to the shape of your food or dish. This will create an airtight seal and prevent any air from getting in.
Step 5: Seal the Beeswax Wrap
Once all edges are folded and molded onto your food or dish, rub your fingers firmly over the edges to seal them in place. This will create a tight seal that will keep your food fresher for longer. You can also use the warmth of your hand to help seal any edges that may not be sticking as firmly. But be sure to use gentle pressure to avoid tearing the wrap.

Step 6: Use Beeswax Wraps for Sandwiches and Snacks
Beeswax wraps are also great for wrapping sandwiches and snacks on the go. Simply place your sandwich or snack in the center of the wrap, fold up two sides, then fold over the remaining edges to create a pocket. This will keep your food fresh and contained until you’re ready to eat. Although beeswax wraps are not airtight like plastic wrap, they will still keep your food fresh for several hours.
Step 7: Cover Bowls and Containers
Beeswax wraps are perfect for covering bowls and containers, whether storing leftovers in the fridge or taking dishes to potlucks. Simply place the wrap over the top of the bowl or container, and use your hands to mold it around the edges for a snug fit. The warmth of your hands will help to create an airtight seal, keeping your food fresh and preventing any spills or messes.
Step 8: Wash Your Beeswax Wraps
After using your beeswax wraps, you can easily wash them with cool water and mild soap. Avoid using hot water as it can melt the beeswax and reduce the effectiveness of your wrap. It’s also important to air dry your wrap and avoid wringing it out, as this can cause the beeswax coating to crack. But don’t worry, if your wrap does become damaged or worn out, it can be composted as it is made from all-natural and biodegradable materials.
Step 9: Store Your Beeswax Wraps Properly
When not in use, store your beeswax wraps in a cool and dry place. Avoid storing them in direct sunlight or near heat sources, as this can cause the beeswax to melt and become less effective. You can also wrap them around a clean dishcloth or store them in an airtight container to keep them protected.

Step 10: Refresh Your Beeswax Wraps
After multiple uses and washings, you may notice that your beeswax wraps are becoming less sticky. This is normal as the beeswax coating can wear off over time. But don’t worry, you can easily refresh your wraps by lightly sanding them with fine-grit sandpaper or running them under warm water and then drying them with a blow dryer on low heat.
Step 11: Say Goodbye to Single-Use Plastic
By using beeswax wraps, you are saying goodbye to single-use plastic wrap and contributing to a more sustainable lifestyle. Beeswax wraps can be reused multiple times and can last up to a year with proper care. This means less waste in our landfills and oceans, making a positive impact on the environment. So next time you reach for plastic wrap, remember that there’s a better, more eco-friendly option available.
So why not give beeswax wraps a try and see the difference for yourself? Following these step-by-step guidelines on how to use beeswax wraps will help you make the most out of your beeswax wraps and reduce your plastic usage. Let’s all do our part in protecting the planet for future generations to come. Happy wrapping!

Additional Tips and Tricks
- Beeswax Wraps Can Also Be Used to Wrap Cheese, Bread, Fruits, and Vegetables.
- It’s Important to Note That Beeswax Wraps Are Not Recommended for Use With Raw Meat.
- Avoid Wrapping Food That is Still Hot or Above Room Temperature, as This Can Cause the Beeswax to Melt and Become Less Effective.
- You Can Refresh Your Beeswax Wrap Multiple Times Before Needing to Replace It.
- Don’t Forget to Label Your Wrapped Items With a Marker or Tape to Help Identify Them Later. This is especially useful for potlucks or packed lunches.
- Make Your Own Beeswax Wraps at Home by Using Beeswax Pellets, Fabric, and an Iron. Just Be Sure to Follow a Proper Recipe for the Best Results.
- Consider Giving Beeswax Wraps as Gifts to Friends and Family Who Are Also Looking for More Eco-Friendly Options in Their Daily Lives.
- Beeswax Wraps Are Not Only Great for Food Storage, but They Can Also Be Used to Cover Jars and Bottles, Making Them a Versatile Household Item. So get creative and find new ways to use your beeswax wraps!
Frequently Asked Questions
Q: Can Beeswax Wraps Be Used in the Microwave or Oven?
A: No, it is not recommended to use beeswax wraps in the microwave or oven as they can melt and become less effective. You should also avoid wrapping hot food or placing it in the refrigerator or freezer.
Q: How Do I Dispose of Old Beeswax Wraps?
A: Since beeswax wraps are made from all-natural and biodegradable materials, they can be composted instead of thrown away. Just cut them into smaller pieces to help them break down faster in your compost pile.
Q: Are Beeswax Wraps Safe to Use?
A: Yes, beeswax wraps are safe to use as they are made from all-natural and food-safe materials. However, it is not recommended to use them with raw meat or hot foods.
Q: How Many Times Can I Reuse a Beeswax Wrap?
A: Beeswax wraps can be reused multiple times, with proper care they can last up to a year. Just refresh them when necessary and avoid using hot water or wringing them out to help prolong their lifespan. So make the switch to beeswax wraps today and start your journey towards a more sustainable lifestyle!

Conclusion
If you’re ready to make the switch to an eco-friendly alternative to plastic — beeswax wraps are definitely for you. They are a simple, sustainable, and affordable solution compared to other plastic alternatives available on the market. Plus, they have great aesthetic properties! So why not try out this awesome product for yourself? You won’t regret it! Once you get the hang of it, using beeswax wraps becomes second nature.
Make sure to follow the steps on how to use beeswax wraps above for long-lasting success with your wax wraps. We look forward to seeing all the creative and fun ways in which you use them in your kitchen! So don’t let bee’s yellow and black stripes fool you…beeswax wraps are as potent as their colour when it comes to swapping out plastic wrap and adding a stylish touch of eco-friendliness into your daily life. Try them out today for a sustainable tomorrow!