
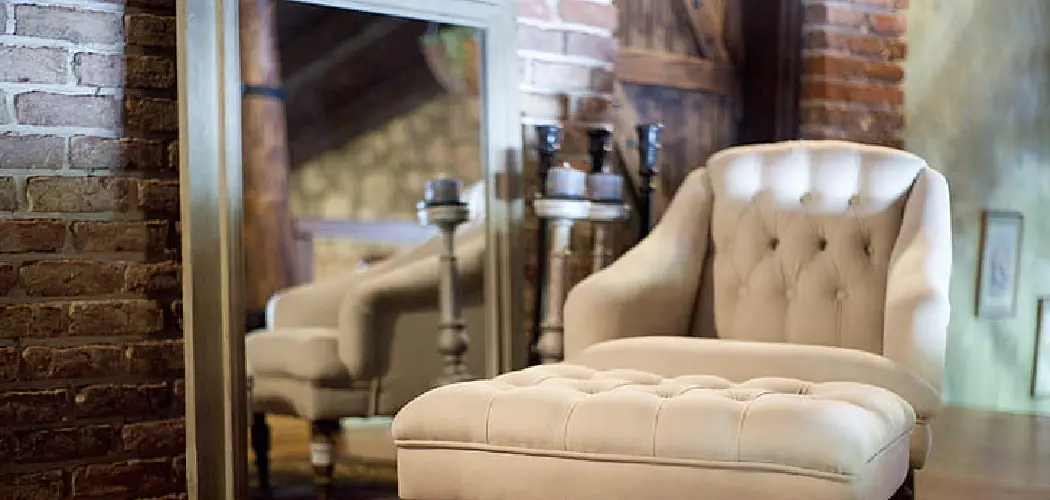
If you’re looking to add a touch of elegance and sophistication to your home decor, learning to tuft a chair is a must. Tufting is the process of creating dimpled patterns on upholstery by pulling thread through layers of fabric and securing it with knots or buttons. This technique has been around for centuries and has remained popular due to its timeless appeal.
The main advantage of learning to tuft a chair is that it allows you to create a unique piece of furniture that reflects your personal style and taste. By adding tufting, you can transform an ordinary chair into a luxurious and elegant piece that will add character to any room. Read this blog post to learn how to tuft a chair.

Materials You Will Need
- Chair (preferably wooden)
- Foam
- Batting
- Fabric
- Scissors
- Staple Gun
- Upholstery Needle and Thread
- Buttons
- Screwdriver
Step-by-Step Instructions for How to Tuft a Chair
Step 1: Inspect the Chair
Before beginning to tuft a chair, it’s important to inspect the condition of the chair. Check for any loose or broken parts and make sure the frame is sturdy. This will ensure that your tufting process goes smoothly.

Step 2: Gather Materials
To tuft a chair, you’ll need some basic materials such as fabric, batting, a tufting needle, and thread. Depending on the type of chair, you may also need a staple gun or tacks. Measure the dimensions of your chair’s seat and backrest and cut out pieces of fabric that are slightly larger than those measurements to allow for folding and securing.
Step 3: Attach Batting
Lay the cut pieces of fabric over the seat and backrest and then add batting between the fabric and the chair. The batting will give your chair a cushioned and plump look. Using a ruler or measuring tape, create evenly spaced marks on the fabric where you want to place your tufts. These marks will act as a guide for your tufting.
Step 4: Thread the Needle
Thread your tufting needle with a strong thread that matches the color of your fabric. Make sure to leave a long tail of thread for securing the tufts later on. Insert the needle through one of the marked spots on the fabric and pull it through until the thread is taut. Then insert the needle back through the fabric and pull it out again, creating a tuft.
Step 5: Secure the Tuft
Once you have created a tuft, hold it down with your free hand and tie a knot on the back of the chair using the long tail of thread. This will secure the tuft in place. Continue to tuft in a grid-like pattern, using your markings as a guide. Make sure to pull the thread tightly each time and secure with a knot on the back of the chair.

Step 6: Trim Excess Thread
Once you have completed all the tufts, trim any excess thread from the knots on the back of the chair for a neat finish. If desired, you can add buttons or decorative touches to your tufts for an extra elegant look. Simply attach them to the center of each tuft using a needle and thread.
This technique can also be applied to other furniture pieces, such as headboards or ottomans, for a classic and cozy look in any room. With practice, you’ll become an expert at tufting and can showcase your skills on various DIY projects.
Safety Tips for How to Tuft a Chair
- When using a staple gun or any similar tools, always wear protective eyewear to prevent accidental eye injuries.
- Make sure to use the right type of fabric for your chair. Use heavy-duty fabric that can withstand pulling and stapling without tearing.
- It is important to have a flat and sturdy working surface when tufting a chair. This will make it easier to control the fabric and ensure even tufting.
- Use caution when working with sharp objects such as scissors or needles. Keep them away from children and pets to avoid any accidents.
- Take breaks and stretch your hands and fingers to avoid strain or cramps while tufting. It can be a repetitive task, so it is important to take care of your hand muscles.
- If you are using a drill to make tufting holes, be sure to carefully measure and mark the spots before drilling. This will ensure that your tufts are evenly spaced.
- Clean up any mess or debris after completing the tufting process. This will help prevent injuries from tripping over materials or tools left on the floor.
By following these safety tips, you can ensure a smooth and accident-free experience while tufting your chair. Remember to always prioritize safety and take necessary precautions when working on any DIY project.
How Long Does It Typically Take to Tuft a Chair?
The time it takes to tuft a chair can vary depending on the size and complexity of the chair, as well as your level of experience. On average, it can take anywhere from 1-3 hours to tuft a standard sized chair. However, if you are new to tufting or working with a more intricate design, it may take longer. It is important to take your time and not rush the process, as this can lead to mistakes and potentially compromise the quality of your tufted chair.

Are There Any Specific Techniques or Tips for Achieving Professional-looking Tufting?
When learning to tuft a chair, it’s important to have a basic understanding of the overall concept and process. However, there are also specific techniques and tips that can help you achieve a more professional-looking finish. One key tip is to invest in high-quality materials. This includes not only the fabric and foam used for the cushion, but also the buttons, thread, and needle. Using cheap materials can result in a less polished look and may not hold up over time.
Another helpful technique is to mark your fabric before starting the tufting process. This can help ensure that your buttons are evenly spaced and aligned, resulting in a more uniform appearance. Additionally, using a grid pattern or ruler can also aid in achieving precise tufts. It’s also important to take your time and be patient when tufting. Rushing through the process can lead to mistakes and a less professional finish. Don’t be afraid to step back and assess your work as you go.
What Are Some Common Mistakes to Avoid When Tufting a Chair?
When it comes to tufting a chair, there are many tutorials out there that provide step-by-step instructions on how to do it properly. However, even with these guidelines, there are still some common mistakes that people make when attempting to tuft their own chairs. In this section, we will discuss some of the most common mistakes to avoid when tufting a chair.
One of the most common mistakes that people make when tufting a chair is not using the right materials. Tufting requires specific tools such as a tufting needle, thread, and foam padding. If you try to use alternative materials or skip certain steps, your tufting may come out uneven or may not hold up over time. Another mistake to avoid is not properly measuring and marking out the tufting pattern. Taking shortcuts with this step can result in an unbalanced and asymmetrical tufted chair. It’s important to take your time and measure accurately so that your tufts are evenly spaced and aligned.
What Are Some Creative Ways to Incorporate Tufting Into the Design of a Chair?
Tufting is a classic upholstery technique that involves pulling thread or fabric through layers of padding and securing it with a knot or button, creating a tufted appearance. This decorative element adds dimension and texture to furniture, making it an excellent choice for those looking to add some visual interest to their chairs.

1. Use Different Materials for Tufting
When we think of tufting, the first thing that comes to mind is usually fabric. However, there are other materials you can use to achieve a unique look. Leather and velvet are popular options that add a touch of luxury and elegance to any chair design. You can also experiment with using different types of thread or even ribbons for a more eclectic feel.
2. Vary the Size and Shape of Tufting
Traditionally, tufting is done in a uniform pattern with evenly spaced buttons. But why not mix things up and play around with the size and shape of your tufts? You can create larger or smaller tufts, use different button shapes such as square or diamond, or even skip the buttons altogether and opt for a knot instead.
3. Tuft Only Certain Areas of the Chair
Who says tufting has to cover the entire chair? You can add tufting to only specific areas, such as the backrest or seat cushion, to create a focal point. This is a great way to add some visual interest without overwhelming the design.
4. Combine Tufting with Other Design Elements
Tufting doesn’t have to be the only decorative element on your chair. You can combine it with other design elements, such as piping or nailhead trim, for a more intricate and detailed look. Just make sure not to overdo it and keep a balance in your design.
5. Play with Colors and Patterns
Don’t be afraid to have fun with tufting by incorporating different colors and patterns. For a bold look, use contrasting thread or fabric for the tufts. You can also mix and match patterns on different parts of the chair, such as using a floral pattern for the backrest tufts and a striped pattern for the seat cushion tufts.

Conclusion
In conclusion, learning to tuft a chair is an essential skill for any furniture enthusiast. Not only does it add a touch of elegance and sophistication to your furniture, but it also provides added comfort and durability. Through this step-by-step guide, we have learned that the process of tufting a chair requires patience, precision, and attention to detail. From choosing the right fabric and foam to creating the perfect tufting pattern, every step is crucial in achieving a professional-looking tufted chair.
Moreover, tufting a chair can be a fun and creative project that allows you to personalize your furniture and express your unique style. Whether you choose traditional diamond tufting or experiment with different patterns and fabrics, there are endless possibilities when it comes to tufting. I hope reading this post has helped you learn how to tuft a chair. Make sure the safety precautions are carried out in the order listed.