
Tracing an image onto wood may seem like a daunting task, but with the right tools and know-how, it can be surprisingly simple. Whether you’re tracing elaborate illustrations or small designs, transferring artwork through tracing is a great way to get started on creating art out of wood.
In this blog post, we’ll walk you through exactly how to trace onto wood in easy steps so you can make stunning wall hangings and furniture pieces that will last for years to come. So grab your pencils and paper –– let’s get started!

11 Step-by-step Guidelines on How to Trace Onto Wood
Step 1: Choose Your Wood and Image
Before you start tracing, pick out the type of wood you’d like to use for your project. You can find wood in a wide variety of shapes and sizes at your local hardware store. You’ll also want to select an image you plan on tracing onto the wood –– this can be either a digital or printed version.
It’s important to choose an image that won’t be too difficult to trace. But if you’re feeling adventurous, go for something a bit more complex. It’s all up to you! This is the fun part. It doesn’t have to be precise. But of course, you can be as precise as you would like to get the best results.
Step 2: Sand Down the Wood
Once you have your wood and image, it’s time to sand down the surface of the wood with a fine-grit sandpaper. This will help ensure there are no rough patches or splinters that could get in the way of your tracing later on. It doesn’t have to be perfect, but you want it to be as smooth as possible.
But be sure to wear protection if you’re sanding with power tools. It’s important to be safe! This step is also important for ensuring that the printed image and tracing will stick to the wood surface. If the wood is too rough, it will make tracing more difficult.
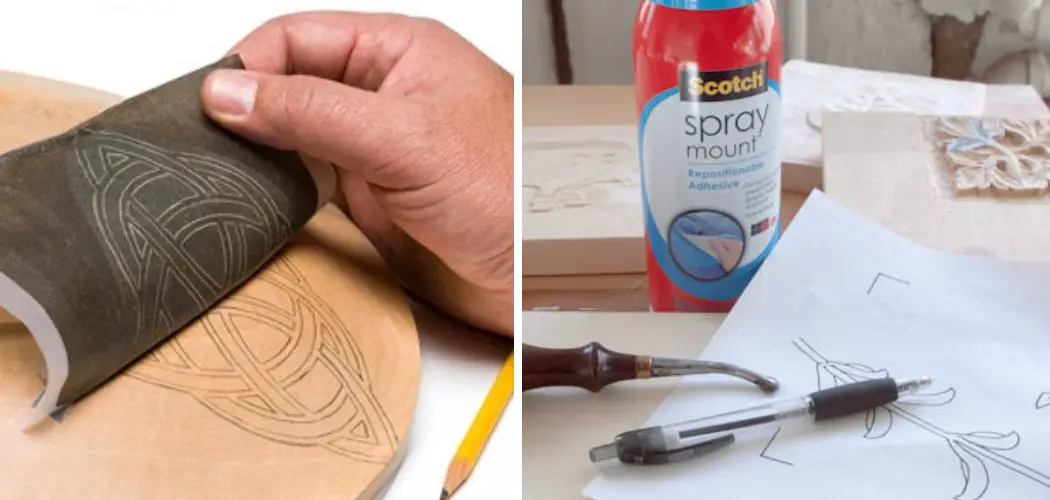
Step 3: Prepare Your Transfer Paper
Next, you’ll need to prepare some transfer paper for your project. Transfer paper comes in different varieties, but it essentially allows you to trace a drawing from one surface to another. In this case, you’ll be transferring from the image onto the wood.
Although it’s not essential, you can also use tracing paper to make sure your lines are extra crisp. This step is optional but can result in a cleaner tracing. But be sure to use the correct type of transfer paper for your wood.
Step 4: Trace Your Image Onto the Transfer Paper
Now, lay your transfer paper on top of your image and begin to trace the outlines of your design with a pencil. Be sure to use a light hand when tracing so that your lines are clear but not too deep –– if they’re too deep, they may leave marks in the wood after you’ve transferred it over.

It’s also important to be careful with the shading, and make sure your pencil stays within the lines. You can use tracing paper to double-check your lines if necessary.
Step 5: Place Transfer Paper On Wood
Once you’ve finished tracing your image onto the transfer paper, place it on top of your sanded-down piece of wood and secure it in place with tape. You’ll also want to make sure the image is facing up so that you can see what you’re tracing.
However, if you’re using tracing paper, you can trace on either side. You’ll also want to make sure the image and wood are aligned properly. It’s best to start in the center and work your way out.
Step 6: Trace Design onto Wood
Then, take a ballpoint pen and trace over the outlines of your design on the transfer paper. This will cause the ink from the pen to transfer onto the wood below, leaving you with an exact copy of your original image. This step requires a steady hand and patience, as you want to be sure that every line is traced accurately.
It’s also important to go slowly and not press down too hard, as this can leave marks on the wood. You can also use the tracing paper to double-check if you need to.
Step 7: Carefully Remove the Transfer Paper
Once you’ve finished tracing all of your lines, carefully remove the transfer paper from the wood and set it aside for later use. You should now have a perfect representation of your image on the wood surface! It’s important to note that some transfer papers may still leave a faint impression on the wood even after they have been removed.

If this happens, you can simply sand it down with a very fine grit of sandpaper. It’s also a good idea to use a sealant after you’re done tracing just in case.
Step 8: Color In Your Image (Optional)
If desired, you can color in or paint your traced image to make it stand out even more. This is a great way to add some extra color and texture to your wood project. You can use acrylic paint or colored pencils, just be sure to use a sealant after you’re finished coloring to help protect the image from fading or smudging.
It’s also important to use a layer of primer before you begin painting, as this will help ensure the paint adheres correctly. It will also make your colors more vivid.
Step 9: Protect Your Image
To protect your image from scratches and dings, you can add a layer of clear sealant or polyurethane to the wood surface. This will give it added durability and will keep your design looking its best for years to come. But be sure to use a sealant that is meant for wood surfaces and follow the manufacturer’s instructions closely.
However, if you’re planning on adding any additional layers of paint or stain to the wood, you can skip this step. It is also important to wait until your paint or stain is completely dry before sealing it. It’s best to wait at least 24 hours.
Step 10: Mount in Place (Optional)
If you’re planning on mounting your artwork onto a wall or other surface, secure the wood piece with nails or screws, making sure not to damage any of the lines in the process. You can also hang it up using picture hangers for an easy installation.

This is a great way to showcase your hard work and make it an eye-catching part of your home or office décor. It’s also a great way to add some unique, handmade art to your space.
Step 11: Enjoy Your Finished Piece!
And last but not least –– enjoy your finished piece! With just a few simple steps, you’ve created a one-of-a-kind artwork that will be sure to stand out wherever it’s placed. Always remember to be proud of your work and don’t hesitate to show it off.
You may even get inspired to try this technique on other materials like glass or fabric! It’s a great way to add a special touch to any project. So get out there and start tracing! You never know what beautiful works of art you might create.
We hope this guide on how to trace onto wood has been helpful in getting you started with creating beautiful wooden masterpieces. Good luck and happy tracing!
Frequently Asked Questions
Q: What Type of Wood Should I Use for Tracing?
A: Any type of wood will work for tracing. However, some woods are easier to trace than others. Softwoods such as pine or plywood are the best choice since they’re easier to sand down and take less time to transfer your image onto.
Q: How Do I Keep My Traced Image From Smudging?
A: To prevent smudging, you can apply a layer of clear sealant or polyurethane to the wood surface after you’ve finished tracing your image. This will help protect it from scratches and dings. It will also make the colors in your design stand out even more.
Q: Can I Trace Onto Metal or Glass?
A: Yes, you can use the same tracing technique on metal and glass surfaces –– just be sure to use a specialized transfer paper for either material instead of regular copy paper. You may also need to use an oil-based pen or marker for tracing onto metal, as the ink won’t show up as clearly with a regular pen or pencil.
Q: Does Tracing Onto Wood Damage the Wood?
A: No, tracing onto wood won’t cause any permanent damage if done correctly. Just be sure to use a light hand when tracing your image so that the lines are not too deep, and always sand down your wood before transferring any images onto it. With these simple precautions, you can enjoy creating beautiful wooden art for years to come!

Conclusion
It is possible to trace any design you wish onto your wood! Once your tracing is finished, you can customize it even further with your choice of pencils or paints. Transfers can also be used but be aware that extensive sanding may be needed and colors tend to come out slightly faded.
By following these steps, anyone can personalize their wood project in no time. After all, why should wood get left behind when it comes to creativity?
Now that you know how to trace onto wood, why not give it a try – and maybe create something unique in the process? When you have mastered this skill, why not challenge yourself further by learning how to decorate a canvas bag – which opens up a whole world of creative possibilities? Give it a go and see where the journey takes you!