
Are you looking to expand your sewing repertoire? Shirring is the perfect solution! This decorative technique adds a romantic flair to fabric, with gathered pleats that can either form delicate details on top of garments or cinch-fitted pieces.

By learning how to sew shirring, you will be able to embellish just about any clothing item and create looks that are unique and special. Explore this simple instructional guide for mastering the timeless art of shirring so you can get started creating beautiful garments right away!
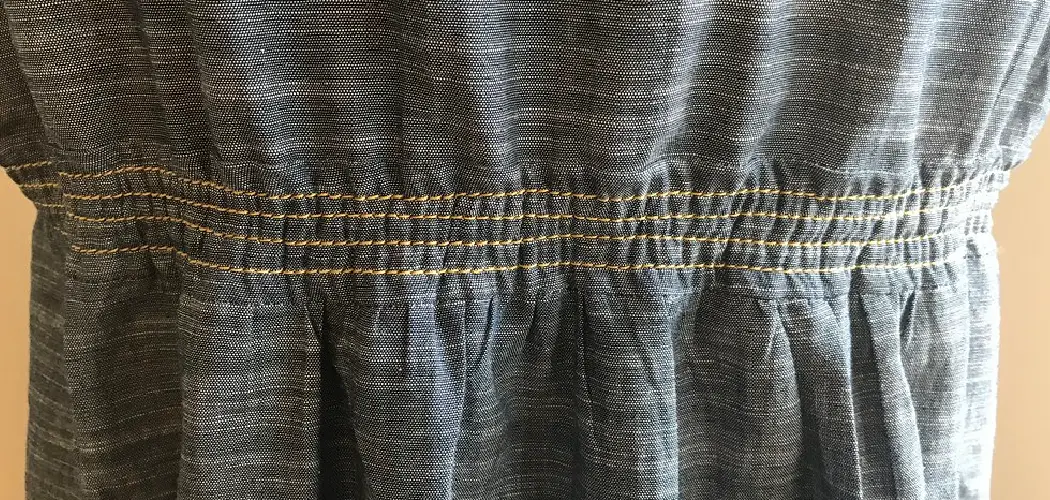
What is Shirring?
Shirring is a sewing technique that involves creating gathered pleats on fabric by using elastic thread. As the elastic thread is stitched along the fabric, it creates a series of small gathers that give the fabric a unique and textured appearance. This technique is often used on clothing items such as blouses, dresses, and skirts to add a touch of femininity and create a flattering silhouette. Shirring is also commonly used on home decor items, such as curtains and pillowcases, to add a charming touch.
Materials Needed
Before you begin sewing shirring, make sure you have all the necessary materials on hand:
- Elastic thread
- Regular sewing thread
- Fabric of your choice
- Sewing machine
- Iron and ironing board
- Scissors
- Pins or clips
11 Step-by-step Instructions on How to Sew Shirring
Step 1: Prepare Your Fabric
Before shirring, it is essential to prepare your fabric by washing, drying, and ironing it. This will remove any sizing or wrinkles that may affect the outcome of your shirring. It is also recommended to use a lightweight fabric for shirring, such as cotton or rayon. You can also experiment with different types of fabric, but keep in mind that thicker fabrics may not shrink as well. It is best to do a test run on scrap fabric before attempting shirring on your final garment.

Step 2: Wind Your Bobbin with Elastic Thread
Wind your bobbin with the elastic thread, ensuring that the tension is not too tight or too loose. If it’s too tight, it will create puckering on your fabric, and if it’s too loose, the shirring will not be as gathered.
You can adjust the tension on your sewing machine if needed. It is also helpful to use a bobbin specifically designated for elastic thread, as it can be challenging to remove once it’s wound onto the bobbin. You can also use regular thread in the bobbin if you prefer.
Step 3: Thread Your Machine with Regular Sewing Thread
Thread your sewing machine with regular sewing thread in the top spool. Make sure to use a matching color or a color that complements your fabric for a polished look. Otherwise, the top thread may show in between the gathers.
It is also helpful to use a longer stitch length, such as 4mm, for better results. You can also use a zigzag stitch for added stretch if desired. It is also helpful to use a bobbin specifically designated for elastic thread, as it can be challenging to remove once it’s wound on the bobbin.
Step 4: Mark Your Stitch Lines
Using a fabric pen or chalk, mark your desired stitch lines on the wrong side of the fabric. These lines will act as a guide for your stitching and ensure that your shirring is even and evenly spaced. You can choose to make multiple rows of shirring or keep it simple with just one.
You can also experiment with the distance between each stitch line for different effects. It is recommended to space your stitch lines at least 1/4 inch apart for best results. But feel free to adjust based on your preference.
Step 5: Begin the First Row of Shirring
Place your fabric under the sewing machine, starting at one end of your marked stitch line. Leave a tail of elastic thread and sew over it with regular thread to secure it in place. Sew along the marked line, keeping an even tension on the fabric as you go.
You can also guide the fabric with your hands to ensure it is gathering evenly. Make sure to backstitch at the beginning and end of each row for added durability. Otherwise, the stitches may unravel when you pull on the elastic thread.
Step 6: Continue Sewing Rows of Shirring
After completing the first row, move on to the next one, using the previous line of shirring as a guide. This will ensure that your shirring is evenly spaced and create a professional look. Remember to backstitch at the beginning and end of each row for added durability.

Continue sewing rows until you reach the desired width or length of shirring on your fabric. You can also play with different stitch lengths and widths for a textured effect.
Step 7: Iron Your Shirred Fabric
Once you have completed all your rows of shirring, it’s time to give your fabric a good press with an iron. This will help the gathers set in place and give them a clean, polished look. Set your iron to medium heat and gently steam over the shirred fabric.
Make sure not to flatten the gathers while ironing. You can also use a pressing cloth to protect your fabric if needed. It’s also helpful to iron the fabric on the wrong side to avoid crushing the shirring.
Step 8: Trim Excess Thread
After ironing, you may notice some excess thread hanging from the edges of your shirring. Use scissors to carefully trim any excess thread, being careful not to cut the elastic thread that is holding the gathers in place. You can also use a seam ripper to carefully remove any unwanted stitches or mistakes. It is essential to be gentle while trimming and removing stitches to avoid damaging the shirring.
Step 9: Complete Your Project
Now your shirred fabric is ready to be incorporated into your project! You can use it as a waistband on a skirt or dress, add it to the neckline of a blouse, or use it as an accent on a home decor item. The possibilities are endless! Just remember to handle your shirred fabric with care while sewing and avoid stretching the gathers too much. With practice, you’ll be able to create beautiful shirred garments and items.

Step 10: Care for Your Shirred Garments
When it comes to caring for your shirred garments, it’s essential to handle them with care. Always wash on a delicate cycle in cold water and hang or lay flat to dry. Avoid using high heat while ironing shirring, as it can cause the elastic thread to shrink and lose its stretch.
With proper care, your shirred garments will last for a long time and continue to look beautiful. You can also experiment with different types of shirring, such as honeycomb or diamond patterns, to create unique and stunning garments.
Step 11: Experiment with Different Techniques
Now that you know how to sew shirring, don’t be afraid to experiment with different techniques and designs. You can try using different types of elastic thread, like clear or colored, for different effects. It’s also fun to play with different fabrics, such as lightweight cotton for a flowy look or denim for a structured style. Always remember to practice and be patient, as shirring can take some time to master.

You can also experiment with adding ruffles or lace to your shirred fabric for added texture and dimension. The possibilities are endless, so have fun and get creative! So go ahead and start incorporating shirring into your sewing projects for a beautiful and unique touch. Happy sewing!
How Much Will It Cost?
The cost of sewing shirring will depend on the materials you use. Elastic thread can vary in price, but it is generally affordable and can be found at most fabric or craft stores. Regular sewing thread and fabric markers are also relatively inexpensive. The only other costs may come from any additional materials you choose to incorporate into your project, such as lace or ruffles.
Overall, sewing shirring is a cost-effective way to add beautiful gathers and texture to your garments and items. So why not give it a try? Your projects will thank you for it! Now go forth and sew some shirring!
Frequently Asked Questions
Q1: Can I Use Regular Thread in the Bobbin Instead of Elastic Thread?
A: Yes, you can use regular thread in the bobbin if you prefer. Just make sure to use a longer stitch length, such as 4mm, for better results. You can also use a zigzag stitch for added stretch if desired.
Q2: Can I Use Shirring on Different Types of Fabric?
A: Yes, shirring can be used on a variety of fabrics. However, it works best on lightweight and medium-weight fabrics with some stretch, such as cotton, jersey, and rayon. Thicker or stiffer fabrics may not gather as well or create a bulky look.
Q3: Can I Use Shirring for Garments with Multiple Seam Lines?
A: Yes, shirring can be used on garments with multiple seam lines. However, it’s essential to keep your stitch lines even and consistent throughout the garment for a professional look. You can also play with different patterns and designs by shirring only specific sections of the garment.

Q4: Can I Sew Shirring Without Marking Stitch Lines?
A: While marking stitch lines is recommended for best results, you can also sew shirring without marking. Just make sure to keep your stitch lines evenly spaced and consistent while sewing. Using a guide, such as a presser foot or previous rows of shirring, can also help ensure even spacing.
Conclusion
In conclusion, shirring can be a great addition to your sewing projects to make them look more unique and eye-catching! It is an easy technique that doesn’t require too much time or skill but adds so much extra texture and design to garments. Whether you’re altering a dress, making skirts or creating your own shirred garment, remember these tips on how to sew shirring when you try out shirring for yourself! Don’t forget the elastic thread and practice patience until your stitching becomes even.
If done right, you will be rewarded with a secure but beautiful ruching that really stands out. Sewers of any level should give shirring a try – who knows? Maybe it will become your favorite go-to textural element. Start now and show off your shirring skills every chance you get!