
Do you feel like creating your own clothes or tailoring existing ones to fit like a glove? If so, then learning how to sew bust darts is an essential skill. Bust darts are the triangular folds of fabric that fit along the contours of our body at the top and sides of a blouse or dress – typically found right under the arm line – providing shape and structure for clothing items.

While this simple technique may appear intimidating at first glance, there’s no need to be intimidated! We’re about to give you all of the know-how for drafting beautiful bust darts in your DIY projects and seamstress endeavors.
What is the Purpose of Bust Darts?
Bust darts play a crucial role in garment construction and achieving a perfect fit. They help to shape the fabric around our bust area, providing a contour that follows the natural curve of our bodies. In other words, they give blouses and dresses more dimension and prevent them from looking baggy or ill-fitted.
Another function of bust darts is to provide ease for the bust area. Typically, our busts require more fabric than our waist or hips, so without bust darts, garments may pull or gather in an unflattering way.
Needed Materials
Before we dive into the process of sewing bust darts, let’s gather all of the necessary materials:
Fabric:
Choose a medium-weight fabric, such as cotton or linen, for your garment.
Pattern:
You can either use an existing pattern with bust darts included or draft your own using the instructions below.
Ruler:
A clear ruler with measurements is essential for accurate dart placement.
Pins:
To secure your fabric in place while sewing.
Sewing Machine and Thread:
A sewing machine will make the process faster and more precise, but you can also hand-sew your darts if necessary. Make sure to use a matching thread.

Scissors:
Sharp scissors are necessary for cutting the fabric.
Iron and Ironing Board:
Ironing the darts will help to set them in place and give a polished look to your finished garment.
10 Step-by-step Guidelines on How to Sew Bust Darts
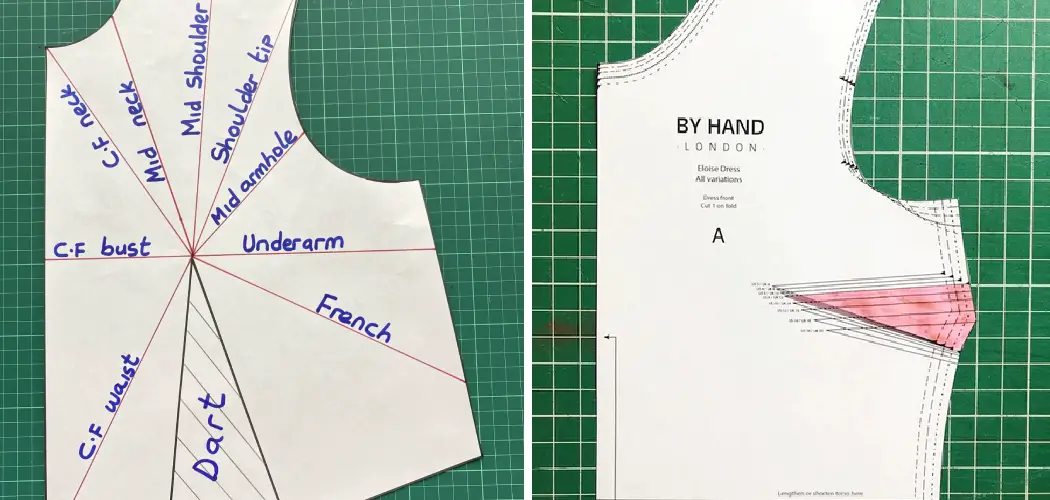
Step 1: Measure the Bust Point
Using your measuring tape, locate and mark the bust point on your pattern. This is typically ⅓ of the way between your shoulder and underarm. You can also determine this point by measuring from your shoulder to the fullest part of your bust. It’s important to have this measurement as accurate as possible. Otherwise, your darts may end up in the wrong place.
Step 2: Draw a Vertical Line
From the bust point, draw a straight vertical line down to the waistline of your pattern. This is where your dart will start. It’s recommended to make the line at least 1 inch longer than your desired dart length. You can always make adjustments later. It’s better to have a longer dart than a shorter one. But don’t make it too long, or it may look awkward.
Step 3: Create the Dart Width
Measure and mark ½ inch from each side of the vertical line. This will be your dart width. You can adjust this measurement depending on how deep you want your dart to be. Keep in mind that wider darts are better for larger busts, while narrower darts may work better for smaller busts. It’s best to experiment and find what works for your unique body shape.

Step 4: Mark the Dart End Point
Measure and mark a point on the waistline about 1 inch from the end of your vertical line. This will be the endpoint for your dart. You can adjust this point as needed, but make sure it’s at least 1 inch away from the end of your vertical line. It’s also important to make sure that the endpoint is perpendicular to the waistline. You can use a clear ruler to double-check.
Step 5: Connect the Dots
Using a straight edge, connect the dart width points with the endpoint on the waistline. You should now have a triangular shape on your pattern. This is where your dart will be sewn. But first, we need to make a few more markings. Then, you can cut out your pattern piece along the dart lines. If you’re using a pre-made pattern, it should already have the dart lines marked.
Step 6: Create Dart Legs
Measure and draw two lines from each side of the vertical line to your bust point. This will create the “legs” of your dart. If you’re using a pre-made pattern, these lines may already be drawn for you.
You can also use a French curve ruler to create smoother lines. If you’re drafting your own pattern, make sure the dart legs are symmetric and even on both sides. It’s best to start with longer dart legs and adjust them later if needed.
Step 7: Cut Out Your Pattern Piece
Now it’s time to cut out your pattern piece along the dart lines. Make sure to use sharp scissors and be precise, as any irregularities will affect the fit of your garment. Otherwise, you may end up with a wonky-looking dart.
It’s also a good idea to label your dart as “front” or “back” so you don’t get them mixed up later. You can also mark the dart direction and length if you’re using a pre-made pattern.
Step 8: Transfer Your Dart to the Fabric
Using your newly cut-out pattern piece, transfer the dart onto your fabric. You can use tailor’s chalk or disappearing ink pens for this. Make sure to transfer all of the markings, including the dart legs and endpoints. You can also use pins to secure the pattern piece onto your fabric to prevent it from shifting while transferring the markings.

Step 9: Sew the Dart
Now it’s time to sew your dart! Fold the fabric along the vertical line and pin it in place. Then, starting from the waistline endpoint, stitch along the dart lines all the way to the bust point. Remember to backstitch at both ends for a secure seam. It’s best to use a smaller stitch length for darts, around 2-3mm, to create a smoother and more precise dart.
Step 10: Press the Dart
Last but not least, press your dart using an iron. This will help set the stitches and give your garment a clean finish. You can also trim off any excess fabric on the wrong side of the seam if needed. And voila! You have successfully sewn a bust dart.
You can now continue with the rest of your garment construction, knowing that you have a well-fitted and professional-looking bust. Remember to always take your time and make any necessary adjustments along the way for the best results.
Following these steps on how to sew bust darts will give you the confidence to sew bust darts for any garment, and with practice, it will become second nature. Happy sewing!
Frequently Asked Questions
Q: Can I Sew Bust Darts on Any Fabric?
A: Yes, you can sew bust darts on most fabrics. However, it’s important to consider the weight and stretch of the fabric when determining the dart length and width. It’s best to test the dart on a scrap piece of fabric before sewing it onto your garment.
Q: Can I Use the Same Dart Pattern for Different Garments?
A: While there are some standard dart shapes and sizes, it’s always best to adjust the darts according to each specific garment. The size, shape, and placement of darts will vary depending on the style and fit of the garment.
Q: Do I Need Special Tools to Sew Bust Darts?
A: No, you don’t need any special tools to sew bust darts. However, having a clear ruler and a French curve ruler can make it easier to create precise dart lines. You may also find tailor’s chalk or disappearing ink pens helpful for transferring markings onto the fabric. But if you don’t have these tools, you can always use a ruler and a regular pen or pencil.

Conclusion
Overall, following these steps can help you learn how to sew bust darts. It may not seem like the most exciting task, but mastering this skill can help you create better-fitting garments, resulting in a more comfortable and flattering fit for yourself or the intended recipient. Whether it’s formal garments for special occasions or casual clothes worn every day, learning to sew bust darts will come in handy.
With practice and motivation, you’ll be sewing perfect bust darts in no time! Get out that fabric and thread and let your creativity run wild – creating fashionable clothing that fits well won’t just make you happier with your finished product but is also sure to bring compliments from friends and family alike.