
Putting in an invisible zipper may seem like a daunting task, especially for beginners. However, once you learn how to do it properly, it can make a huge difference in the appearance of your garment. Invisible zippers give a smooth and seamless finish, making them perfect for dresses, skirts, and other garments where you don’t want the zipper to be visible.

The main advantage of putting in invisible zipper is that you can create more sleek and professional-looking garments. Unlike visible zippers, which are meant to be seen as a decorative element, invisible zippers are designed to blend seamlessly into the fabric. This results in a cleaner and more polished appearance for your clothing. In this blog post, You will learn in detail how to put in invisible zipper.
Materials You Will Need
- Sewing machine
- Invisible zipper foot
- Scissors
- Straight pins
- Marking tool (such as chalk or disappearing ink)
- Ruler or measuring tape
- Fabric of your choice
- Invisible zipper in the desired length and color
- Thread to match the fabric and zipper color
- Seam ripper
Step-by-step Instructions for How to Put in Invisible Zipper
Step 1: Inspect the Zipper
Before you start putting in an invisible zipper, it is important to inspect the zipper to make sure it is not damaged. Check for any missing or broken teeth, and ensure that the slider moves smoothly along the track.
Step 2: Prepare Your Fabric
Lay out your fabric with the right side facing up. If necessary, iron out any wrinkles or creases to ensure a smooth surface for sewing. Using tailor’s chalk or an erasable fabric marker, mark the location where you want your zipper to be placed on your fabric. Make sure to leave enough room at the top and bottom for seam allowances.

Step 3: Sew the Seams
Sew up the side seams of your garment, stopping at the marking for the zipper placement. If you are working with a pattern, make sure to follow the seam allowance indicated on the pattern. Press open the side seams of your garment with an iron. This will ensure that the fabric lays flat and makes it easier to insert the zipper.
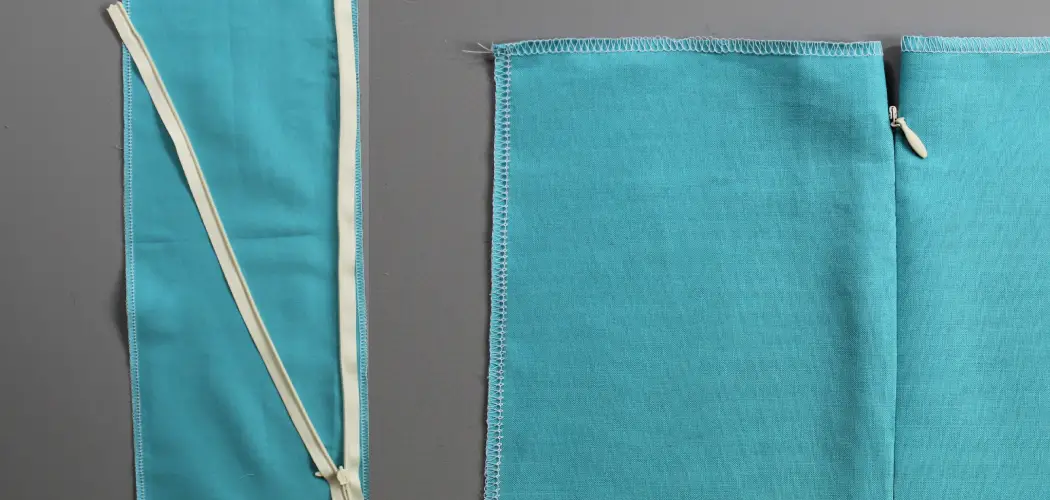
Step 4: Open up the Zipper
Unzip your zipper and use an invisible zipper foot on your sewing machine to sew the seam closed where you have marked for the zipper placement. Place the right side of the zipper face down on the right side of your fabric. Align the teeth of the zipper along the seam allowance and pin it in place.
Step 5: Sew the zipper in place
Using a zipper foot, sew the zipper in place. Start at the top of the fabric and sew down to the bottom, making sure to backstitch at both ends. Press open the seams again with an iron to ensure they lay flat. Sew up the remaining part of the seam, making sure not to catch any of the zipper teeth. Again, follow the pattern’s indicated seam allowance.
Once you have finished sewing in your invisible zipper, give it a test run by zipping and unzipping it a few times to make sure everything is in working order. If necessary, make any adjustments to ensure the zipper moves smoothly.
Tips for How to Put in Invisible Zipper
- Make sure that the sewing machine is unplugged before starting the process.
- Always wear a thimble to avoid any needle accidents.
- Keep your fingers away from the needle area while operating the sewing machine.
- Use quality invisible zippers for best results.
- Avoid ironing over an invisible zipper as this could melt or damage it.
- Be cautious when pressing down on the zipper teeth to avoid breaking them.
- Double-check the placement of the invisible zipper before sewing it in place.

Invisible zippers are a popular choice for garments that require a concealed closure. Unlike regular zippers, they do not show any visible stitching which gives a sleek and professional finish to your garment.
Are There Different Methods to Put in an Invisible Zipper?
There are a few different methods to put in an invisible zipper, and which one you use may depend on your preference or the type of project you are working on. The first method is known as the “lapped” method. This involves sewing one side of the zipper onto the fabric with a regular zipper foot, then overlapping the other side of the fabric over the zipper and sewing it down. This method is commonly used for garments such as skirts or dresses, where the zipper is typically located on the side seam.
Another method is called the “centered” method. As the name suggests, this involves aligning the center of the zipper with the center back seam of a garment. The zipper is sewn onto both sides of the fabric using a specialized invisible zipper foot, resulting in a neat and seamless finish. For projects that require the zipper to be located on an edge, such as bags or pillow covers, the “exposed” method may be used. This involves sewing the zipper onto the fabric with right sides together, then flipping it over and topstitching along the edges of the zipper for a decorative finish.

Are There Any Special Techniques for Stitching in an Invisible Zipper Without Getting Puckered Fabric?
When it comes to sewing in an invisible zipper, there are a few techniques you can use to avoid puckered fabric. In this section, we will discuss some of these techniques and how they can help you achieve smooth, seamless results.
Firstly, make sure your machine is set to the appropriate stitch length. A shorter stitch length, around 2mm or less, can help prevent puckering as you stitch in your zipper. Additionally, using a smaller needle size, such as a 60/8 or 70/10, can also help create more precise stitches and prevent puckering.
Another key technique is to use an invisible zipper foot. This specialty foot is specifically designed for sewing zippers and allows you to get closer to the teeth of the zipper, resulting in a neater finish.
This foot also has grooves on the underside to help guide the zipper teeth as you sew them in. When stitching the zipper in place, it is important to go slow and steady. Rushing through this step can often lead to puckering and uneven stitches. Instead, take your time and carefully stitch along both sides of the zipper teeth, making sure to catch the edges evenly.

What Are the Common Mistakes to Avoid When Putting in an Invisible Zipper?
Invisible zippers are a popular choice for many people because they provide a clean and seamless look to garments. However, putting them in can be a bit tricky, especially for beginners. In this section, we will discuss the common mistakes that should be avoided when putting in an invisible zipper. First and foremost, it is essential to have the right tools before you begin installing an invisible zipper. Make sure you have a zipper foot, pins, and preferably an invisible zipper foot for your sewing machine. Using the wrong tools may result in a poorly installed zipper.
Another common mistake is not pressing the fabric correctly before installing the zipper. It is vital to press the seam allowance open which will make it easier for the zipper teeth to grab onto the fabric. Skipping this step may cause wrinkles and bumps around the zipper, making it visible. When sewing an invisible zipper, it is essential to stitch as close to the teeth as possible.
However, many people make the mistake of stitching too close or even on top of the teeth. This not only affects the functionality of the zipper but also makes it visible when worn. Another mistake is not properly aligning the zipper with the fabric. When installing an invisible zipper, make sure to line up the teeth of the zipper with the seam allowance on both sides. If it is not aligned correctly, it may result in uneven and bumpy zippers.

Are There Any Additional Tricks for Achieving a Professional-looking Result When Installing an Invisible Zipper?
When it comes to putting in an invisible zipper, the techniques and steps discussed earlier are essential for a successful installation. However, there are a few additional tricks that can help you achieve a more professional-looking result. Firstly, make sure to press your fabric before inserting the zipper. This will create crisp edges and ensure that the fabric lays flat when zipped up. It is also important to use an invisible zipper foot, which will help you stitch close to the teeth of the zipper for a clean and neat finish.
Another trick is to baste the seam closed before topstitching the zipper. This will keep your fabric in place and prevent it from shifting as you sew along the edge of the zipper. You can remove the basting stitches once the topstitching is complete. These zippers have finer teeth and are more lightweight, making them less noticeable when zipped up. It’s worth investing in a good brand for a professional finish. Finally, don’t rush the process. Take your time to carefully press, baste and stitch the zipper for a clean and precise result. With practice, you’ll soon master the art of putting in an invisible zipper like a pro.
Conclusion
In conclusion, invisible zippers are a great way to add a professional and seamless finish to your garments. They provide a clean look without any visible stitching or bulging, making them perfect for dresses, skirts, and pants. The process of putting in an invisible zipper may seem intimidating at first, but with practice and patience, it can become second nature.
The key is to ensure that you have the right tools, such as an invisible zipper foot and a good quality zipper, to make the process easier. A tip to keep in mind is to always test your zipper before sewing it onto your garment. This will help you make any necessary adjustments and ensure that your final product turns out perfectly. I hope this article has been beneficial for learning how to put in invisible zipper. Make Sure the precautionary measures are followed chronologically.