
Do you want to turn a mundane home decor item into an absolute showstopper? Oyster shells have the potential to be amazingly beautiful—if you know how to paint them. With just a few strokes of color, you can transform every oyster shell into a stunning piece of art.

Painting oyster shells might seem daunting if it’s something you haven’t experimented with yet but fear not because we’ll show you how to paint oyster shells easy and fun it is! Join us as we take on this creative adventure and discover the perfect way to make your own vibrant masterpieces.
What is an Oyster Shell?
Oyster shells are the hard, protective outer layer of oysters, a type of mollusk found in both freshwater and saltwater environments. They typically have a rough and bumpy texture with various shades of brown, gray, and white. Oyster shells are commonly used for decorative purposes due to their unique shapes and patterns.
Materials Needed
Before you get started on your oyster shell painting journey, you’ll need to gather some essential materials. These include:
Oyster Shells:
You can either find them at the beach or purchase them from a craft store.
Acrylic Paint:
This type of paint works best for oyster shells as it adheres well and dries quickly.
Paintbrushes:
Use different sizes to create different strokes and patterns.
Palette or Paper Plate:
This will serve as your mixing palette for blending colors.
Paint Pens:
These are optional, but they can make adding small details easier.
Sealant Spray:
To protect the paint and give the shells a glossy finish.
11 Step-by-step Guidelines on How to Paint Oyster Shells
Step 1: Clean and Dry the Oyster Shells
Remove any dirt or debris by gently scrubbing the shells with a brush and rinse with water. Let them dry completely before painting. It’s important to start with a clean surface for the paint to adhere properly. You can also soak them in water and white vinegar to help remove any stubborn dirt or odor.

You can also bleach them if you want to lighten the color of the shell. But be sure to rinse them thoroughly afterward. It’s always a good idea to wear gloves while handling the shells, especially if you have sensitive skin.
Step 2: Choose Your Design
Think about the type of design you want to create on your oyster shells. You can go for a simple, monochromatic look or get creative with patterns and colors. Search for inspiration online or come up with your own unique design. You can also use stencils to help create a specific design.
If you don’t want to freehand your artwork. It’s completely up to your imagination and personal preference. You can also sketch out your design on the shells beforehand using a pencil. It will act as a rough guide for your painting. It doesn’t have to be perfect, as you can always make adjustments while painting.
Step 3: Prepare Your Paints
Squeeze out the colors you’ll need on your palette or paper plate. You can also mix colors together to create different shades and tones. But keep in mind that acrylic paint dries quickly, so don’t mix too much at once. This will help prevent waste and keep your colors fresh.
Although, if you do have leftover paint, you can store it in an airtight container. It should last a few days before drying out. But if you need to use the same color for touch-ups, it’s better to mix a fresh batch.
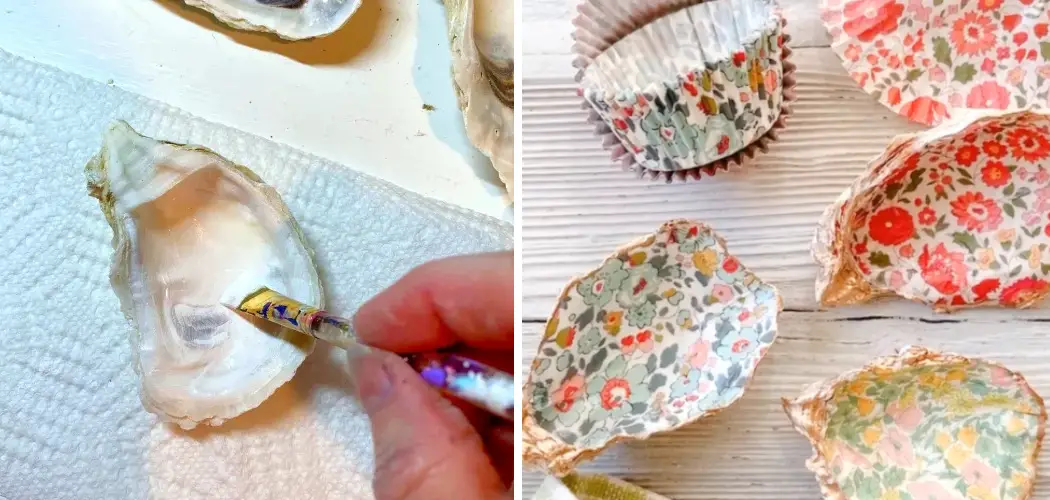
Step 4: Start Painting!
Using a paintbrush, apply a base coat of paint onto the oyster shell. Make sure to cover the entire surface evenly. If needed, let the first coat dry before applying a second coat for a more opaque finish. You can also use paint pens for precise details. You can also use a toothpick to create small dots or lines.

Let your creativity flow! It’s also a good idea to paint the edges of the shell for a more polished look. This step can also help hide any imperfections on the shell. Let the paint dry completely before moving on to the next step.
Step 5: Experiment with Different Techniques
Don’t be afraid to get creative and try out different painting techniques like splattering, blending, or using a sponge to create texture. It’s all about having fun and finding what works best for you. You can also use a hairdryer on the cool setting to speed up the drying process between layers.
But make sure the paint is completely dry before adding any additional layers or details. It will help prevent smudging and mixing of colors. But if you do make a mistake, don’t worry. Acrylic paint is forgiving and can easily be corrected by painting over it once it has dried.
Step 6: Let the Paint Dry
Once you’re satisfied with your design, let the paint dry completely before adding any additional details or layers. But be careful not to stack the shells on top of each other until they are completely dry. This can cause the paint to smudge or stick together.
You can also use a toothpick or needle to gently lift the shells off the surface while they are drying. It will help prevent them from sticking and ruining your artwork. It’s recommended to let them dry overnight for the best results. This will also ensure that the paint is completely cured before applying a sealant.
Step 7: Add Details
Using a smaller brush or paint pen, add any small details to your design. This can be dots, lines, or intricate patterns. It’s all about personal preference and adding those finishing touches to make your shells unique. You can also use metallic or glitter paint for a touch of sparkle.

Get creative and have fun! It’s also a good idea to let the details dry before moving on to the next step. You can also use a hairdryer on the cool setting to speed up the drying process.
Step 8: Seal the Paint
Once everything is fully dry, use a sealant spray to protect the paint and give the shells a glossy finish. Make sure to do this in a well-ventilated area. It’s recommended to do a few light coats, allowing each coat to dry completely before adding another.
This will help prevent any drips or smudging of the paint. You can also use a clear nail polish if you don’t have sealant spray on hand. This will also help protect the paint and give the shells a shiny finish.
Step 9: Let it Dry Again
After sealing, let the shells dry for another hour or so before handling them. But it’s best to let them cure for a few days before using them as decoration or in crafts. This will ensure that the paint and sealant are fully set and won’t easily come off.
It’s best to handle the shells gently after they have been painted and sealed, as any rough handling can still cause damage to the paint. You can also add additional layers of sealant for extra protection if needed.
Step 10: Display Your Artwork
Find a special place in your home to display your painted oyster shells. They can be placed in a bowl, used as table decor, or even hung on the wall. It’s a great way to add a unique and personalized touch to your home decor. You can also give them as gifts or use them in different craft projects.

The possibilities are endless! And if you ever get tired of the design, simply paint over it with a new one. Oyster shells make for beautiful and versatile canvases that will elevate any space they are displayed in.
Step 11: Keep Practicing and Be Proud of Your Masterpieces!
Practice makes perfect, so keep experimenting with different designs and techniques. And most importantly, have fun and be proud of your beautiful oyster shell creations! But don’t forget to take care of your brushes and paints after each use, so they stay in good condition for future projects.
Now that you know how to paint oyster shells, the possibilities are endless. So grab your supplies and let your creativity flow! Your painted oyster shells are sure to be a conversation starter and a unique addition to your home decor.
Following these simple steps, you can easily learn them and turn them into stunning pieces of art. So the next time you come across some oyster shells, don’t just toss them away—let your creativity run wild and turn them into unique home decorations or thoughtful gifts for your loved ones. Now go out there and unleash your inner artist!
Do You Need to Use Professionals?
No, you do not need to be a professional artist to paint oyster shells. It’s a fun and easy DIY project that anyone can do. Just gather the materials, follow the steps, and let your creativity shine! You’ll be amazed at how beautiful your painted oyster shells will turn out.

It’s a great way to relax, unwind and express your artistic side. So don’t be afraid to give it a try! Whether you’re an experienced painter or just starting out, painting oyster shells is an enjoyable activity for all ages and skill levels.
How Much Will It Cost?
The cost of painting oyster shells is relatively low, as the materials needed are affordable and easy to find. Depending on the quality and brand of your paints, you can expect to spend around $20-$30 for all the necessary supplies. And with a little creativity, you can turn plain oyster shells into beautiful pieces of art without breaking the bank. It’s a budget-friendly way to add some unique decor to your home.
Frequently Asked Questions
Q1: Do I Have to Use Acrylic Paint?
A1: While acrylic paint works best on oyster shells, you can also try using other types of paint such as spray paint or watercolor. Just keep in mind that the results may vary. It’s best to do a test on one shell first before painting all of them.
Q2: Can I Use Natural Oyster Shell Colors?
A2: Absolutely! You can leave some of the shells in their natural color and design, especially if they have interesting patterns. This will add a unique touch to your overall display. It’s all about getting creative and finding what works best for you.
Q3: Can I Use Oyster Shells from the Store?
A3: Yes, you can purchase oyster shells from a craft store if you don’t have access to them in their natural habitat. Just make sure to clean and dry them thoroughly before painting. It’s also a great way to repurpose items that may have otherwise been thrown away.
Q4: Can I Paint the Inside of the Shell?
A4: Absolutely! The inside of the shell can be painted as well, adding another dimension to your design. Just make sure to let it dry completely before handling or displaying. This can also be a fun way to personalize your shells by writing messages or names inside.

Conclusion
Painted oyster shells make fabulous decorations to enliven any home! With the right tips and tricks in mind, these unique pieces of art will be easy to bring to life. So get out there, gather some beach-ready materials, give your creative juices a jump-start, and transform ordinary shells into extraordinary works of art!
Trust us when we say that your hard work will be worth it. You never know whose eyes might light up in admiration when they take notice of your artistic genius. Feel free to use all these suggestions as a basis for inspiration or a rocking starting point for more projects – the possibilities are endless! Thanks for reading on how to paint oyster shells and good luck with your oyster shell painting journey – have fun and enjoy creating something special!