
Embarking on a creative journey with a paintbrush in hand often leads to remarkable transformations, whether it’s on a canvas or an unexpected surface. One such surface that offers an exciting and unique opportunity for artistic expression is a simple basket.
While baskets are conventionally associated with functionality, they also possess the potential to become exquisite works of art through the application of paint. Whether you’re an experienced painter looking to explore a new medium or a novice eager to delve into the world of artistic creation, learning how to paint a basket can be an engaging and fulfilling endeavor.

From choosing the right materials and colors to understanding techniques that best suit the woven texture of the basket, this process involves a blend of skill, imagination, and patience. This article delves into the step-by-step process of transforming a humble basket into a stunning piece of functional art, offering insights, tips, and inspiration for painters of all levels.
The Concept of Painting a Basket
Painting a basket is an enjoyable and creative way to customize your home décor. If you’d like to add a unique touch to any room of your house, painting a basket can be the perfect solution. It doesn’t require any expensive or hard-to-get materials – all you need is some paint, a brush and the basket of your choice!
Before you start the painting process, it’s important to choose the right kind of paint. Acrylic paints are usually the best option for painting baskets since they are water-based and dry quickly. When selecting a color, make sure that it will complement both the basket and the room’s overall design scheme. Once you have chosen a color, you’re ready to start painting.
The process of painting a basket is relatively straightforward. First, make sure the surface of the basket is clean and free of any dirt or debris. Next, use a wide paintbrush to apply an even coat of acrylic paint on the entire outside surface of the basket. Finally, allow the paint to dry completely before adding a second coat. Once dry, you’ll have the perfect painted basket for your home!
Painting a basket can be a great way to add some personality and style to any room in the house. With just a few simple steps, you can transform an ordinary basket into something truly special. So grab those brushes and get ready to create your very own custom-painted basket!
The Versatility of Painting as a Form of Creative Expression

Painting a basket is an exciting way to express your creativity and make something that is truly one of a kind. Whether you’re looking for a unique gift or a conversation piece for your home, painting a basket could be just the right project. With proper preparation and some practice, you can have fun creating something that looks great and shows off your own personal style.
Before you begin painting, it is important to properly prepare the basket. Clean the surface with a soft cloth and mild detergent. If your basket has stained or discolored areas, try using a mixture of baking soda and white vinegar to help remove any dirt or buildup. Once the basket is completely dried, sand lightly with fine-grit sandpaper to ensure a smooth surface.
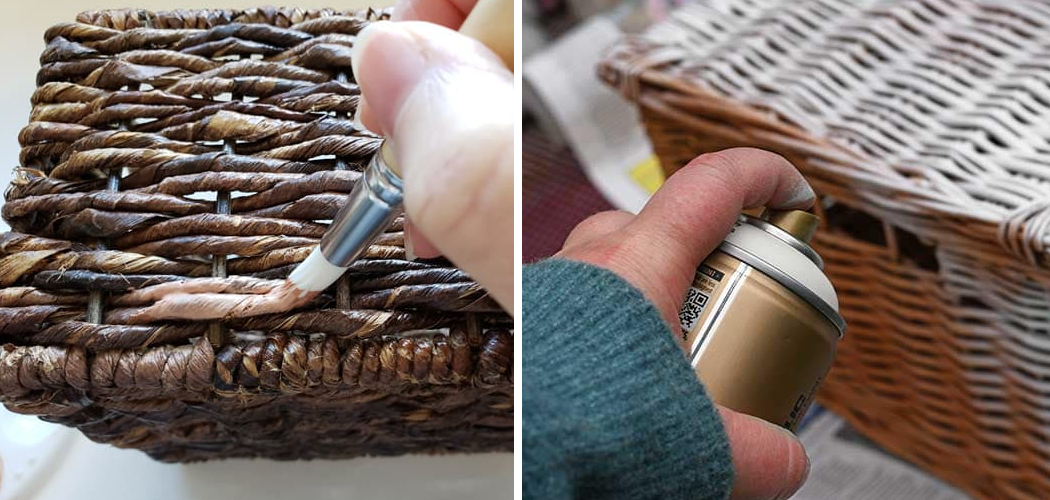
When it comes to choosing your paints, the options are endless. If you want a more traditional look, use acrylic or oil-based paint and choose colors that match the natural tones of the basket. For a unique twist, try metallic spray paint or mix different colors together for a creative design. Depending on the type of paint you use, it may require a sealant to keep it from chipping or peeling off.
10 Steps How to Paint a Basket
Step 1: Gather Your Materials
Before you embark on your basket-painting journey, it’s essential to gather all the necessary materials. You’ll need a variety of acrylic paints, paintbrushes in different sizes, a palette for mixing colors, painter’s tape, a container of water for cleaning brushes, and a rag or paper towels.
Select a basket made of a suitable material such as wicker, rattan, or bamboo, as these textures hold paint well. Make sure to choose paints that are compatible with your basket material and provide good coverage.

Step 2: Prepare Your Workspace
Creating a conducive environment is key to a successful painting session. Lay down newspapers, a drop cloth, or an old sheet to protect your work surface from paint splatters. Adequate lighting is crucial, so position your workspace near a window or use a bright lamp.
Ensure good ventilation if you’re working indoors, as some paints can emit fumes. Organize your paints and brushes for easy access and keep your water container handy for quick brush cleaning.
Step 3: Clean and Prime the Basket
Before applying paint, it’s important to clean the basket to remove any dust, dirt, or oils that might prevent proper paint adhesion. You can wipe it down with a damp cloth and let it dry completely. If your basket has a glossy finish, lightly sand it to create a rougher surface that the paint can grip onto.
Priming the basket with a coat of gesso or acrylic primer helps the paint adhere better and provides a smooth surface for painting.
Step 4: Choose Your Design and Colors
Decide on the design you want to paint on your basket. It could be anything from abstract patterns to intricate landscapes. Consider your skill level and the complexity of the design. Choose a color scheme that complements your design and fits the aesthetic you’re aiming for. You can use a single color for a monochromatic look or a combination of colors for a vibrant effect.
Step 5: Apply Base Coat
Start by applying a base coat of paint to the entire basket. This base coat will serve as the background for your design. Use a large, flat brush to cover the surface evenly. Apply multiple thin coats if needed, allowing each coat to dry before applying the next. This step creates a foundation for your design and helps unify the basket’s appearance.

Step 6: Sketch Your Design
Once the base coat is dry, lightly sketch your chosen design onto the basket using a pencil or chalk. This step will help guide your painting process and ensure that you achieve the desired placement and proportions of your design elements. Don’t worry if the lines are faint; they will be covered by paint later.
Step 7: Start Painting
With your sketch in place, it’s time to start painting! Begin with the larger areas of your design and work your way to the smaller details. Use different brushes to achieve various effects – flat brushes for broad strokes, round brushes for finer lines, and detail brushes for intricate elements. Apply the paint in thin layers, building up the colors gradually for better coverage and depth.
Step 8: Add Details and Highlights
As you continue to paint, focus on adding details and highlights to your design. Use lighter shades of paint to create highlights and dimension. Consider how light would interact with the basket’s texture and your design elements. This step brings your design to life and adds a sense of realism or depth to your painted basket.
Step 9: Correct and Refine
Mistakes happen, even to experienced painters. If you make a mistake, don’t panic. Acrylic paint is forgiving and can be painted over once it’s dry. If needed, use a small amount of water to gently erase the mistake, and then repaint the area. Take your time to refine the details and ensure that your design is as close to your vision as possible.
Step 10: Seal and Protect Your Work
Once you’re satisfied with your painted basket, allow it to dry completely. To protect your masterpiece from wear and tear, apply a clear acrylic sealer. This sealant will safeguard the paint and add a protective layer against dust and moisture. Follow the manufacturer’s instructions for application and drying times. Once the sealer is dry, your painted basket is ready to be displayed or used!

Conclusion
Painting a basket may appear to be time-consuming and intimidating, but with the right steps, it can be a rewarding experience. By following the tips outlined in this blog post, such as prepping your basket, choosing the right paint, and clean-up measures, you will have created a beautiful masterpiece you can display proudly.
It doesn’t matter if you’re an experienced painter or a beginner; painting that basket will become one of your favorite pastime activities.
You may even find yourself making more baskets so you can practice different techniques – make one for each season! With your creativity and determination, there is no limit to what you can create. Now that we know how to paint a basket, go ahead and give it a try – it might surprise you how fun and exciting it is!