
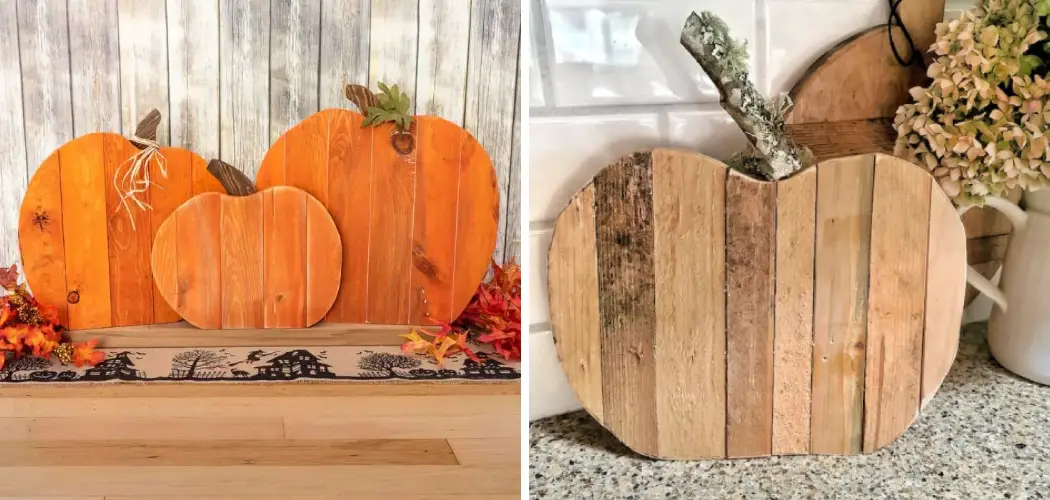
Fall is just around the corner, and what better way to welcome the season than crafting DIY wood pumpkins? These pumpkins will be perfect decorations for Halloween and Thanksgiving, but they are also easy to make and customizable according to your preference.

Whether you are a crafting expert or are new to DIY, follow this step-by-step guide on how to make wood pumpkins for your fall décor.
Can You Make Wood Pumpkins?
Fall is here, and it’s time to decorate your home with some festive pumpkins! But what if you want something more unique than the usual orange or white gourds? How about making your own wood pumpkins? Not only do they add a rustic charm to your decor, but they can also be reused year after year.
You can carve or paint your way to the perfect wooden pumpkin with a few supplies and some creativity. Plus, you can customize the size and shape to fit your exact preferences. So, why settle for generic store-bought pumpkins when you can make your own one-of-a-kind wooden ones?
Why Should You Make Wood Pumpkins?
Fall is just around the corner, and with it comes the season of pumpkins galore. While plastic pumpkins are a quick and easy decoration, why not add a touch of personalization to your decor and make your own wooden pumpkins? These pumpkins can be customized to fit your style and can be used year after year, making them both sustainable and cost-effective in the long run.
Plus, crafting can be a fun activity to do with friends or family, allowing you to make memories while creating something beautiful for your home. So, trade in the plastic for something a little bit more special and make your own wooden pumpkins this fall season.
How to Make Wood Pumpkins: A Step-by-Step Guide
Step 1: Gather Materials and Tools
For this project, you will need wood slats, a saw, sandpaper, wood glue, and orange acrylic paint (or any color you choose). You’ll also need newspapers or a drop cloth to protect your work area. Choose wood slats that are 1 inch thick, and cut them into your pumpkin’s desired height and width. Sand the edges and surface to even it out and get a smooth finish.
Step 2: Assemble the Pumpkin
Lay the wood slats on a flat surface and arrange them in a pyramid shape. Connect the slats at the corners using wood glue and let it dry for an hour. Then, turn the pyramid upside down and glue the remaining corners until they connect. You should now have a pumpkin-shaped structure made of wood.

Step 3: Paint the Pumpkin
Paint the entire pumpkin with the orange acrylic paint. You may need to do two layers of paint to get the desired color and texture. Allow the paint to dry completely before moving on to the next step.
Step 4: Add Stem and Leaves
Use a brown-colored wood slat for the stem and leaves and cut it into a stem shape. Glue it to the top center of the pumpkin. Use green felt or paper and cut two or three leaf shapes for the leaves. Glue them to the top of the stem. You can also use other materials like fake leaves, burlap, or twine to add more dimension to your wood pumpkin.
Step 5: Finish Off with Embellishments
You can personalize your wood pumpkin even more by adding embellishments like ribbon, paint splatters, or glitter. This is where you can unleash your creativity and make each pumpkin unique. Once you’re satisfied with the look, let it dry completely.
Step 6: Display Your Wood Pumpkin
Your beautiful wood pumpkin is now ready to be displayed! You can place it on a mantel shelf or use it as a centerpiece for your fall decorations. You can also make several pumpkins in different sizes and colors to create a fun and festive display.
Step 7: Maintenance
To ensure the longevity of your wood pumpkin, avoid exposing it to extreme temperatures or harsh weather conditions. If you plan on using it as an outdoor decoration, consider sealing it with a waterproof sealant. Also, store your wood pumpkins in a dry and cool place when not used.

Now that you know how to make wood pumpkins, have fun creating your own unique and festive fall decor! You can experiment with different colors, sizes, and designs to make your wood pumpkins stand out.
5 Considerations Things When You Need to Make Wood Pumpkins
1. Wood Selection
When making wood pumpkins, it is important to choose the right type of wood for the project. Generally, softwoods such as pine or poplar are best for this craft because they are easy to carve and shape. Harder woods, such as oak or walnut, can also be used but may require more time and effort to carve. Additionally, if you want your pumpkins to last longer, it is recommended that you use a wood sealer before painting them.
2. Carving Tools
The next consideration when making wood pumpkins is the type of tools you will need to carve them. The most common tools for carving wooden pumpkins are a saw, chisel, gouge, and rasp.
Depending on the size and shape of your pumpkins, you may also need other tools, such as files or sandpaper, for smoothing out edges and surfaces. It is important to select tools that are sharp and in good condition to create precise shapes with minimal effort.

3. Painting
Once your wooden pumpkins have been carved into the desired shapes, it’s time to start painting them! Acrylic paints work best on wood surfaces since they dry quickly and provide a vibrant finish that won’t fade over time.
Additionally, using a primer before painting will help ensure that the paint adheres properly to the pumpkin’s surface and won’t chip off easily once dry. Consider adding glitter or metallic accents after your base coat has dried completely for an extra special touch.
4. Finishing Touches
After your wood pumpkins have been painted and allowed to dry completely, it’s time to add some finishing touches! Consider adding things like ribbon or twine around the stem for a decorative look or attaching leaves made from felt or craft foam for added texture and dimension.
You can also use hot glue or epoxy resin to attach items such as beads or buttons onto your wooden pumpkins for an extra special touch!
5. Displaying Your Pumpkins
Finally, when all of your hard work is complete, it’s time to display your beautiful wooden pumpkins! Consider hanging them from doorways or mantles with ribbons or twine for a festive look during fall holidays like Halloween or Thanksgiving. Alternatively, you could arrange them in groups on shelves or tables as part of an autumn-inspired centerpiece display!
5 Benefits of Making Wood Pumpkins
1. Eco-Friendly
Making wood pumpkins is an eco-friendly alternative to buying plastic or foam pumpkins. Wood is a renewable resource that can be harvested without depleting the planet’s natural resources.

Additionally, wood pumpkins don’t require any electricity or fuel, making them even more environmentally friendly than traditional pumpkins. Plus, when you’re done with your wooden pumpkin, you can easily recycle it or repurpose it into something else.
2. Affordable
Wood pumpkins are also an affordable way to decorate for the fall season. You can find wood at most craft stores for relatively cheap prices, and you won’t need to purchase any special tools or equipment to make your pumpkin. Additionally, if you already have some basic woodworking tools at home, making wood pumpkins will be even cheaper as you won’t need to buy anything extra.
3. Personalized
Making a wooden pumpkin also allows you to personalize it however you want. For example, you could paint or stain it in whatever color scheme fits your home decor best and add embellishments such as leaves, twigs, and pinecones to give it a unique look that reflects your own style and personality. You can also carve out details such as eyes and a mouth so that your pumpkin looks real!
4. Fun Activity
Making wooden pumpkins is also fun for the whole family to enjoy together! It’s easy enough for kids of all ages to join in on the fun while still being challenging enough for adults, too, so everyone can feel involved in creating their own unique decorations for the fall season. Plus, once everyone has finished their pumpkins, they’ll have some great decorations they made together!
5. Lasts Longer

Finally, wooden pumpkins last much longer than traditional ones since they don’t rot or get eaten by animals like real ones do! This means that once you’ve made your wooden pumpkin, it should last for many years if properly cared for, making a great investment that will keep on giving throughout the seasons!
6 Common Mistakes People Make When Trying to Make Wood Pumpkins
1. Not Using the Right Type of Wood
One of the most common mistakes people make when making wood pumpkins is not using the right type of wood. The best types of wood for making wood pumpkins are softwoods such as pine or cedar, as they are easier to carve and shape. Hardwoods such as oak or walnut can be used but require more skill and patience.
2. Not Preparing the Wood Properly
Another mistake people often make when making wood pumpkins is not preparing the wood properly. Before carving, it is important to sand down any rough edges on the piece of wood to ensure a smooth surface for carving. It is also important to apply a sealant or finish to protect the pumpkin from moisture and other elements after it has been carved.
3. Not Measuring Accurately
Accurate measurements are essential when making a wooden pumpkin, and many people forget this step when creating their own designs. When measuring out your design, use a ruler or other straight edge so that your lines will be precise and even. This will help ensure that your pumpkin looks neat and professional once it is finished.
4. Not Using the Right Tools
Another mistake that people often make when making wood pumpkins is not using the right tools for carving their design into the piece of wood. The best tools for this job are small chisels and gouges, as they allow you to create intricate details in your pumpkin’s design without damaging the surrounding wood.

If you do not have access to these tools, you can use a craft knife or Dremel tool instead, but be sure to take extra care to avoid damaging your workpiece.
5. Not Taking Safety Precautions
Chisels and gouges can be very sharp tools, so safety precautions must be taken whenever they are used. Be sure to wear protective eyewear while working with these tools in order to protect your eyes from flying chips or dust particles. Additionally, always keep your hands away from where you are cutting to avoid any potential injuries from contact with sharp blades or edges on your tools.
6. Not Finishing Your Pumpkin Properly
Finally, you must finish your wood pumpkin properly to look its best once completed! After carving out all of the details on your pumpkin, be sure to sand down any rough edges before applying a sealant such as polyurethane or varnish to protect it from moisture damage over time.
Can I Paint or Varnish the Wood Pumpkins?
Wood pumpkins are the way to go if you’re looking for the perfect fall decor. But what happens when you want to spruce them up a bit? Can you paint or varnish the wood pumpkins? The short answer is yes! Whether you want to add a pop of color or preserve the natural look of the wood, painting, and varnishing are great options for transforming your wooden pumpkin into a masterpiece.
With the right materials and techniques, your wood pumpkin can be a customized, eye-catching addition to your home decor. So don’t be afraid to get creative and make your pumpkins stand out this fall!
Conclusion
Making wood pumpkins for your fall decorations is a fun and easy way to get into the season’s spirit. With just a few materials and this step-by-step guide, you can create personalized pumpkins that will be the envy of your neighborhood.
Get creative and experiment with different color schemes and embellishments. As always, have fun and enjoy the process of crafting. Thanks for reading our post about how to make wood pumpkins, and happy decorating!